 Zal Interactive
Multiplayer Inventory
Inventory samples
Start a survival session
Open the imported sample’s Scenes/RustInventory scene in a Unity 6 project with the Input System, Universal Render Pipeline, and TextMesh Pro Essential Resources installed. The sample uses the package’s server-authoritative inventory, drag-and-drop, equipment, and looting services.
- Enter Play Mode and select HOST SESSION to create a session with a local survivor.
- Run the same scene in a second Editor or standalone build. Enter the host’s IP address and the same port, then select JOIN SESSION. For two instances on the same computer, use 127.0.0.1 and 7777.
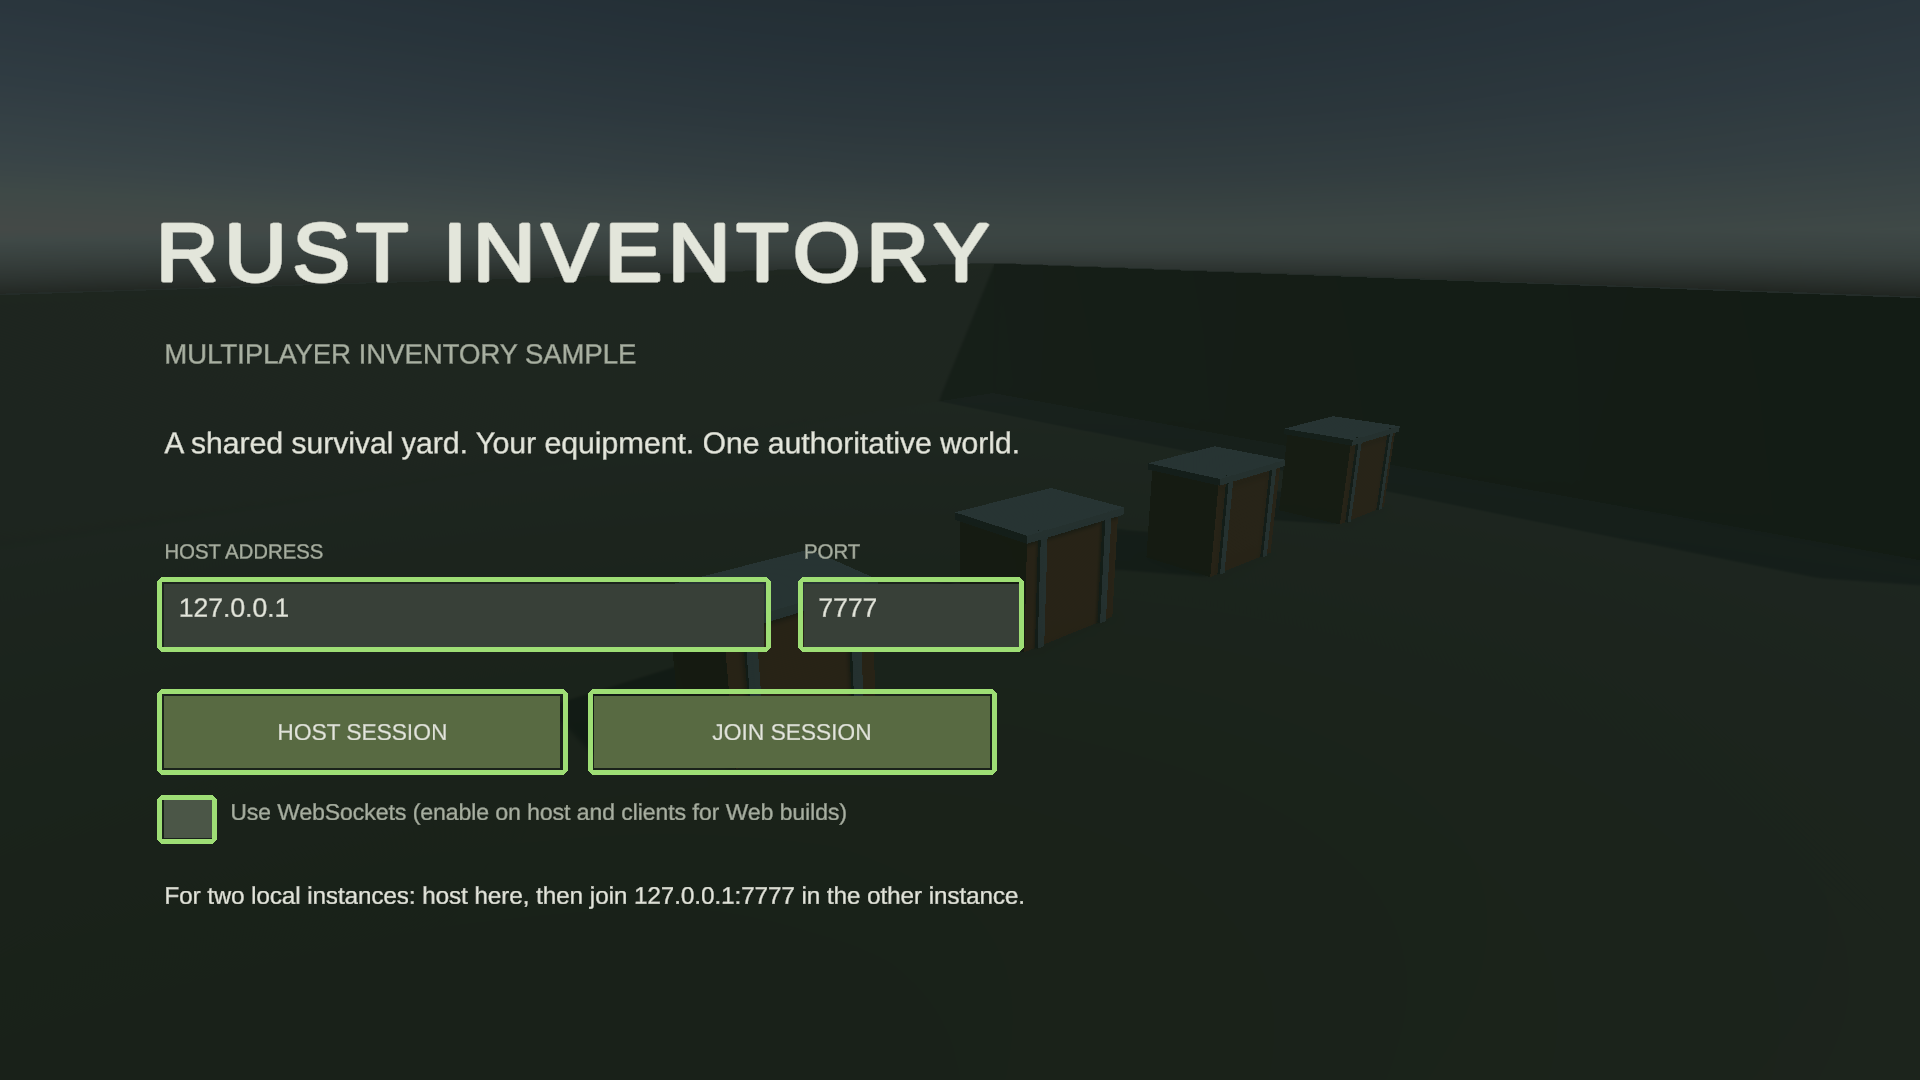
Figure 1
Each survivor starts with resources, tools, two weapons, clothing, and compatible attachments. Move with WASD, look with the mouse, and open your inventory with Tab. Select belt slots with 1-6. Look at a nearby supply crate and press E to inspect its shared contents.
The default transport uses UDP. Enable Use WebSockets on both the host and clients for a Web client. A browser joins a native host; it cannot listen as a host. Internet hosting needs a reachable server address and matching network/port configuration. The sample does not include a lobby, relay service, or matchmaking.
Move, equip, and share items
The backpack contains 24 one-cell slots. The belt contains six slots. Each clothing slot accepts its matching category: head, torso, legs, or feet. Resource stacks hold up to 1000 units; bandages hold up to 10.
Drag a stack from an occupied backpack cell to an empty cell to move it. Drag a compatible stack onto another stack to merge up to its limit. Move clothing between its equipment slot and the backpack in the same way; an incompatible item cannot occupy that clothing slot.
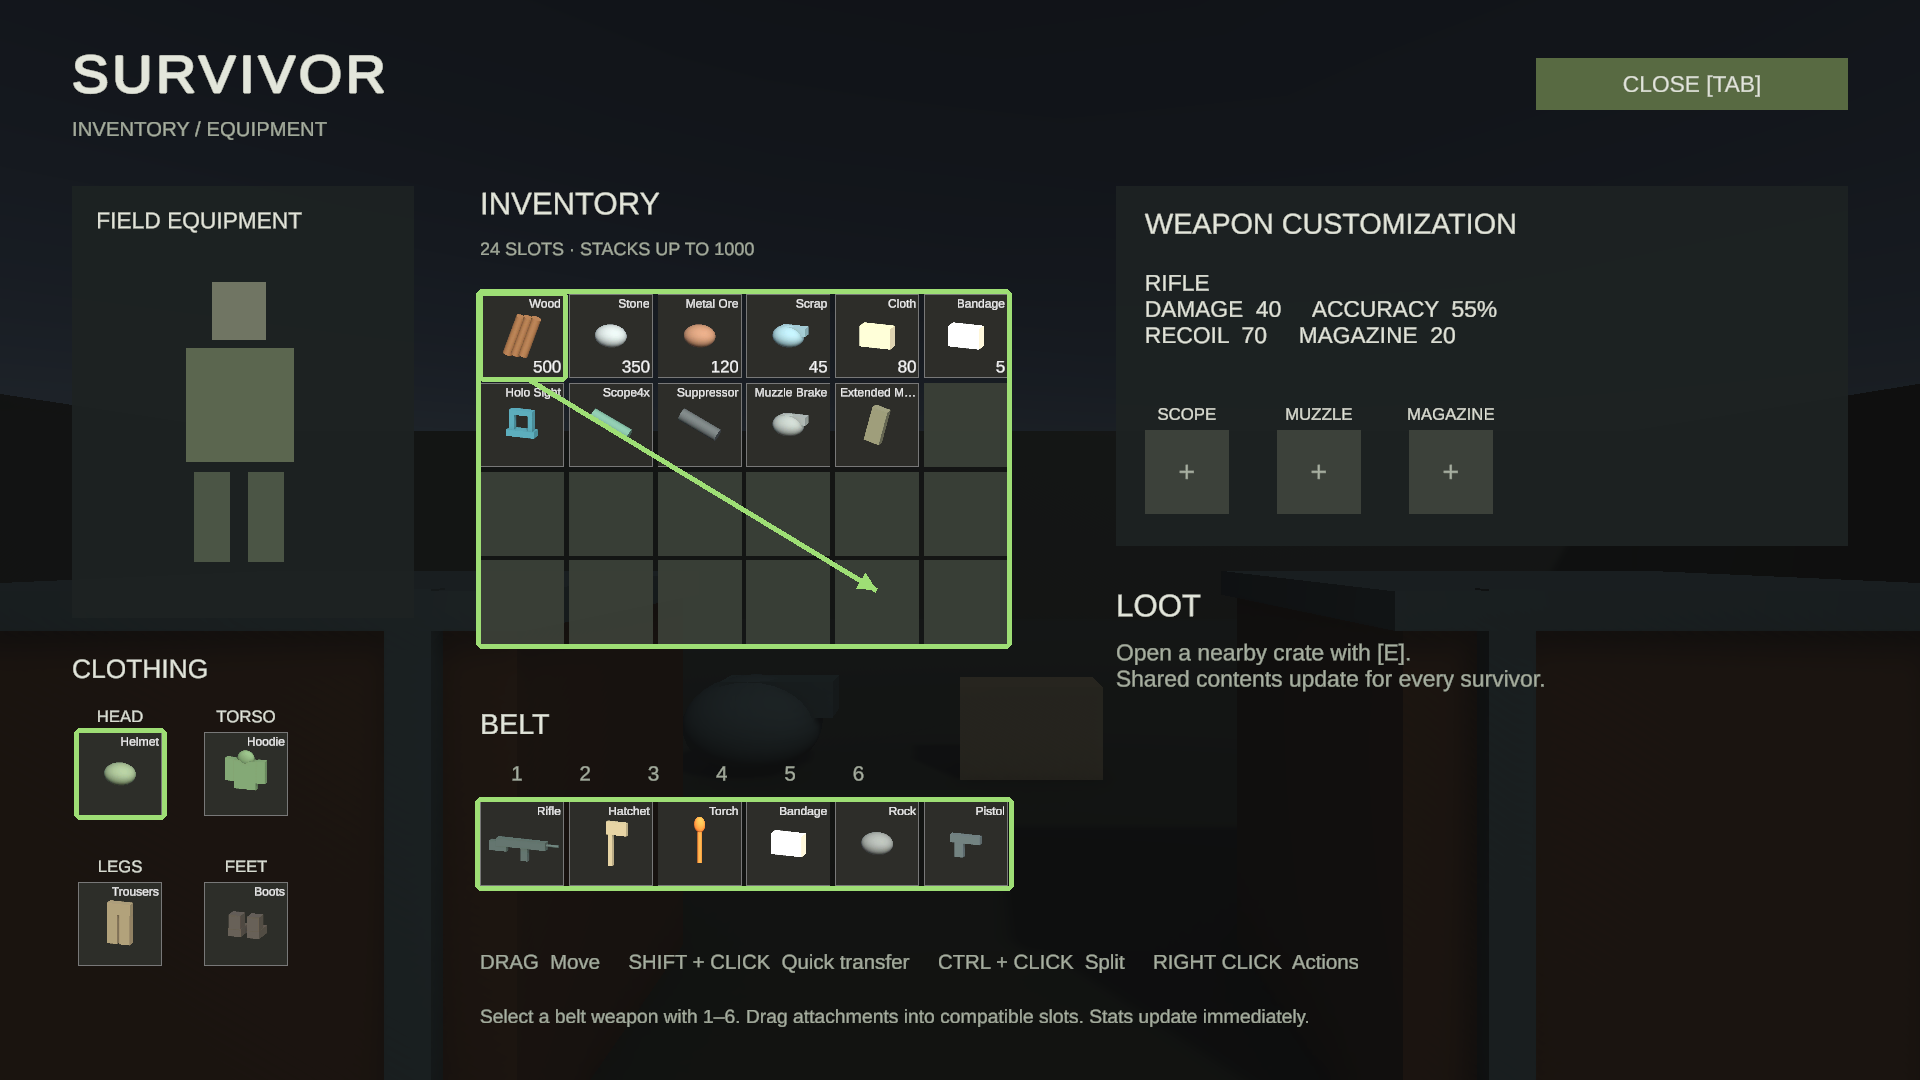
Figure 2
Crates are shared network inventories. The server validates inventory requests, item compatibility, and world-container reach. Moving an item out of a crate changes the contents available to the other connected survivors. Closing the inventory with Tab restores movement and mouse look.
This is an inventory demonstration. Clothing occupies equipment slots but does not alter the primitive survivor model or provide a damage simulation.
Split a resource stack
Ctrl + click the Wood stack to open its quantity popup. Move the slider to choose an amount, select Split, and then select an empty backpack cell. A 500-unit stack split in half becomes two 250-unit stacks. Drag one onto the other to merge them back into 500.
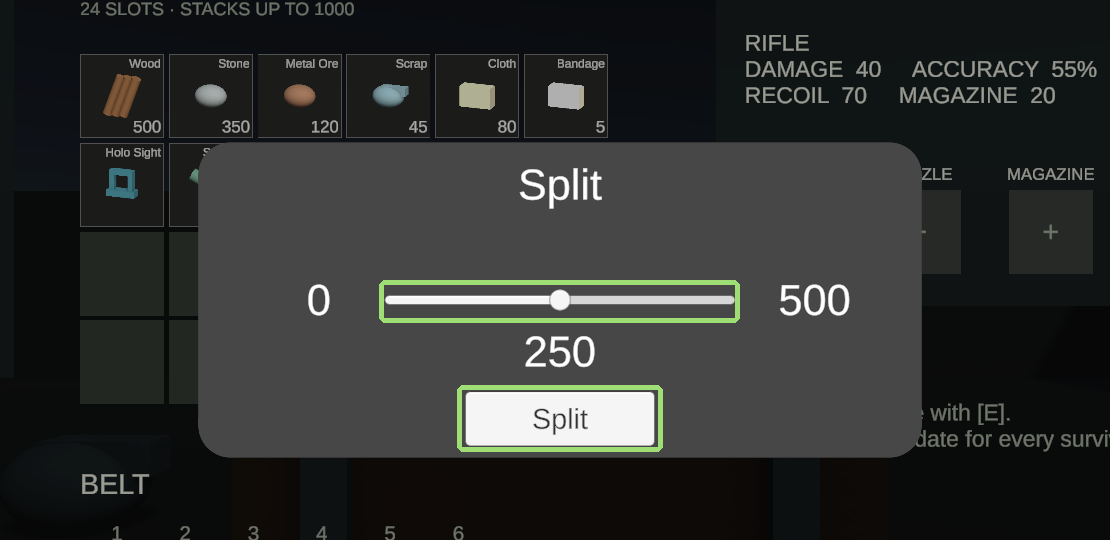
Figure 3
Right click opens the item’s context actions. Shift + click requests a quick transfer; while a crate is open, this transfers between the crate and your inventory. Items that cannot fit remain at their source. The backpack, belt, and attachment slots continue to apply their compatibility and capacity rules.
Closing and reopening an inventory does not reset its contents. Starting a new sample session creates fresh starting equipment and crate contents; this sample does not set up saved-world persistence.
Customize a belt weapon
Open the inventory and select the rifle’s belt slot with 1. Drag a Holo Sight or Scope4x into SCOPE, a Suppressor or Muzzle Brake into MUZZLE, and an Extended Magazine into MAGAZINE. These slots accept only their compatible attachment category. Remove an attachment by dragging it back into the backpack.
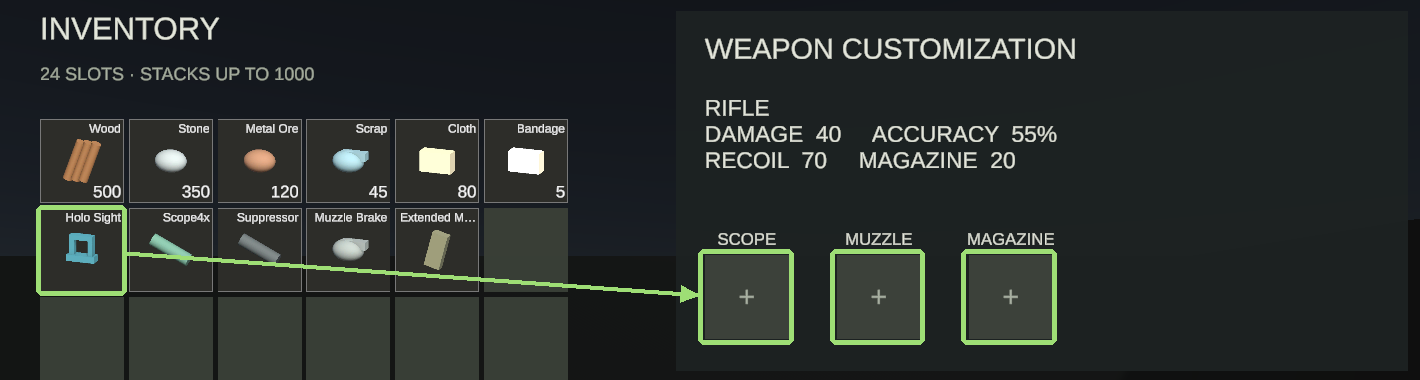
Figure 4
The rifle starts with 40 damage, 55% accuracy, 70 recoil, and a 20-round magazine. A Holo Sight adds 15 accuracy points. A Suppressor subtracts 5 damage and 8 recoil. An Extended Magazine adds 10 rounds and 5 recoil. Those three attachments produce 35 damage, 70% accuracy, 67 recoil, and 30 rounds.
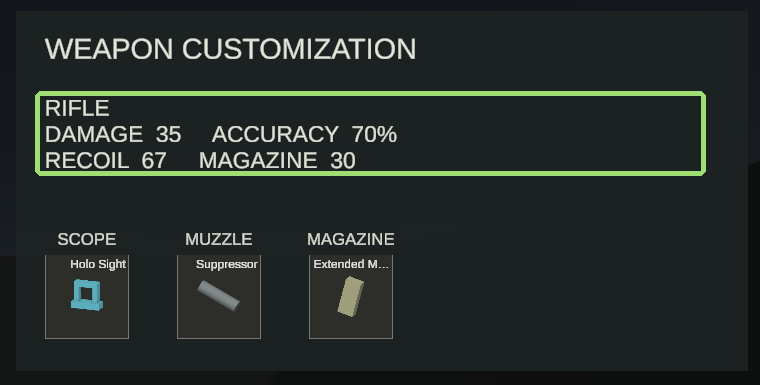
Figure 5
The alternative Scope4x adds 30 accuracy points and 5 recoil. A Muzzle Brake subtracts 25 recoil. The pistol accepts the same attachment categories and starts with 25 damage, 40% accuracy, 45 recoil, and 12 rounds.
Attachments are nested inventory items belonging to the weapon instance, rather than shared mutable values on an item definition. Moving the weapon carries its installed attachments with it. Attachment moves use the same authoritative inventory requests as other item moves. The weapon panel watches the selected weapon’s contents and refreshes its displayed statistics after changes.
Weapon statistics demonstrate configuration and inventory effects; the sample has no shooting, reload, ballistics, or combat simulation.
Adapt the sample
The imported sample keeps its content together under Survival: definitions, icons, visual prefabs, materials, and slot categories. Every inventory item occupies one cell. The original art is built from Unity primitives.
InitialLoadout.cs on the player prefab supplies the starting backpack stacks, belt items, and clothing. It creates this equipment on the server after network spawn. SampleContent registers item definitions and visuals with the inventory package. Its UI configuration registers the inventory, connection screen, HUD, and item popups.
WeaponTuning stores each weapon definition’s base damage, accuracy, recoil, and magazine capacity. AttachmentTuning stores additive adjustments. ContainerExtension defines the weapon’s three nested attachment containers. The containers’ SlotType values and attachments’ AssignableSlots enforce category compatibility through the inventory package.
WeaponWorkbench renders the selected belt weapon and listens for changes in its attachment inventory. BeltSelection owns local belt selection. Selecting a belt slot does not execute a combat action. The inventory package continues to own item identities, placement, compatibility, request validation, and synchronization.
The scene contains four shared crate prefab instances and four pickup spawn points. Crate contents use SpawnItemsInInventory. These are editable scene and prefab assets; the scene does not generate its level geometry at runtime.
Input and platform boundaries
The sample’s first-person controls target keyboard and mouse. Gamepad bindings provide movement, interaction, inventory toggling, and belt cycling; the inventory’s drag-and-drop and context shortcuts are demonstrated with a pointer. The HUD also has inventory, interact, and belt buttons. A complete touch movement controller and console inventory navigation are integration work for the host game.
Web clients require a WebSocket host. A production HTTPS site also needs a secure, reachable WebSocket endpoint. Native platform builds, console certification, and deployment security are outside this sample’s verification.
If a session cannot connect
Check that both instances run the same sample version and scene, use the same port and transport, and can reach the host address. 127.0.0.1 refers only to the same computer. If the host cannot bind its port, stop the other host using that port before retrying.
If text is missing after importing the sample into another project, import TextMesh Pro Essential Resources. If the primitive materials render pink, check that the project uses the Universal Render Pipeline.
Load and unload a magazine
Open Scenes/MagazineLoading.unity in the imported Magazine Loading sample and enter Play Mode. A local host starts and the inventory opens with three empty magazines and four ammunition stacks. The sample requires Unity 6, the Input System, and TextMesh Pro Essential Resources.
Drag 9mm FMJ onto either highlighted 9mm magazine. Each round takes 0.2 seconds to load; the source quantity decreases as the magazine count increases. 9mm AP fits the same magazines. 5.56mm ammunition fits only the 5.56mm magazine. Full magazines cannot accept more rounds.
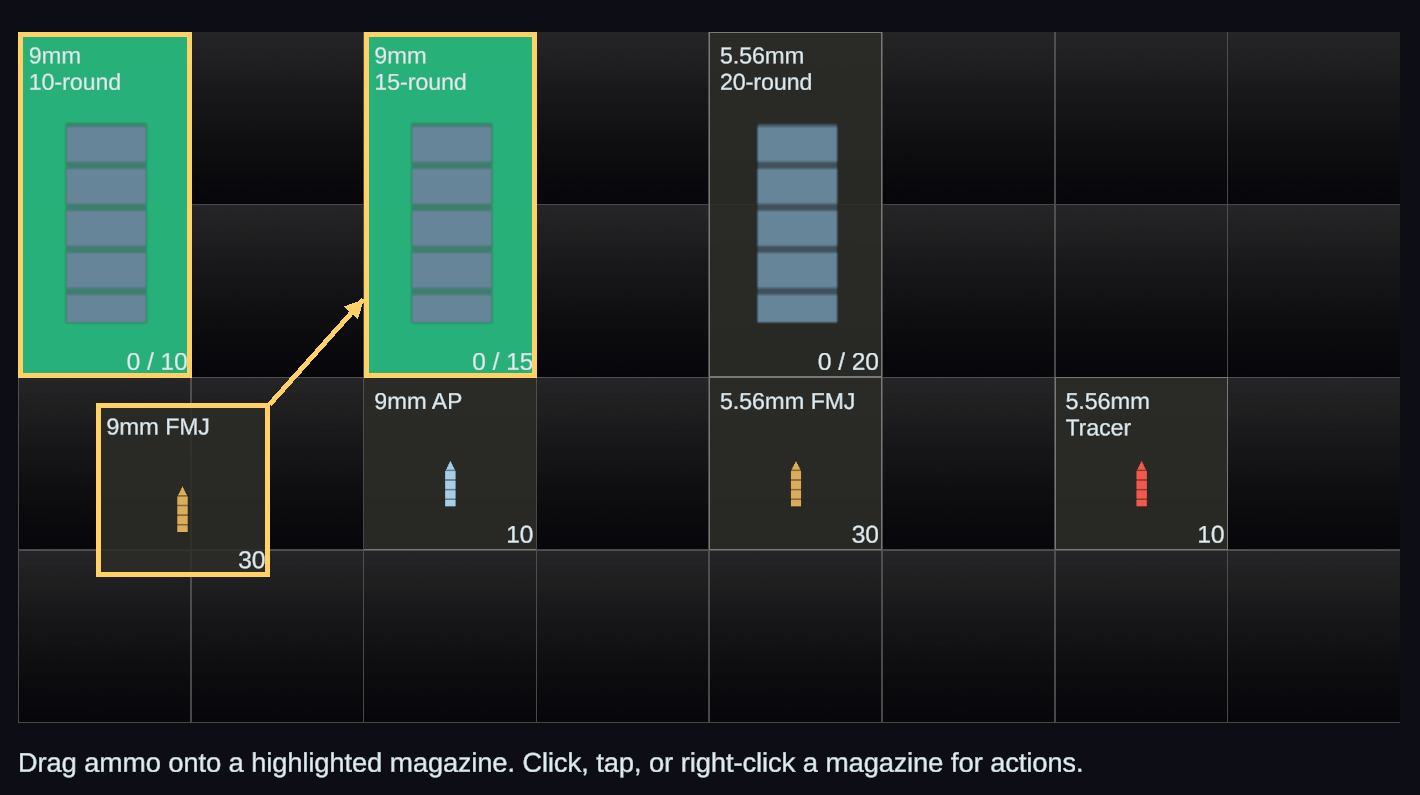
Figure 6
Unload in reverse order
Click, tap, or right-click a loading magazine and select Cancel loading to keep the rounds already inserted. Select Unload one to return the last round inserted, or Unload all to empty the magazine. Last unloaded identifies the returned bullet type. If the inventory has no room, the remaining rounds stay in the magazine.
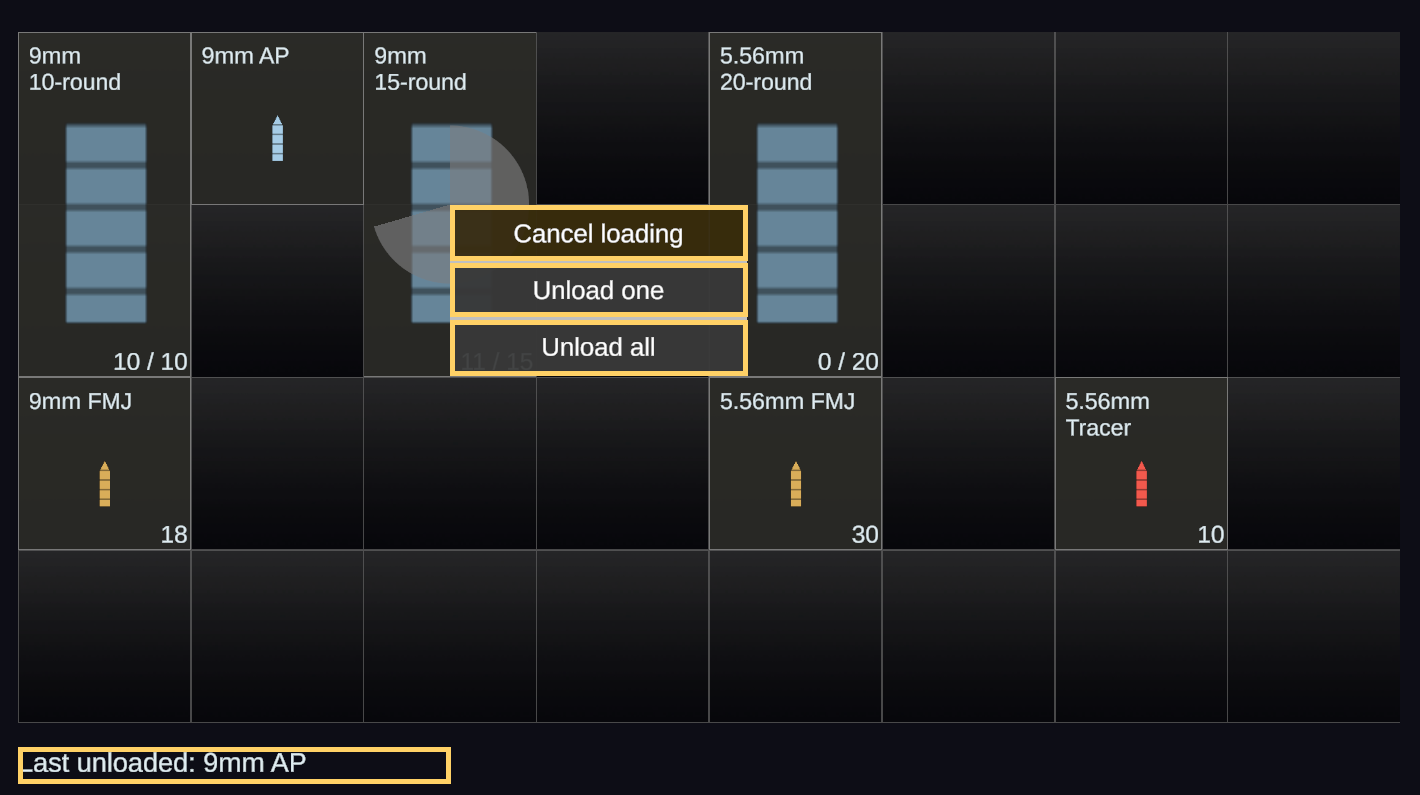
Figure 7
Mixed bullet types retain their insertion order even when their stored stacks merge. Loading two FMJ rounds, one AP, then one FMJ unloads FMJ, AP, FMJ, FMJ. MagazineLoader.cs transfers rounds on the host and updates RoundOrder metadata only after each successful transfer. The magazine’s Container Extension > Item Move Duration sets the per-round delay; its Magazine Definition extension sets caliber and total capacity.
This focused sample has no firing or saved-session persistence. Starting Play Mode again restores the initial contents. Browsers cannot host a listening server, so this auto-host-only sample requires the Editor or a native player.