 Zal Interactive
Annotator
com.zalinteractive.annotator
Capture your first screenshot
Open Tools > Annotator, then click Add screenshot… to capture an Editor window.
Press Ctrl+Alt+A on Windows or Linux, or Cmd+Option+A on macOS, to select a window without opening or focusing Annotator. Repeated presses do nothing during selection or annotation. Finish Screenshot opens or focuses Annotator with your saved capture.
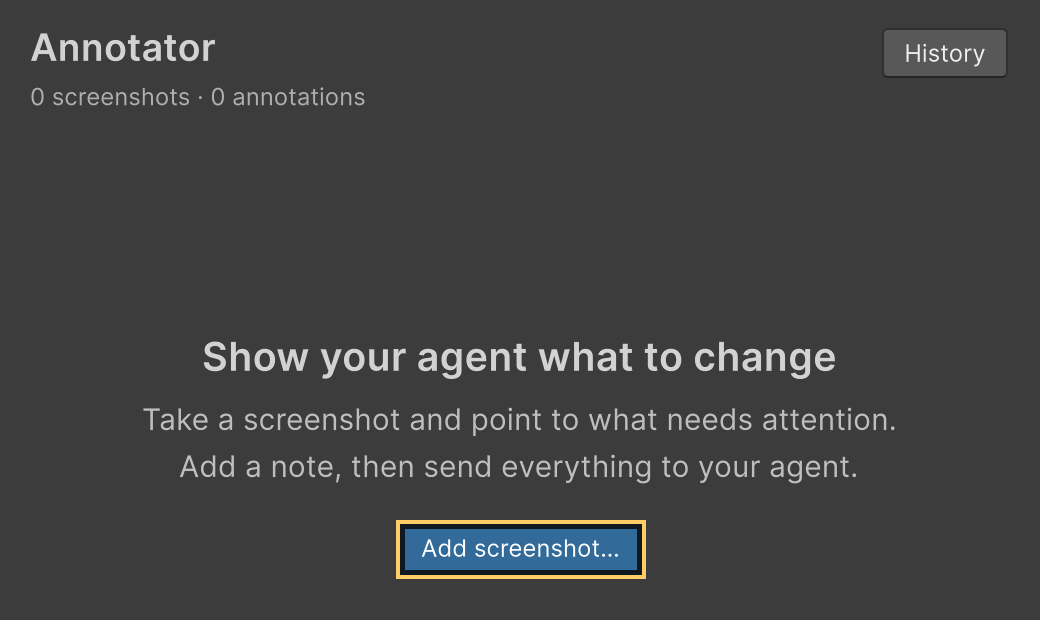
Figure 1
Click Annotate in the Scene view. The image freezes inside a cyan dashed border, ready for the point and area tools on the next page. Only visible, active window tabs can be captured.
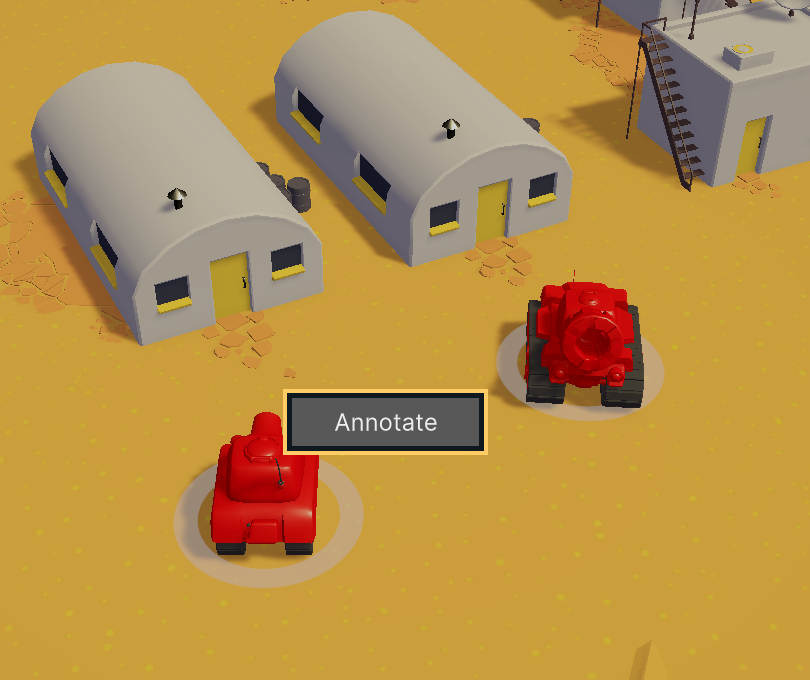
Figure 2
Requirements: Unity 6.0 or newer, Unity’s Newtonsoft JSON package and uGUI. No other Zal package is required. The Tanks content shown here is demonstration content, not included with Annotator.
Add a point or area
Choose Point in Annotator and click the object or location you want to discuss. Choose Area instead to draw a rectangle around a larger region. Each marker opens a Note field beside it; write the change you want there.
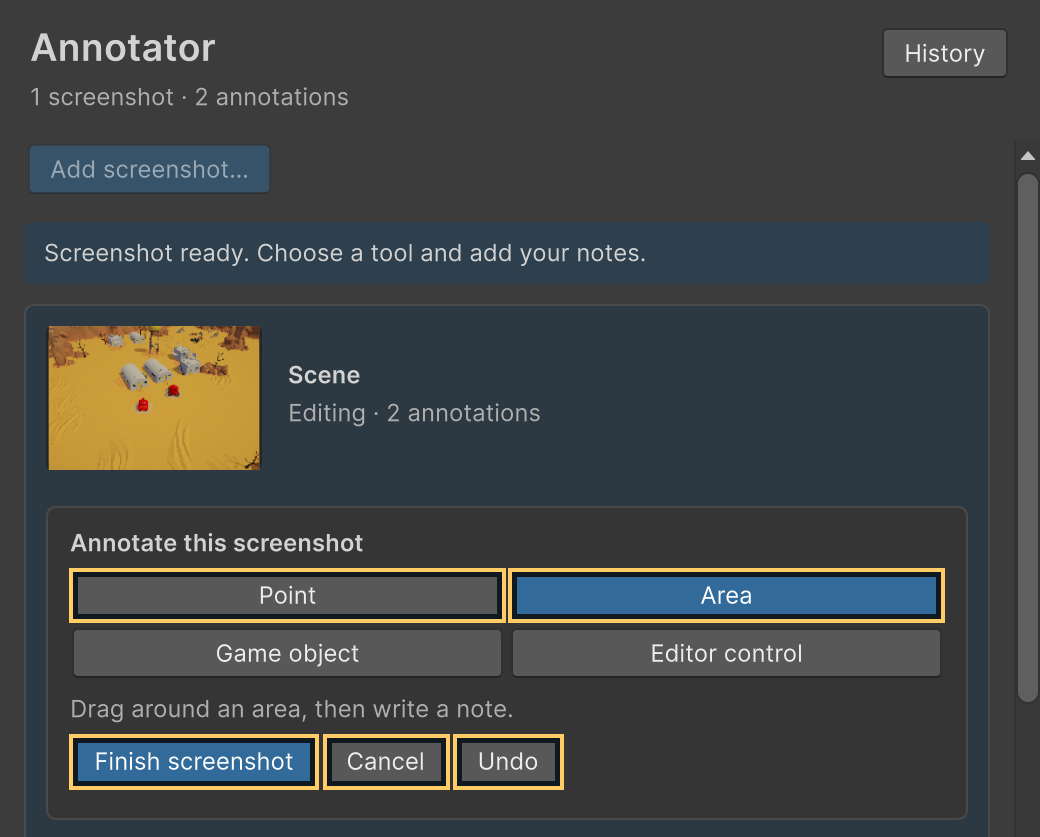
Figure 3
Click Finish screenshot to keep the image and its notes. The capture becomes an editable card in the tray. You can add more screenshots to the same batch; their marker numbers remain unique.
Cancel or Escape discards a fresh screenshot without opening or focusing Annotator. Undo, or Ctrl/Cmd+Z, reverses an edit while a screenshot is active. Typing in one note is one undo step; the session keeps its latest 100 edits.
During a fresh Play Mode capture, Annotator pauses playback. Finishing or cancelling restores the previous pause state. The captured image receives annotation input; other Editor panes remain usable.
Explain the change beside its target
Write a specific instruction in each Note field. Here, a point identifies the player tank and an area identifies the hangars. These are example requests, not changes made to the Tanks demo.
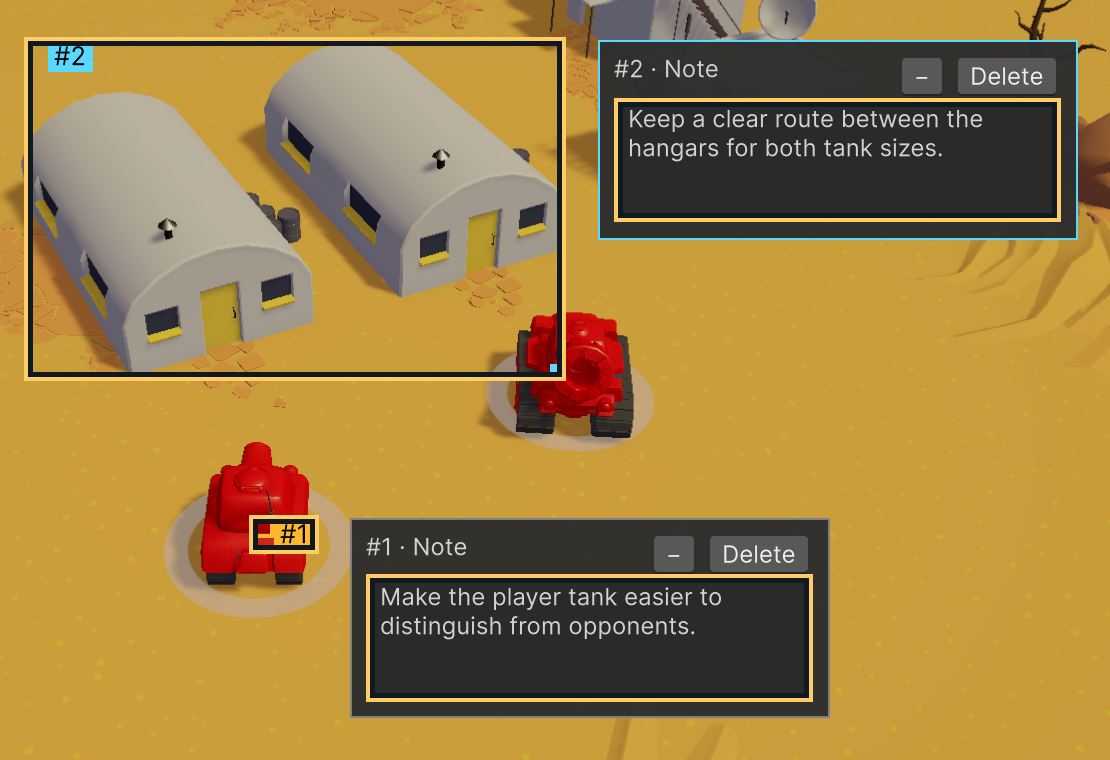
Figure 4
Drag a point marker to reposition it. Drag inside an area to move it, or use its lower-right handle to resize it. The note follows the marker and stays inside the image when space allows.
Notes in the tray and notes over the image edit the same text. The exported preview contains numbered markers; the note text travels separately in the batch, leaving the image easier to inspect.
If several notes cannot fit, Annotator reports the overflow in the tray. Deleted marker numbers are not reused.
Review the screenshot tray
Click the thumbnail or View screenshot to inspect a numbered preview. Edit a Note directly in the card. Delete beside a note removes that marker; Remove screenshot removes the entire draft capture.
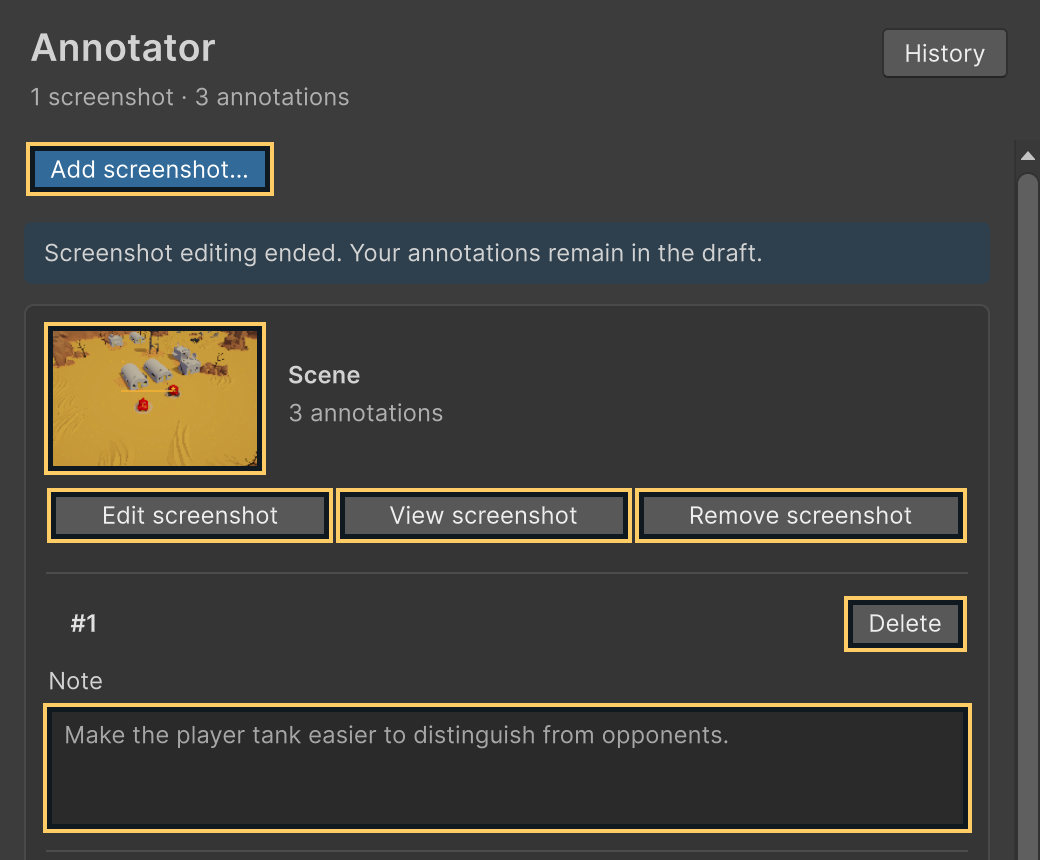
Figure 5
Click Edit screenshot to place or adjust markers again. Finish that edit before opening another capture. Use Add screenshot… to collect a different view in the same batch.
Draft edits save automatically. Closing or resizing a freshly captured source window, recompiling, or changing Play Mode ends that live capture and keeps its annotations in the draft.
Reopen and revise a saved image
Edit screenshot in the tray opens the saved original with its editable markers, even after the source window closes. The toolbox above the image offers Point, Area, Finish Screenshot and Cancel, from left to right.
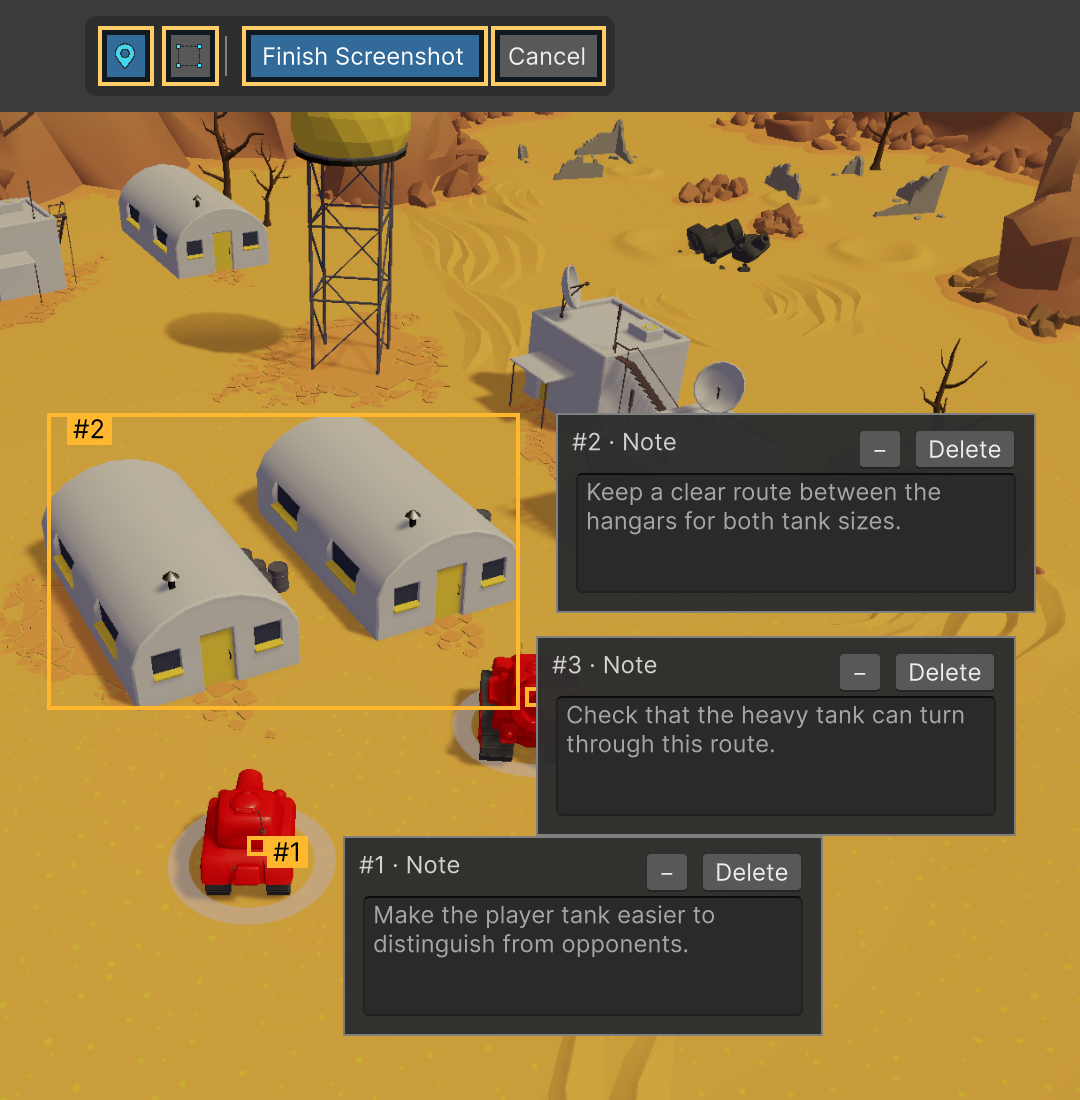
Figure 6
Finish to retain your edits and focus Annotator. Cancel or Escape restores the annotations present when this edit began. Closing the image window, recompiling or changing Play Mode retains saved-image edits without focusing Annotator. Reopening starts a new undo history.
Saved images preserve existing targets but cannot pick new objects or Editor controls. Capture a fresh window for those tools. Resizing the saved-image window preserves marker proportions; saved-image editing does not pause playback.
Pick the exact GameObject
On a fresh Scene or Game capture, choose Game object in Annotator, then click the visible object. Choose GameObject appears over the image with matching objects and their parents.
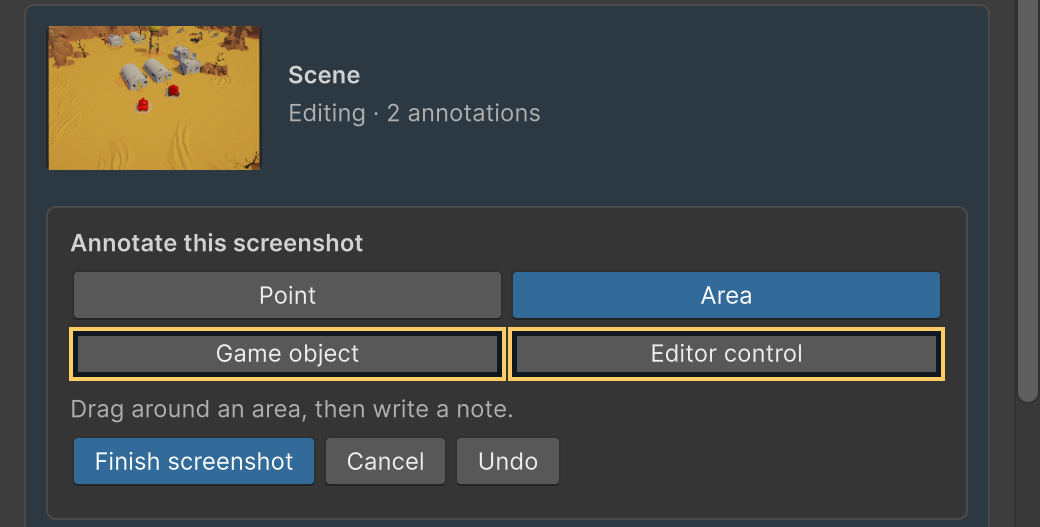
Figure 7
Click the Heavy Tank candidate to attach the tank root, rather than just its turret. The captured reference appears beside that marker in the tray. Add a note describing what should change.
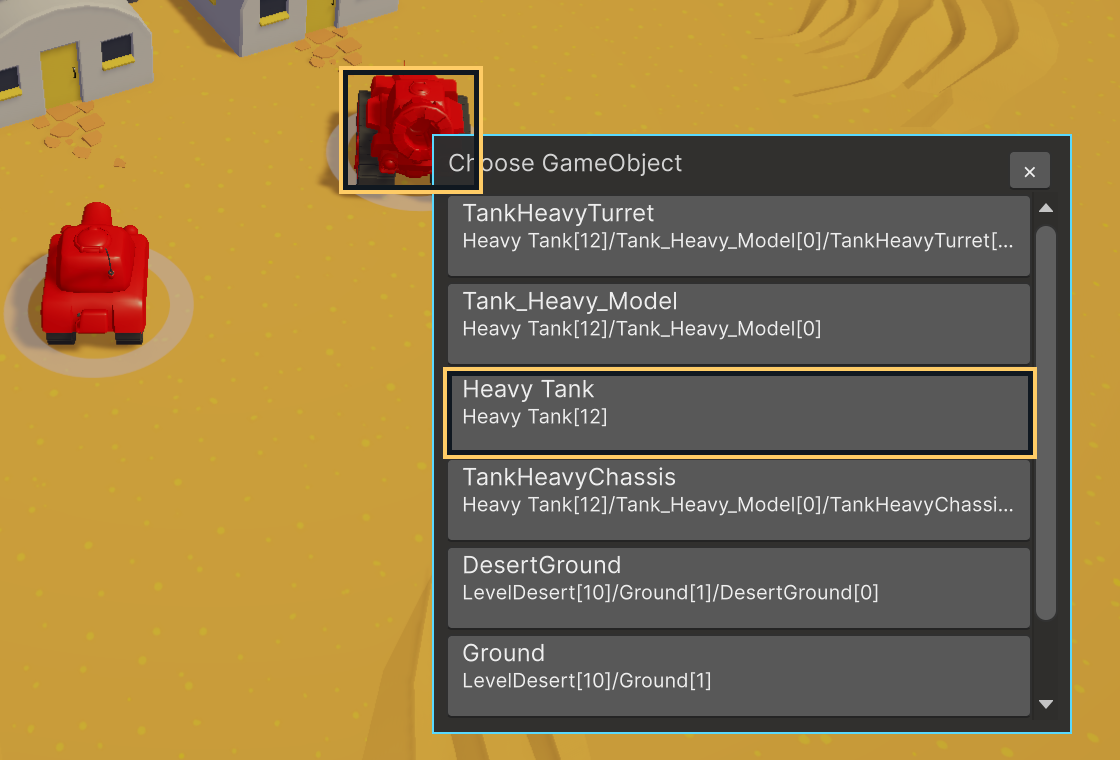
Figure 8
The captured object reference is read-only. It retains the selected object’s identity alongside the screenshot and note.
Point to an Inspector setting
Capture the Tank’s Inspector using Add screenshot… and its Annotate button. Choose Editor control (Figure 7), then hover Speed under Tank Movement (Script). A cyan outline shows the detected field. Click it to create a numbered area without changing the setting, then write your note.
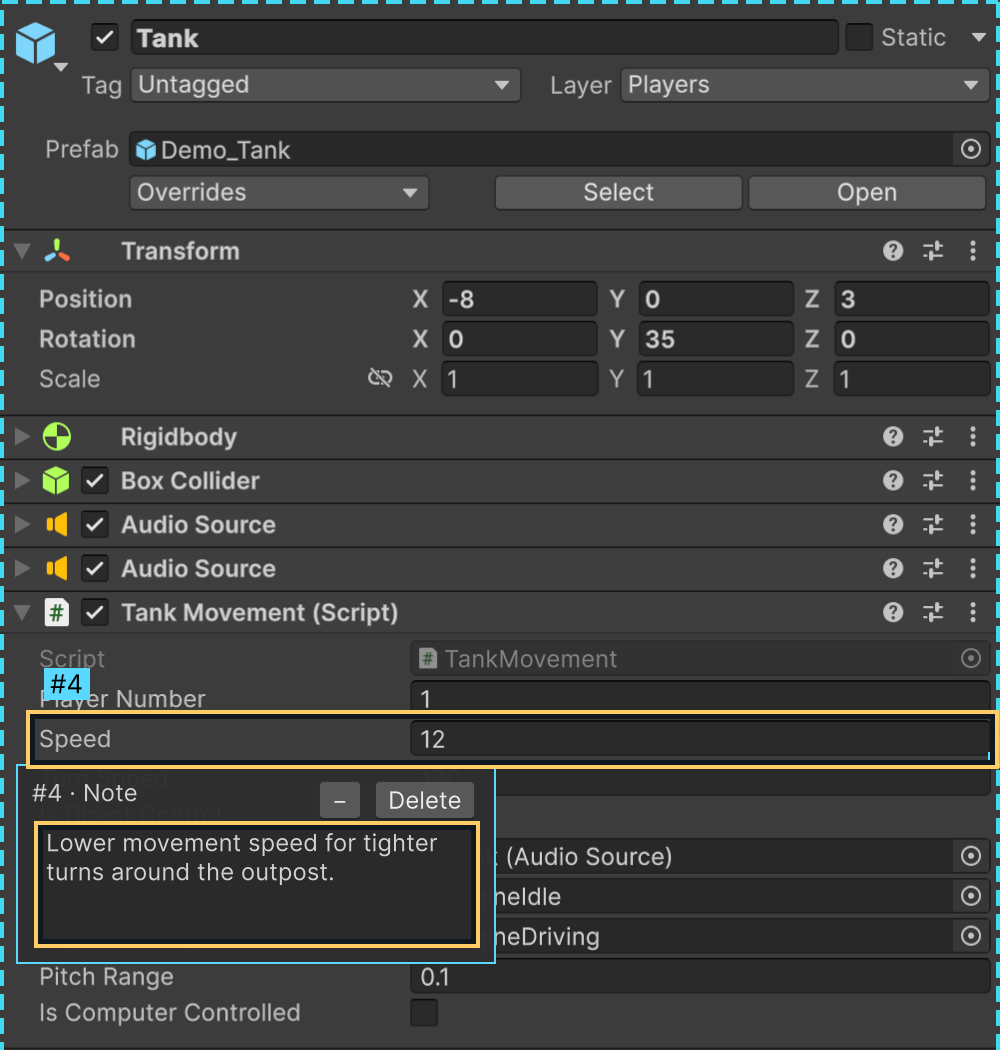
Figure 9
The target records the available control identity, binding path and inspected-object context. Here the selected control is the Speed field, bound to m_Speed, and its value remains 12.
UI Toolkit and available IMGUI controls are supported, including disabled visible controls. Custom IMGUI drawing without a known control identity is described as an IMGUI region. A capture limitation appears in Annotator when some controls cannot be recorded.
Send the complete set of notes
Finish each screenshot and fill every note. Add an optional Message to agent for instructions that apply to the whole batch, then click Send to agent.
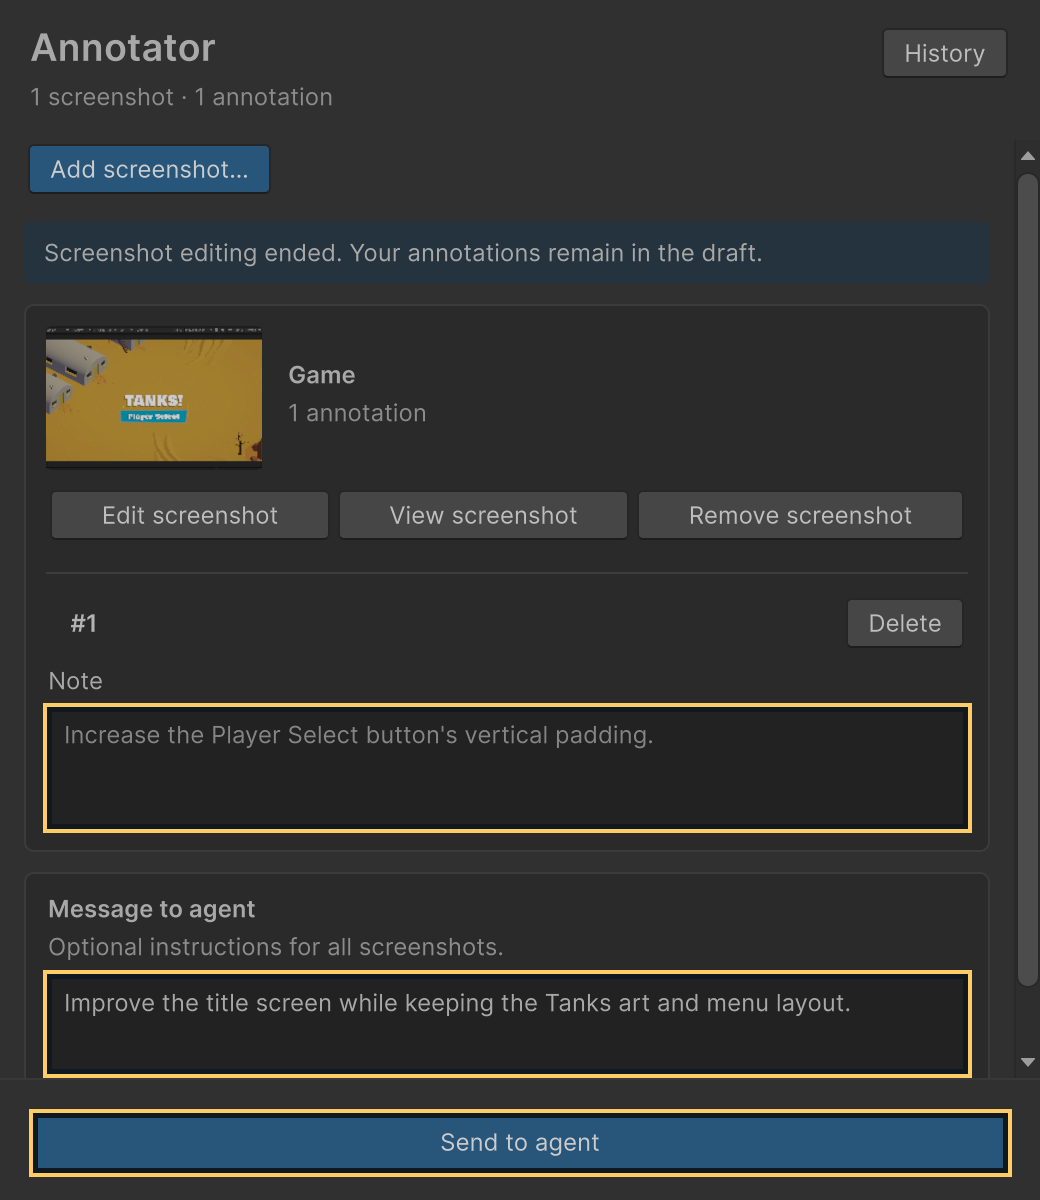
Figure 10
Sending stores the batch locally and opens a request to copy. It does not start a conversation or wake an idle agent. Missing notes or storage failures leave the draft available for correction.
Give the request to your agent
Click Copy and paste the request into your coding agent’s chat. The request identifies the batch and tells the agent how to read every note and screenshot. Your agent needs local file access to the computer running Unity, or the optional Unity Pipeline command integration.
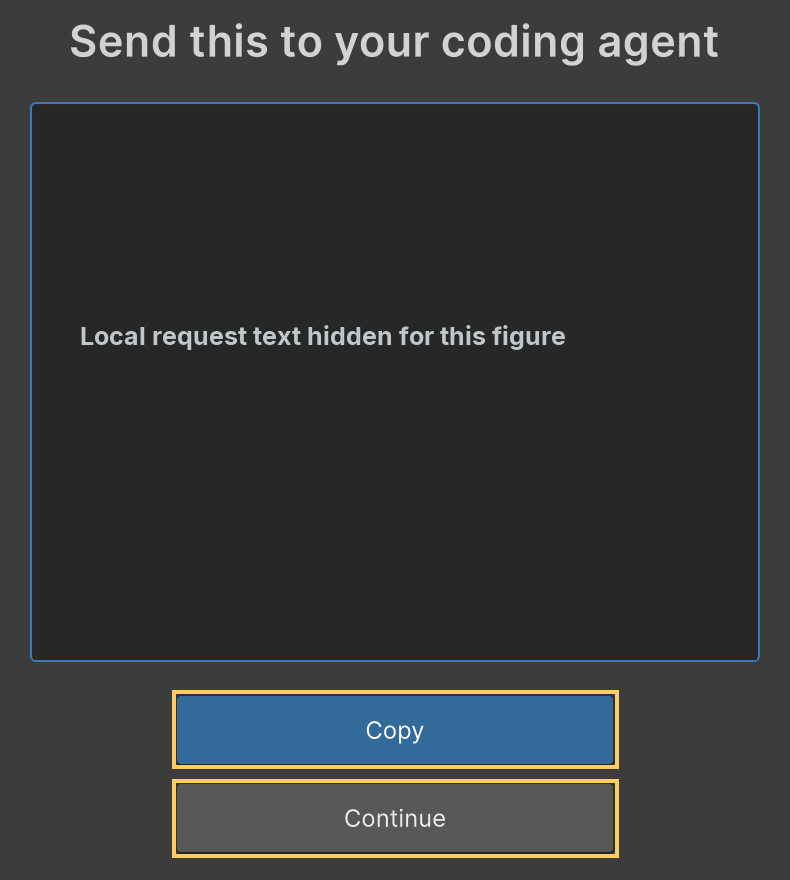
Figure 11
The project-specific request text is hidden in this figure. In your Editor it contains your real project location and batch identifier.
Click Continue to return to Annotator and start another batch. Submitted batches are read-only; prepare a new batch when you need to add more feedback.
Check receipt and retention
Open History in Annotator to find previously submitted batches.

Figure 12
Refresh checks the receipt again. Copy request retrieves an earlier request. Delete asks for confirmation before permanently removing that batch’s images and notes. Back returns to the draft.
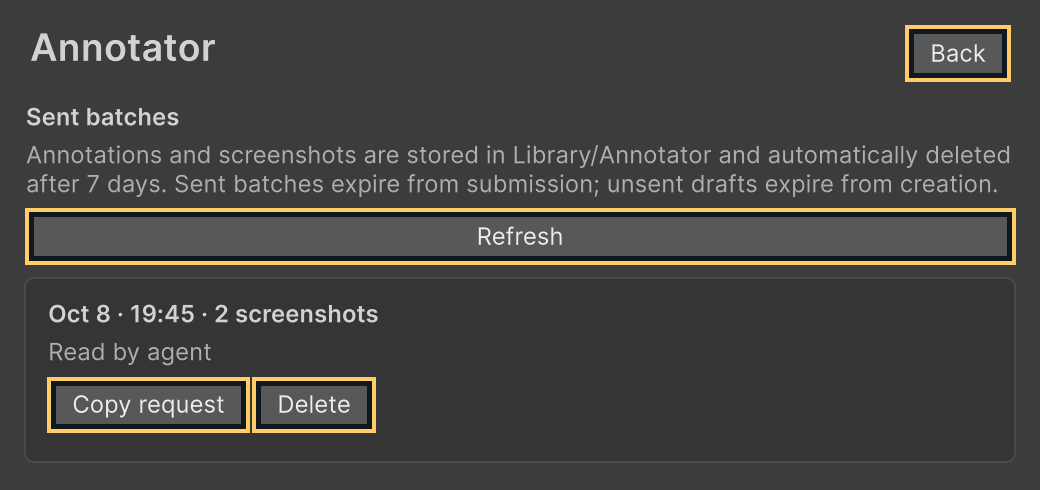
Figure 13
Read by agent means the notes and images were retrieved, not that the requested work is complete.
Annotations are local working data under Library/Annotator. They survive Editor restarts, but expire automatically after 7 days: from creation for an unsent draft, and from submission for a sent batch. Editing a draft does not restart its retention period. Clearing the project’s Library also removes this data.
Keep a separate copy of any batch and images you need as a lasting record before they expire.
Capture scope and picking limits
After Add screenshot…, Capture entire editor captures the main Unity window, including its toolbar and docked panes. Cancel or Escape leaves the chooser without a capture.
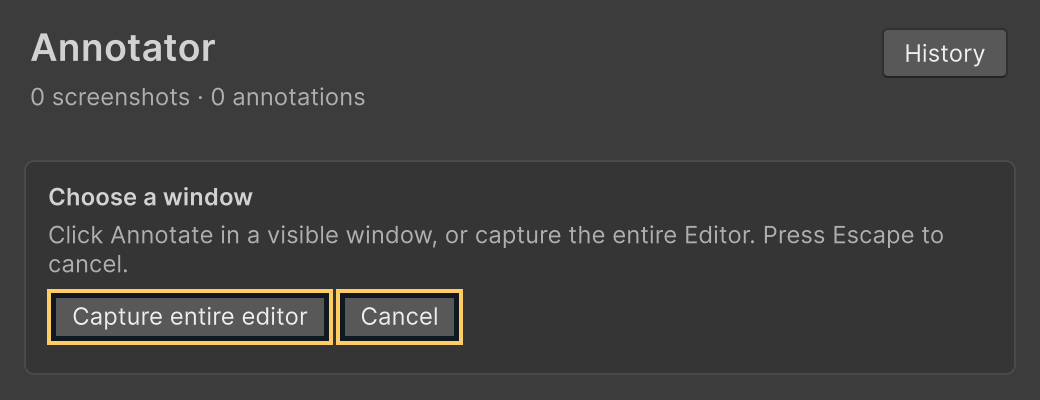
Figure 14
Entire-editor and saved-image captures support Point and Area. Capture an individual window for GameObject or Editor-control picking. Entire-editor capture is an on-screen image: overlapping windows can appear in it, and separately positioned floating windows are not stitched together. Review its contents before sharing.
Scene and Game objects. Scene picking supports terrain, meshes and sprites, including overlapping meshes without colliders. Game captures use the captured cameras, zoom and letterboxing. uGUI graphics can be picked even when gameplay interaction or raycast targeting is disabled.
Picking uses the frozen capture. Moving the Scene camera or changing the captured camera or viewport can invalidate it; finish and capture again. Picking is limited to 64 candidates per camera. If candidates are omitted, a warning reports that more objects overlap. Hide overlapping objects and recapture if the intended target is missing.
uGUI picking uses rendered triangles and masks. Transparent texture pixels or custom shader clipping can produce broader candidates. Camera stacking and custom rendering may need a point or area with a descriptive note.
Editor controls. Captured control metadata describes that repaint, not a permanent live link. Reopened images retain it but cannot pick new controls. Close the IMGUI Debugger before recapturing if it owns IMGUI recording.
Retrieve batches through Unity Pipeline
Unity Pipeline 0.8.0-exp.1 or newer enables Annotator’s optional commands. The core package also works through local files without Pipeline. Annotator runs in the Editor and adds no runtime component to your player build.
Use the submitted ID from the copied request:
{
  "project_path": "/absolute/path/to/project",
  "command": "get_annotation_batch",
  "args": { "batch_id": "<submitted-batch-id>" }
}
list_annotation_batches returns pending summaries. get_annotation_batch returns the compact schemaVersion: 2 export, including the shared message, notes, target descriptors and absolute image paths.
Read every note and open each screenshot’s imagePath. It selects the numbered preview when annotations exist, otherwise the original. Use originalPath and detailsPath when more detail is needed. Geometry is expressed as percentages from the image’s top-left; omitted width and height describe a point.
Check complete and each screenshot’s imageError. Pipeline can rebuild missing previews from available originals. An unreadable or missing image leaves notes readable but blocks acknowledgment.
After retrieving all notes and images successfully, call:
{
  "project_path": "/absolute/path/to/project",
  "command": "acknowledge_annotation_batch",
  "args": { "batch_id": "<submitted-batch-id>" }
}
Without Pipeline, read agent.json in the directory named by the copied request and resolve its image paths relative to that file. Older batches without it use submission.json. After successful retrieval, create received.txt with a UTC ISO 8601 timestamp only if no receipt exists. Preserve the batch and its images.
Captured object information describes capture time. Pipeline checks current availability; runtime object IDs expire with the Play session that created them.
Capture a window from an agent
With Unity Pipeline installed, editor capture_window saves a visible Editor pane directly, without creating an annotation batch.
{
  "project_path": "/absolute/path/to/project",
  "command": "editor capture_window",
  "args": { "window": "SceneView" }
}
window accepts an exact title, short type name or fully qualified type name. Matching is case-sensitive. Inspector, InspectorWindow and UnityEditor.InspectorWindow identify Inspector windows.
The pane must already be a shown floating window or an active dock tab. The command does not open it, change focus or switch tabs. Backbuffer capture reads its rendered contents even when another desktop window covers Unity. Batch mode and Editors without a graphics device are unsupported.
When several visible windows match, the error lists instance IDs. Repeat the request with window_id to disambiguate:
"args": { "window": "InspectorWindow", "window_id": 12345 }The ID must still match the selector and can change after reopening a window. A successful response includes the absolute PNG path, dimensions and window identity. Open that path locally to inspect the image. These captures are stored under Temp/Annotator.
Window not found or visible: Check the selector and show the intended tab before retrying. Capture storage error: Check access to the temporary folder and free disk space. Failure responses have no screenshot path.
A saved image will not reopen: Preserve the draft files and check that its original PNG is present and readable. Edits cannot save: Restore access to the project folder, then edit a note to retry before closing Unity. Keep the in-memory draft open until saving succeeds.
Customize the start shortcut
The start shortcut is registered as Annotator/Start Annotation in Unity’s Shortcuts settings. You can change its keys without editing the package.
- Open Edit > Shortcuts… and select the Annotator category. The Start Annotation command appears with its current binding.
- Double-click the command’s Shortcut cell, then press your preferred key combination. Unity saves it in the active shortcut profile; editing the Default profile creates an editable copy automatically.
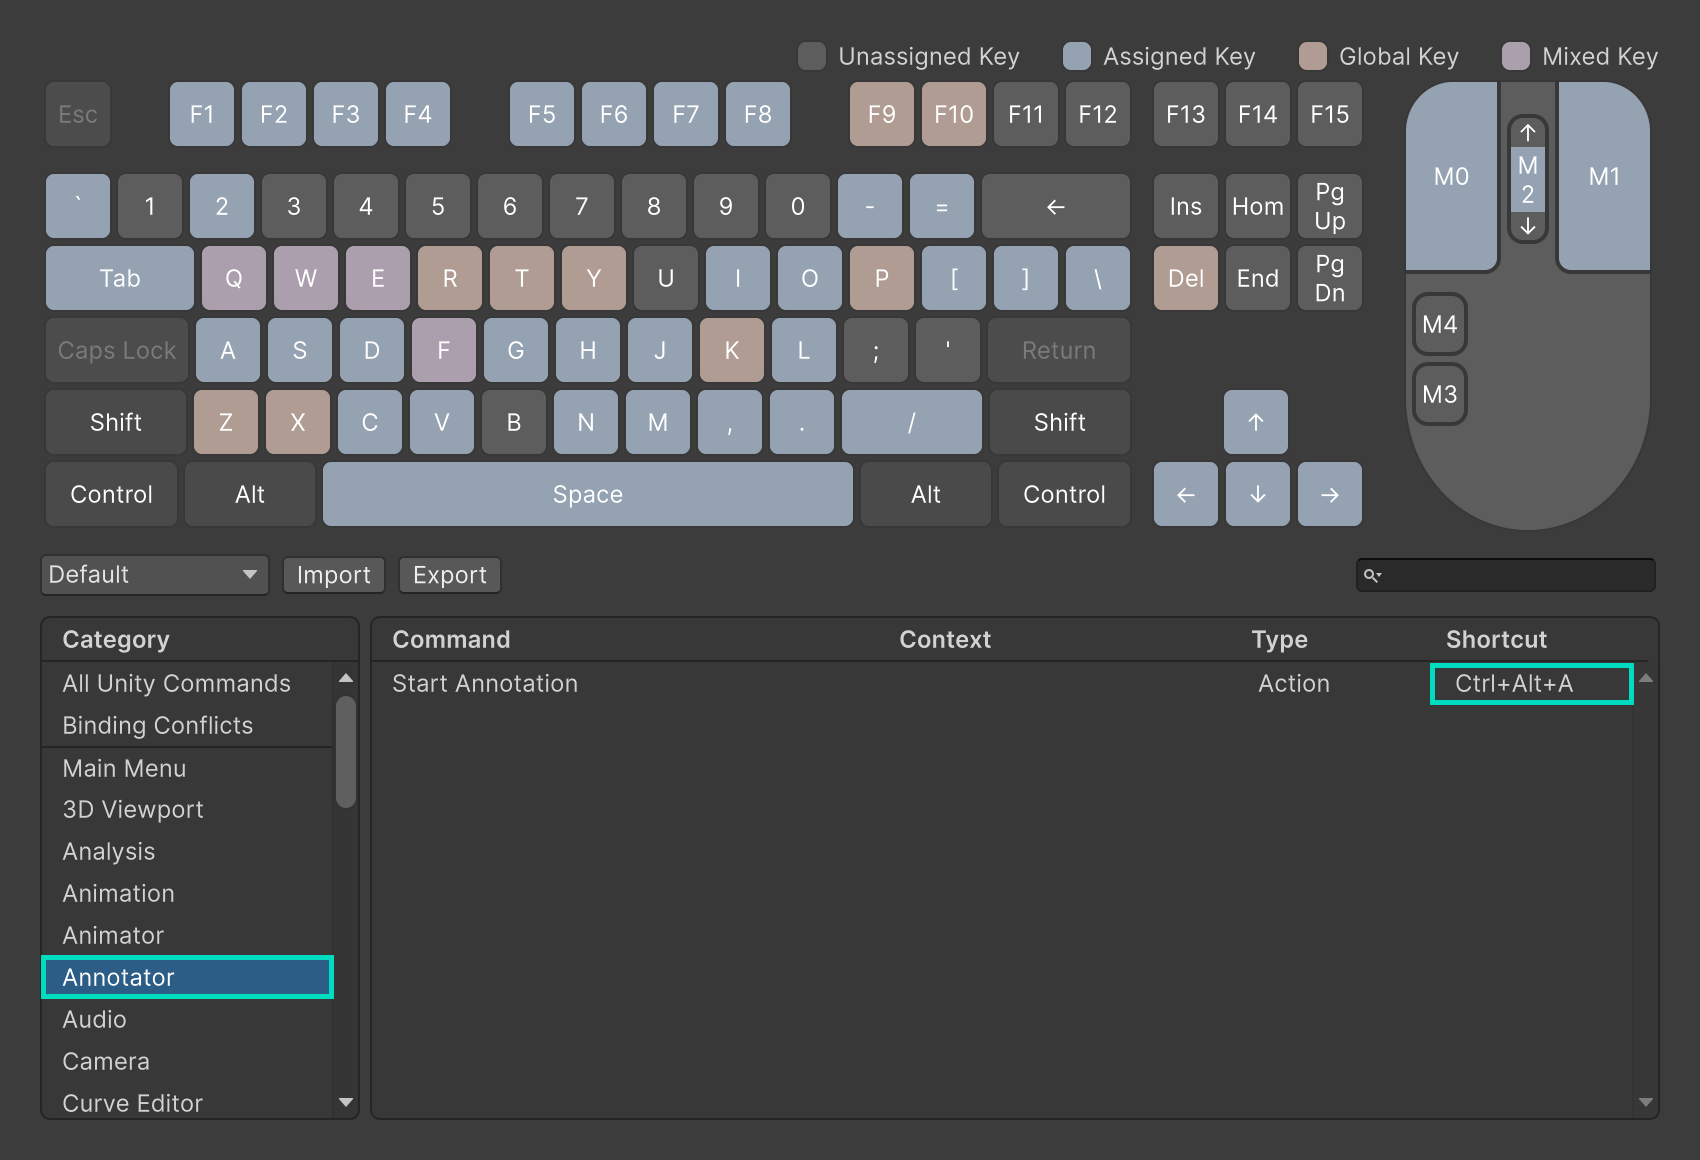
Figure 15
Close Shortcuts and press your new keys in an Editor pane. Annotate buttons appear in visible windows without opening or focusing Annotator. In Play Mode, focus an Editor pane such as the Hierarchy if the Game view is receiving gameplay input.
If Unity reports a binding conflict, choose another combination or resolve the conflicting command in Shortcuts.