 Zal Interactive
Advanced Retarget
com.zalinteractive.advanced-retarget
What Advanced Retarget does
Advanced Retarget moves animation from one character to another. The source is the character the animation was made for. The target is the character that should play it. The package makes a new animation clip that fits the target.
It works with humanoid and non-humanoid characters, first-person arms and animals. Both characters stand side by side in a preview while you work, so you can check the result before you save anything.
What it can do
- Bake new animation clips (
.animfiles) or FBX files for the target. - Retarget between humanoid and generic characters, in any direction.
- Put full-body animation onto first-person arms, and move animation between two arms models.
- Handle characters of different sizes. Hands and feet follow the source, so feet stay on the ground.
- Carry root motion over, so a walk still moves the character forward.
- Repeat a clip several times in one bake and keep its loop setting and animation events.
- Fix poses by hand: offset a bone, mirror a limb or copy a weapon bone.
- Retarget live while the game runs, with the Dynamic Retargeter component.
What it can’t do
- It only moves bones. Blend shapes (face shapes), material changes and custom animation curves aren’t baked.
- It doesn’t create a skeleton. Both models need bones inside a skinned mesh, or a humanoid avatar.
- It doesn’t fix skinning. If the target’s mesh bends badly in its own animations, it bends badly here too.
- It can’t make two very different bodies match perfectly. A short-legged walk on a long-legged character can still slide a little. IK and offsets reduce this.
- Root motion only turns around the up axis. Leaning forward or sideways stays in the pose.
- Humanoid clips only hold the bones Unity’s humanoid avatar knows. Weapon bones, props, tails and other extra bones need a Generic bake.
The tools run in the Unity Editor. Baked clips are ordinary Unity animation clips, so they play wherever your game runs. The Dynamic Retargeter is part of the runtime code and is included in builds. FBX output uses Unity’s FBX Exporter package, which is installed together with this package.
Words you’ll see
These words appear in the window and in this guide.
- Source: the character the animation was made for. Its clips are the input.
- Target: the character that receives the animation.
- Profile: an asset that remembers one source and target pair. You make it once and bake from it as often as you like.
- Rig: the list of bones the profile found in a model. A profile keeps one rig for the source and one for the target.
- Chain: a row of connected bones, such as upper arm, forearm and hand. Chains have names such as
leftArmorspine. - Feature: a rule that moves one part of the target, such as the left arm. A profile has one feature for each part, and shows each feature as a card in the Features tab. See What features do.
- Bake: play the source clip, retarget every frame and save the result as a new clip.
- Humanoid and Generic: Unity’s two kinds of character animation. A humanoid clip plays on any character with a humanoid avatar. A generic clip moves the bones of one particular skeleton.
- Root motion: travel that moves the whole character, such as walking forward or turning.
- Rest pose: the pose a character stands in without animation, such as a T-pose or an A-pose.
To see whether a model is humanoid, select it in the Project window. In the Inspector, open the Rig tab. Animation Type says Humanoid or Generic (Figure 1).
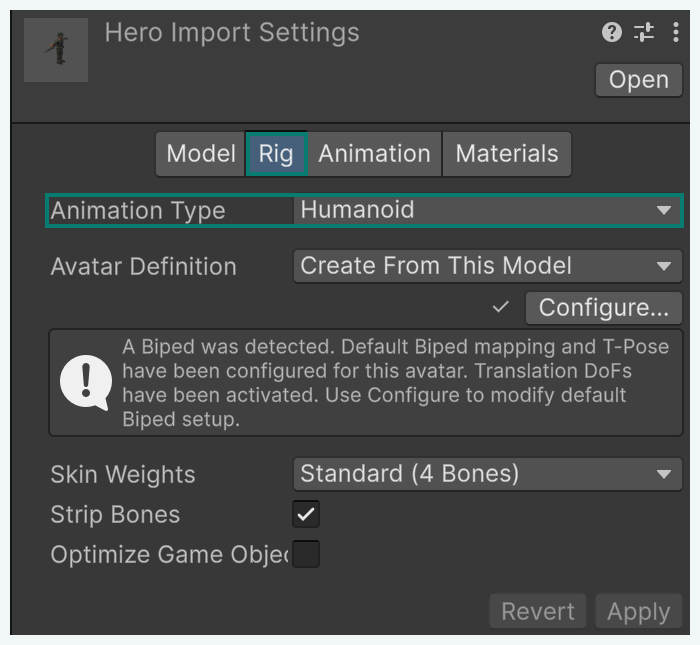
Figure 1
Skeletons the package knows
The package recognizes the bone names of Mixamo, Unreal Engine 4 and 5, Synty, Character Creator 4 and 5, Unity’s humanoid naming and common four-legged animals. Any model with a valid humanoid avatar also works, whatever its bone names are. For other skeletons, you add the features yourself. See Use a skeleton no preset knows.
Advanced pages
Pages marked Advanced in their header cover harder setups. You can skip them until you need them.
Create your first profile
You need two models in your project: the source, with at least one animation clip, and the target. A model can be an FBX, Blender, Maya, 3ds Max, Cinema 4D or Collada file, or a prefab of one.
- In the Project window, click the source model. Hold Ctrl (Cmd on macOS) and click the target model (Figure 2).
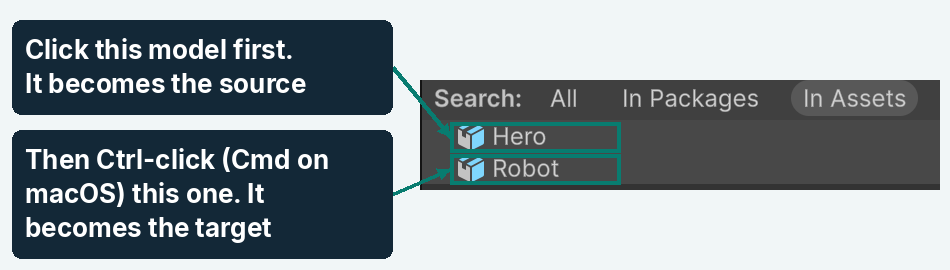
Figure 2
- Choose Tools > Advanced Retarget > Create Profile From Two Models (Figure 3).
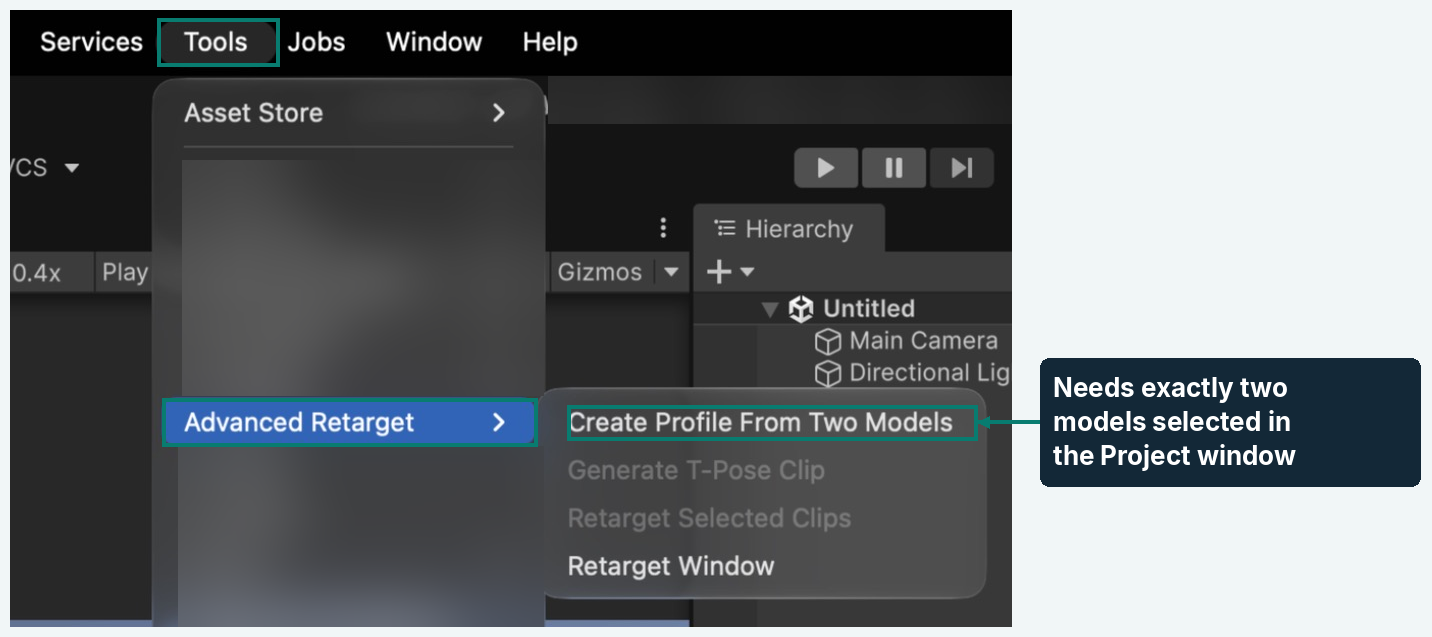
Figure 3
Check the new profile
A profile asset appears next to the source model. It’s named after both models, such as Hero_to_Robot. The Retarget window opens with both characters in the preview (Figure 4).
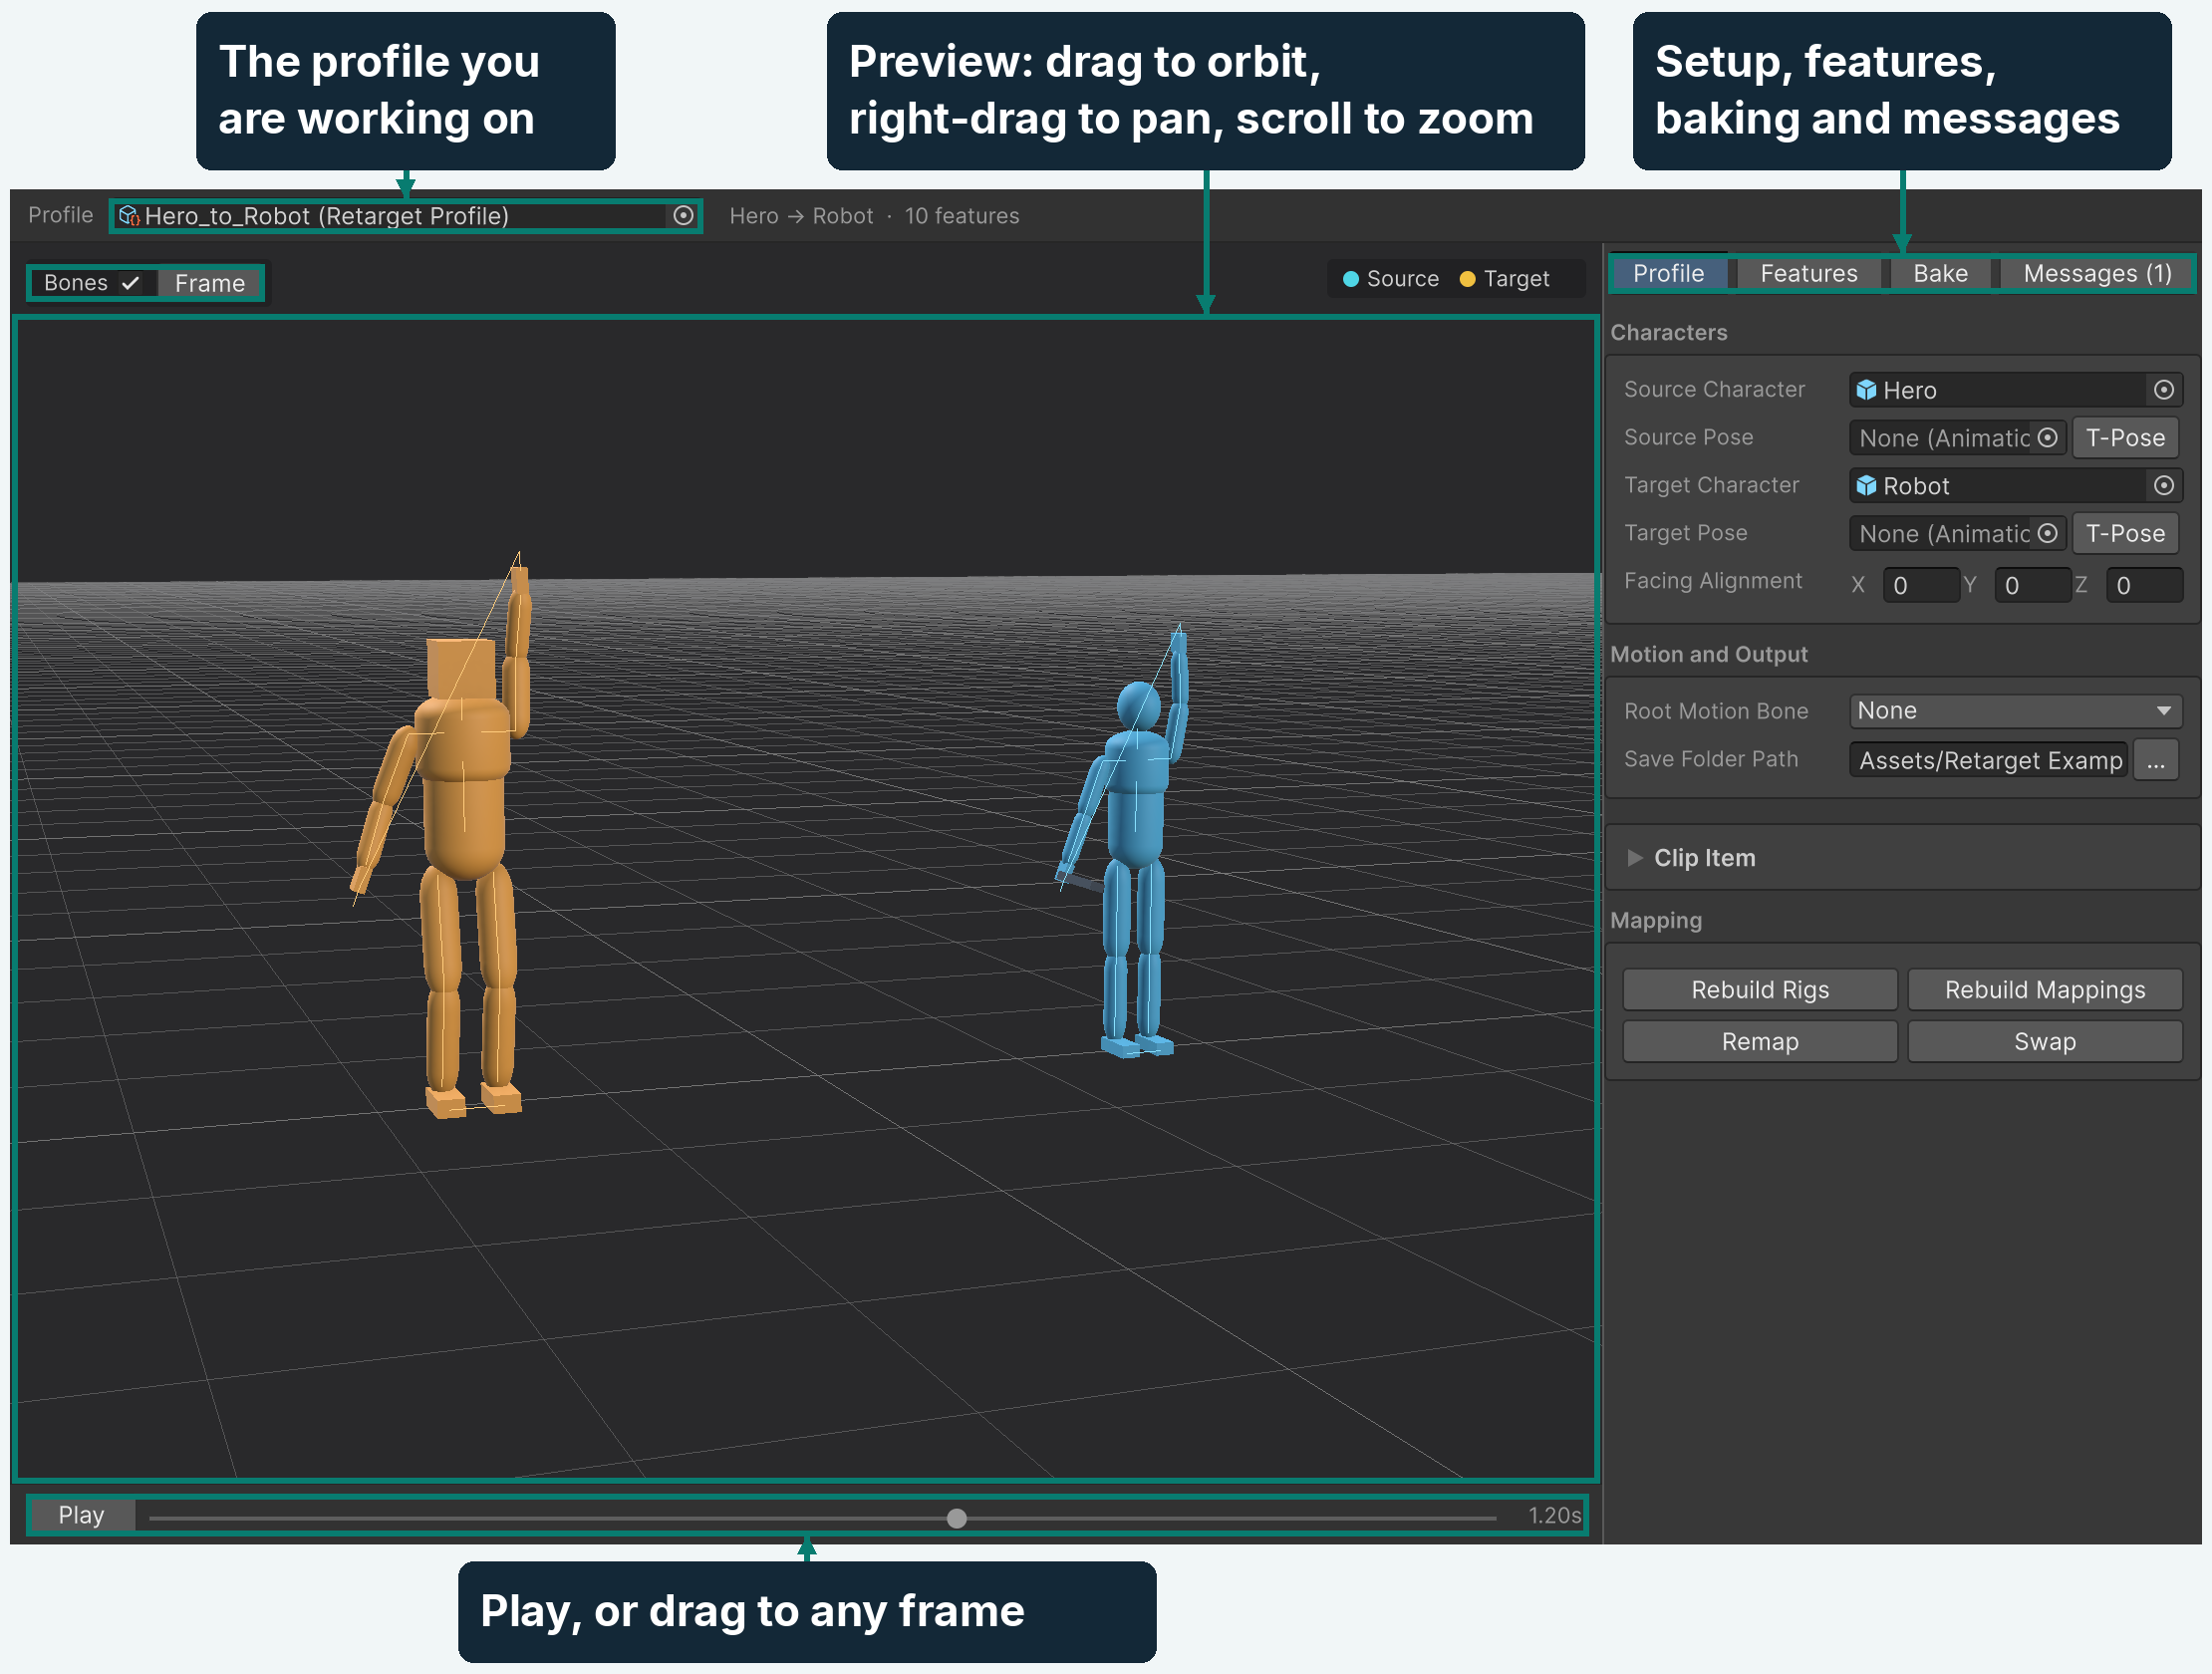
Figure 4
- Check the legend above the preview. It tells you which character is the source and which is the target.
- If they’re the wrong way round, click Swap in the Profile tab. See Rebuild, remap or swap.
Note: If a message says the skeleton couldn’t be mapped, click OK. The profile is still made, but you add its features yourself. See Use a skeleton no preset knows.
Bake your first clip
- Click the Bake tab.
- Drag an animation clip from the Project window onto the Animations list. You can also drop a model to add all of its clips, or pick a clip in Add Clip (Figure 5).
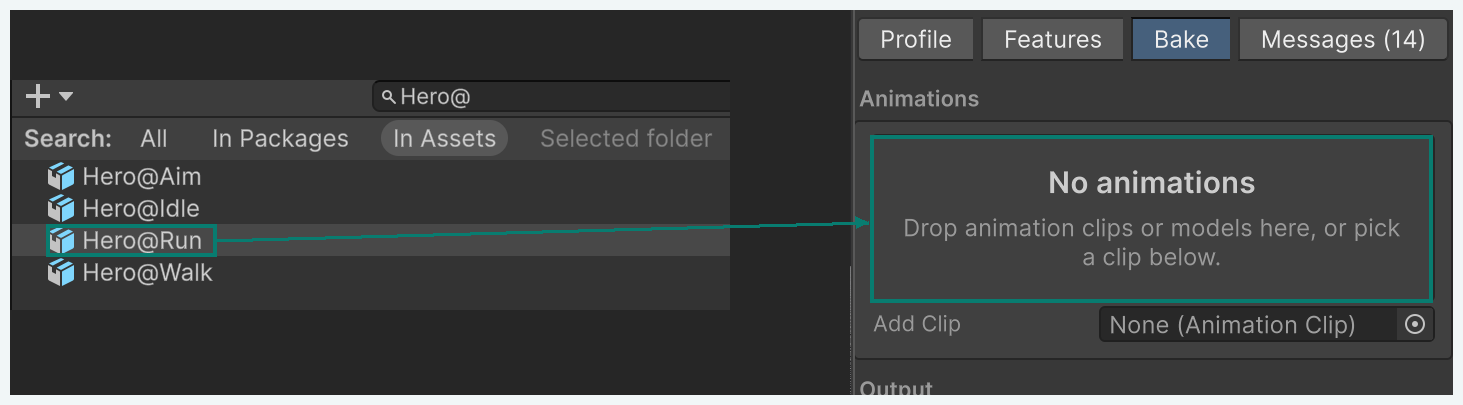
Figure 5
- Click the clip in the list. Then click Play under the preview (Figure 4). Both characters play the clip. Figure 6 shows four moments of a run. The target moves like the source, although its body is a different shape and size.
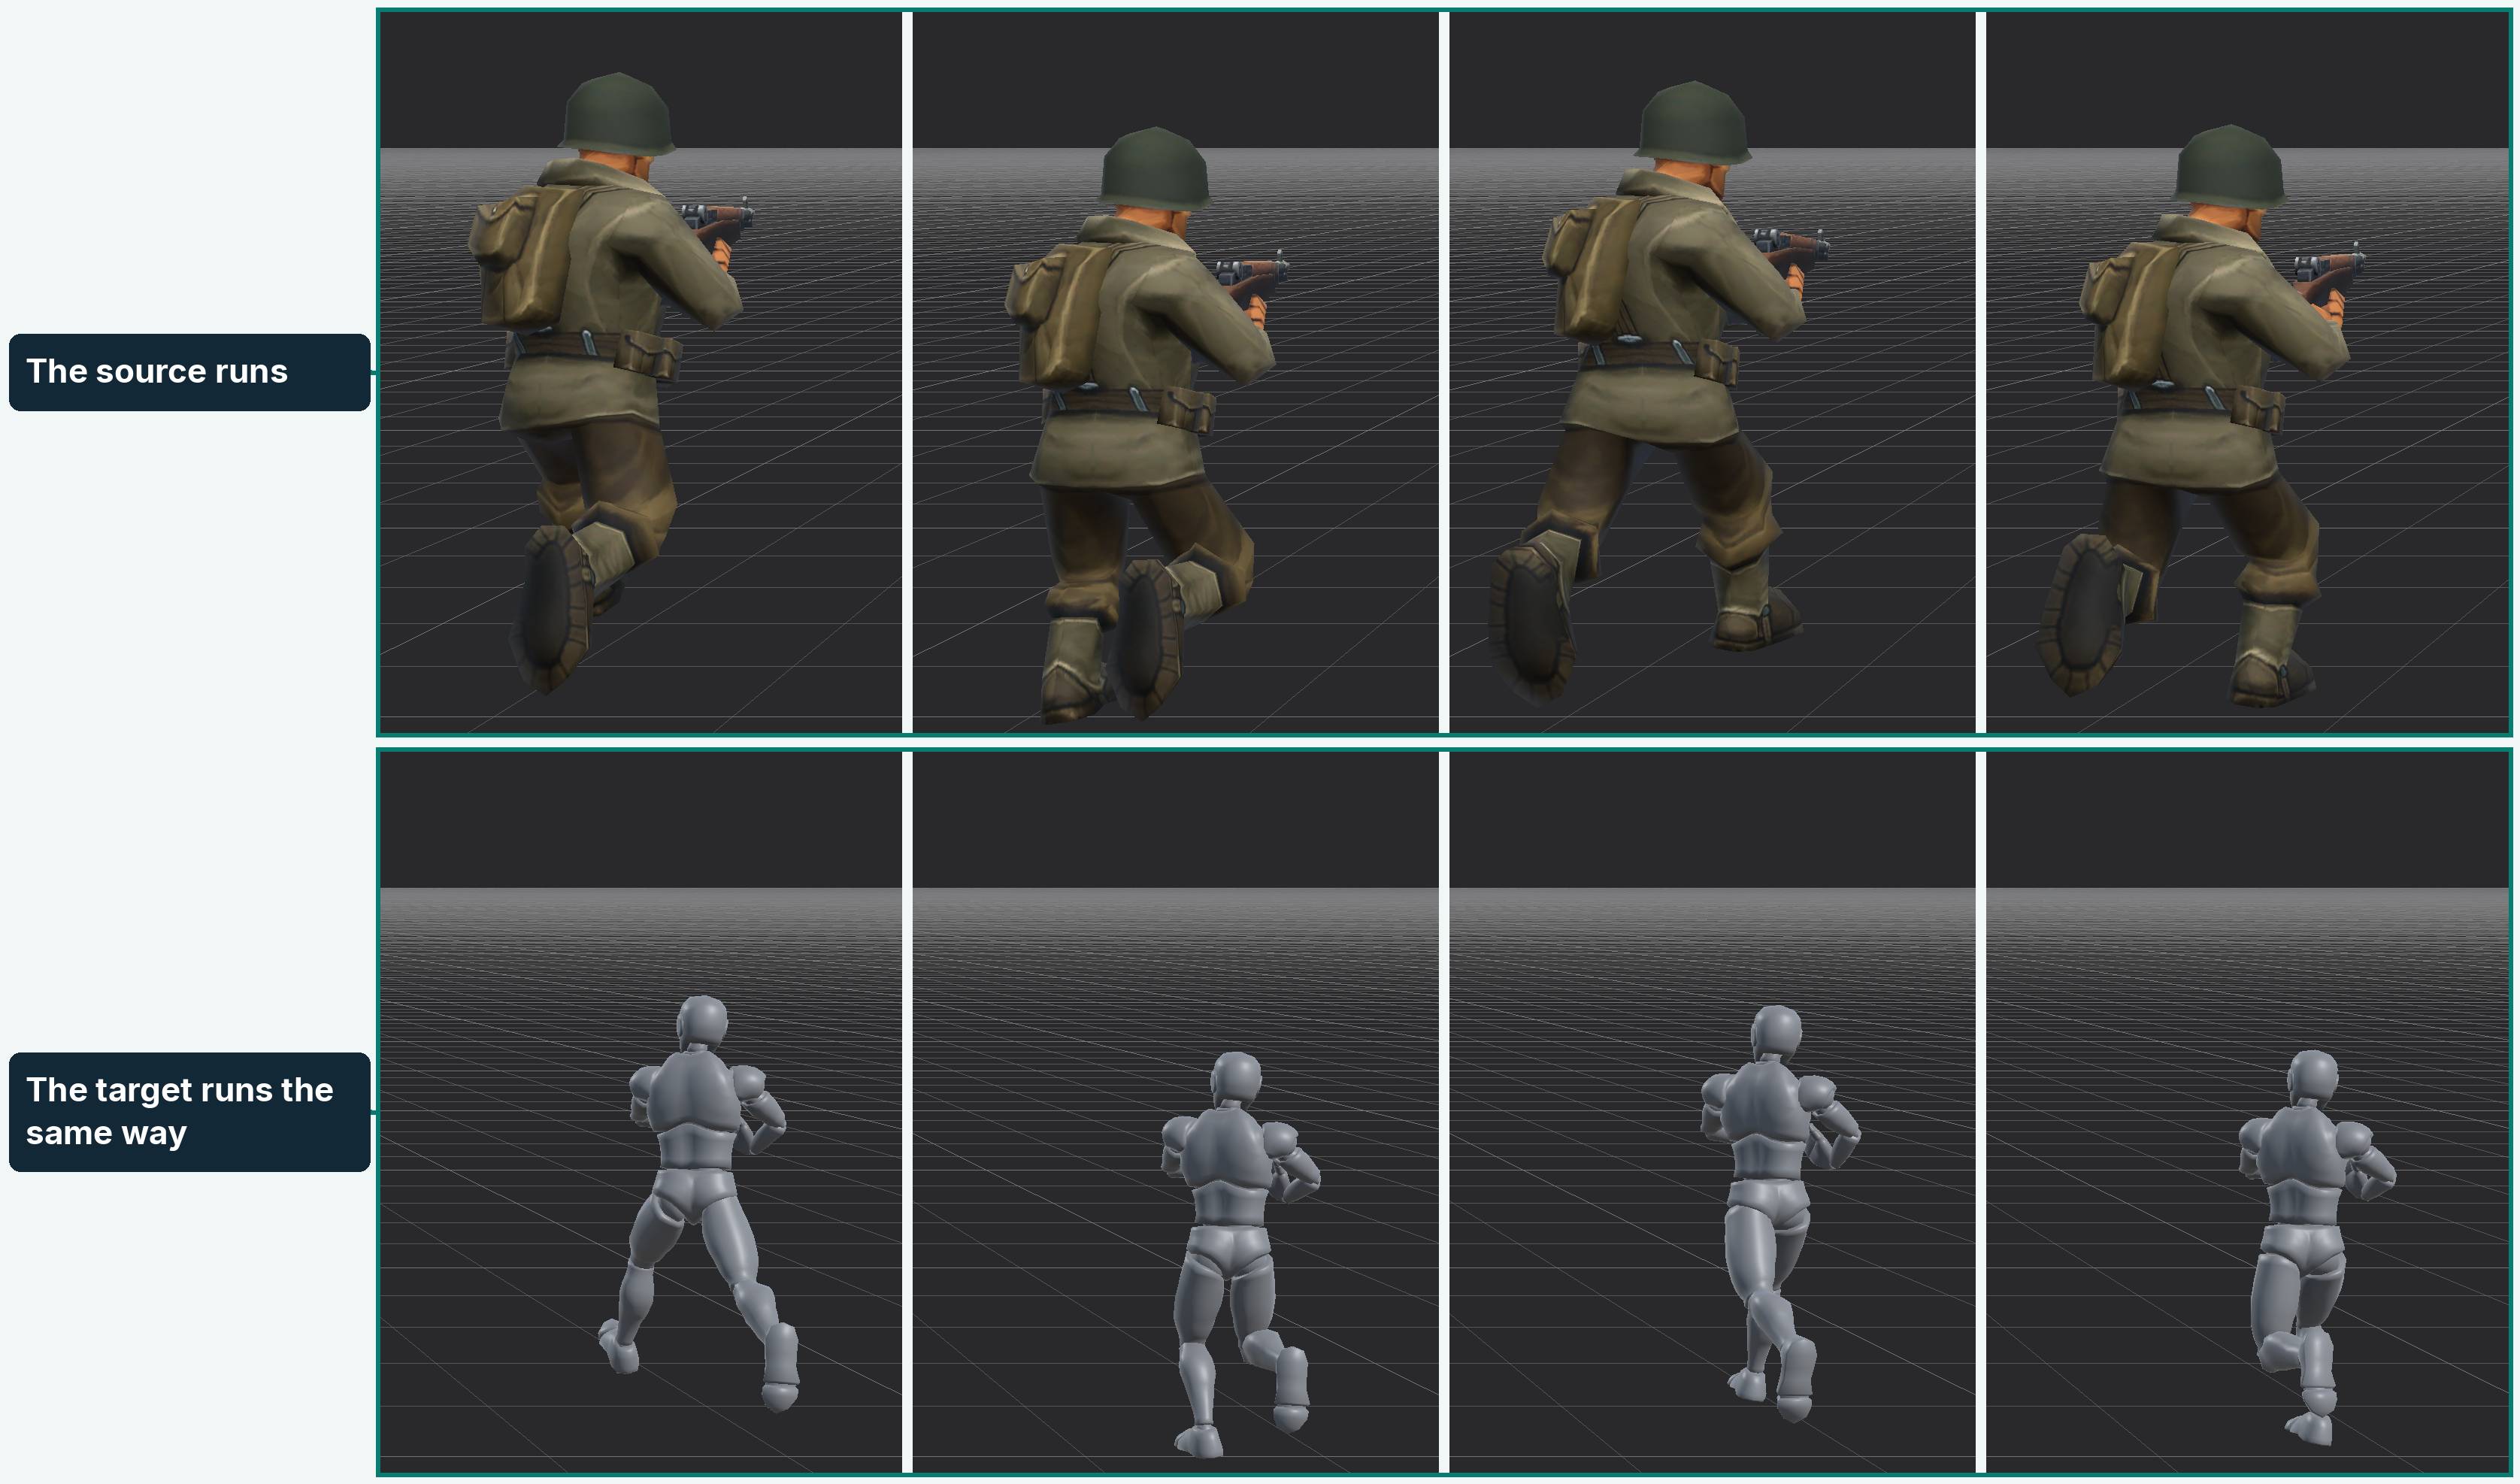
Figure 6
- Leave the other settings as they are for now. Rig Type is already Humanoid when the target has a humanoid avatar, and Generic when it doesn’t.
- Click Bake Selected (Figure 7).
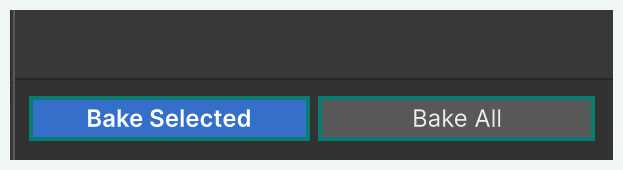
Figure 7
A progress bar appears while the clip bakes. Click Cancel on it to stop the bake.
Find and play the baked clip
When the bake finishes, the Bake tab shows where the clip was saved (Figure 8). The Project window highlights the new clip.
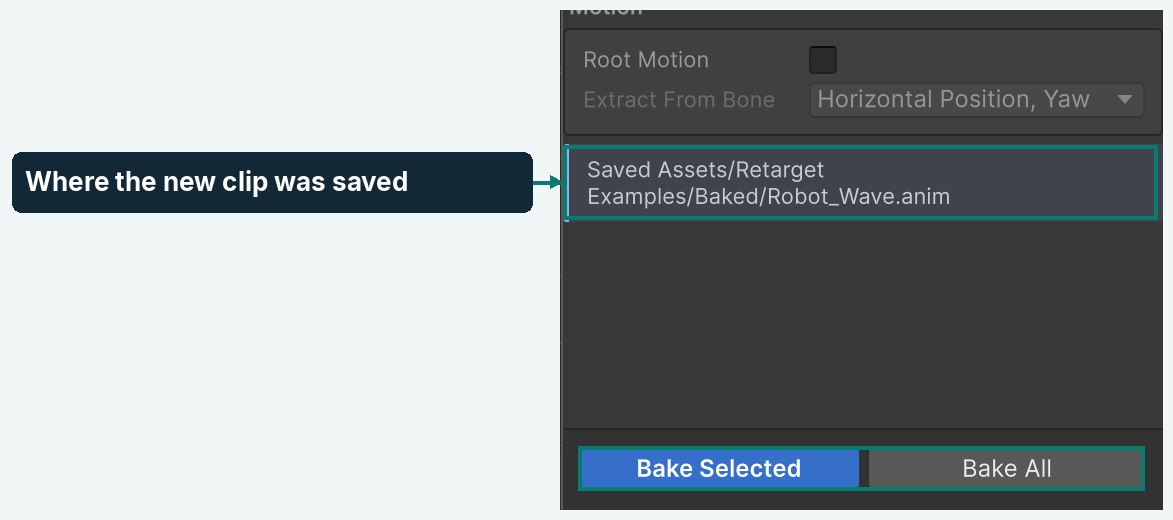
Figure 8
The clip is named after the target and the source clip, such as Robot_Wave. It’s saved in the profile’s Save Folder Path, which is Assets/ until you change it.
To see it in your game:
- Drag the target model into your scene.
- Drag the baked clip from the Project window onto the target in the Hierarchy. Unity adds an Animator and makes an Animator Controller that plays the clip.
- Enter Play Mode. The target plays the animation.
A Humanoid clip also plays on your other humanoid characters. A Generic clip only plays on models with the same bone names and hierarchy as the target.
Tip: You can bake again at any time. A new bake replaces the old clip in place, so Animator Controllers that use it keep working.
Set up the characters
The Profile tab holds the settings of the character pair (Figure 9). They’re saved in the profile asset. The preview, every bake and the Dynamic Retargeter use the same values.
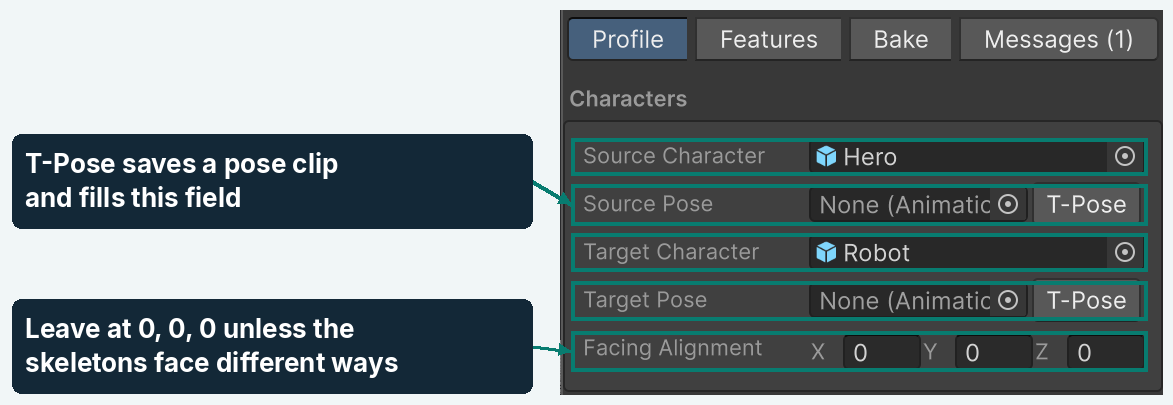
Figure 9
- Source Character: the model the animation was made for.
- Target Character: the model that receives the animation. After you change either model, click Rebuild Rigs and then Rebuild Mappings.
- Source Pose and Target Pose: optional starting poses. Leave them empty unless the arms or legs always come out at a wrong angle. See Characters that stand in different rest poses.
- T-Pose: makes a pose clip for that character and puts it in the pose field.
- Facing Alignment: leave it at
0, 0, 0. It’s only for skeletons that face different directions. See Skeletons that face different ways.
Motion and output

Figure 10
- Root Motion Bone: the target bone that carries the travel, usually the hips or pelvis. See How root motion works.
- Save Folder Path: where baked clips go. Click … to pick a folder inside
Assets. - Clip Item: a prop that’s only shown in the preview. See Props and weapons.
What features do
A profile doesn’t move the whole target in one go. It splits the body into parts, such as the hips, the spine, each arm and each leg. A feature is the rule for one part: it reads that part of the source and moves the same part of the target. The bones a feature reads and moves are its chains.
Why the body is split into parts
Two skeletons rarely match bone for bone. One spine has three bones and the other five. One character has longer arms. One rig has a weapon bone and the other doesn’t. With one rule per part, each part moves the way it needs to. The hips copy travel, the legs reach for the floor, and the spine copies how the source turns.
When you need to think about features
Most of the time, you don’t. When you create a profile, the package recognizes both skeletons and adds a feature for each body part they share. Open the features when:
- The result needs a fix, such as sliding feet or an elbow that bends the wrong way. Change the settings of the feature that moves that part.
- A body part doesn’t move. It has no feature yet. Add one for it.
- You want something the automatic setup doesn’t do, such as first-person arms, a weapon bone, a mirrored limb or a small correction. Add the feature that does it.
How the list of features works
- Features run from top to bottom, on every frame of the preview, of every bake and of the Dynamic Retargeter.
- When two features move the same bone, the lower one wins. Put corrections at the bottom of the list.
- Feature Weight at
0switches a feature off without removing it. Use it to see what one feature adds to the result. - Features are saved in the profile. A change applies to every clip you bake with that profile.
- In the Features tab, each feature is shown as a card.
Choose a feature
The package has seven features. The profile adds the first three by itself. You add the other four with Add Feature when you need them. The Add Feature menu uses a shorter name for each feature, shown in brackets (Figure 11).
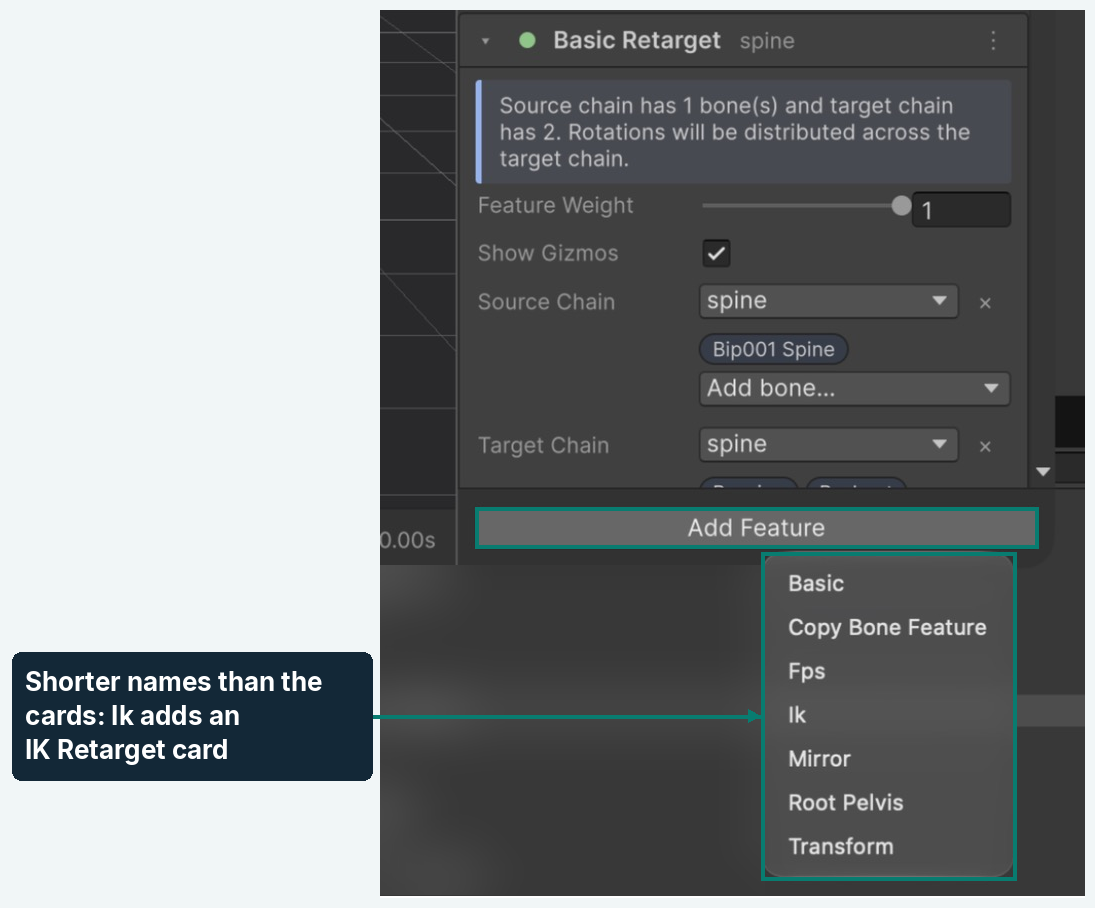
Figure 11
Added by the profile
- Root/Pelvis Retarget (Root Pelvis): moves the root and the hips. It copies how they turn and how they travel, so the body walks, crouches and jumps like the source’s. See Basic Retarget and Root/Pelvis Retarget.
- IK Retarget (Ik): moves an arm or a leg. It puts the hand or foot where the source’s is, scaled to the target’s size, and bends the limb to reach it. This keeps feet on the floor and hands on what they touch. See IK Retarget.
- Basic Retarget (Basic): copies how bones turn. The profile uses it for the spine, neck, head, toes and fingers. Add it for any other part that only needs to turn like the source, such as a tail. See Basic Retarget and Root/Pelvis Retarget.
Added by you
- FPS Animation Retarget (Fps): makes first-person arms hold a weapon the way the source holds it. Add it when the target is a pair of arms. It finds the arms and weapon bones by itself. See Full body to first-person arms.
- Copy Bone (Copy Bone Feature): copies a bone exactly, without scaling it to the target’s size. Add it for a weapon bone, or another bone both skeletons have. Its card title shows both bones, such as Copy from: Weapon, to: ik_hand_gun. See Props and weapons.
- Transform Modifier (Transform): adds a fixed change to bones after the features above it have run, such as turning a hand, tilting the head or lowering the hips. Add it when one bone is a little off. See Fix a pose by hand.
- Mirror Retarget (Mirror): gives bones the mirrored pose of their partner on the other side. Add it to make a left-handed version of a clip. See Mirror an animation.
Every setting of every feature is explained in Settings every feature has and the pages after it.
Check the features
The Features tab shows each feature of the profile as a card (Figure 12). The cards run from top to bottom, as described in What features do.
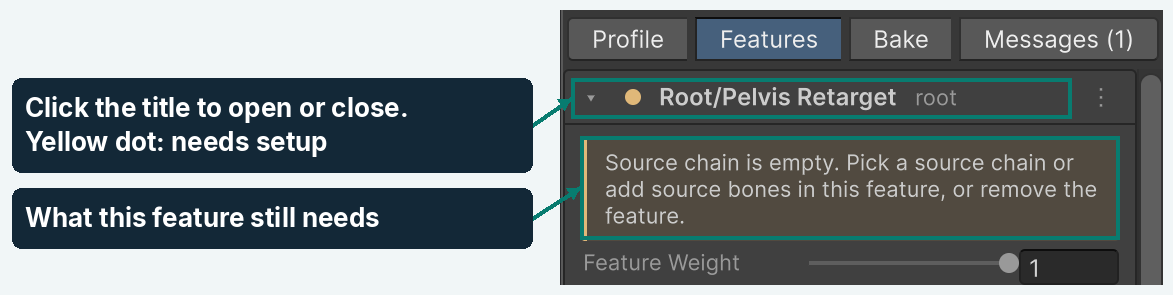
Figure 12
- Click a card’s title to open or close it.
- Look at the dot in front of the title. Green means the card is ready. Any other color means it needs setup, and the open card says what’s missing.
- Click the three-dot button at the right of the title to move the card up or down, copy or paste its settings, or remove it.
Inside an open card, the chains are the bones the feature reads and moves (Figure 13).
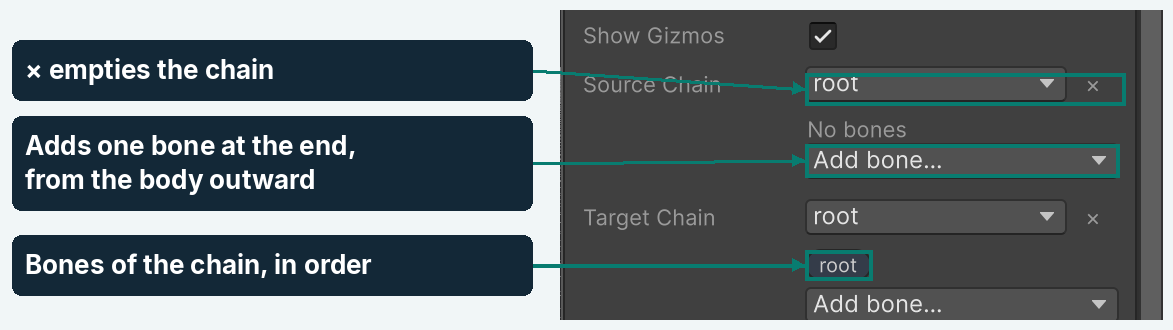
Figure 13
- Pick a chain in Source Chain or Target Chain. Click × next to a chain to empty it.
- Use Add bone… to add one bone at the end of a chain. Add bones from the body outward, such as upper arm, then forearm, then hand.
- Click Add Feature at the bottom of the list to add a new card.
To pick the right feature to add, see Choose a feature.
Rebuild, remap or swap
The four buttons at the bottom of the Profile tab update the profile after something changes (Figure 14).
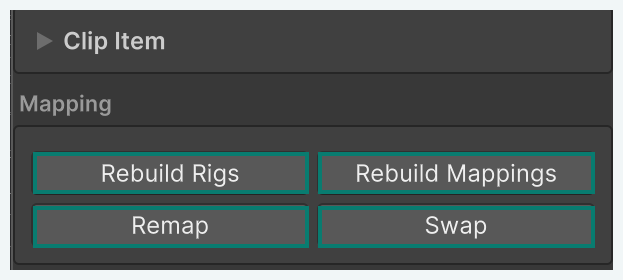
Figure 14
- Rebuild Rigs: reads the bones of both models again. Click it after you change a model, or after you re-import a model with new bones.
- Rebuild Mappings: makes the features the profile adds by itself again: Root/Pelvis Retarget, IK Retarget and Basic Retarget. Any changes you made to those features are lost. The features you added yourself stay as they are.
- Remap: matches the bones by name again, but keeps the settings you changed on each feature. Use it instead of Rebuild Mappings after renaming bones. It also searches again for the arms and weapons of FPS Animation Retarget cards, even on skeletons the package doesn’t recognize.
- Swap: exchanges the source and the target. The Root Motion Bone moves to the bone with the same name on the new target, or is cleared.
A message under the buttons tells you what happened. For example, Recreated 10 feature(s). Source=Mixamo, Target=Unreal Engine 4/5. names the bone naming the package recognized on each side.
Tip: You can undo Rebuild Mappings and Swap with Ctrl+Z (Cmd+Z on macOS).
Make a profile by hand
You can also make an empty profile and fill it in yourself:
- In the Project window, choose Assets > Create > Advanced Retarget > Retarget Profile.
- Double-click the new profile. The Retarget window opens.
- In the Profile tab, assign Source Character and Target Character.
- Click Rebuild Rigs, then Rebuild Mappings.
The preview shows both characters, and the Features tab lists the new features.
Read the messages
The Messages tab collects what the features report (Figure 15). The tab shows a count, such as Messages (1), when there’s something to read.
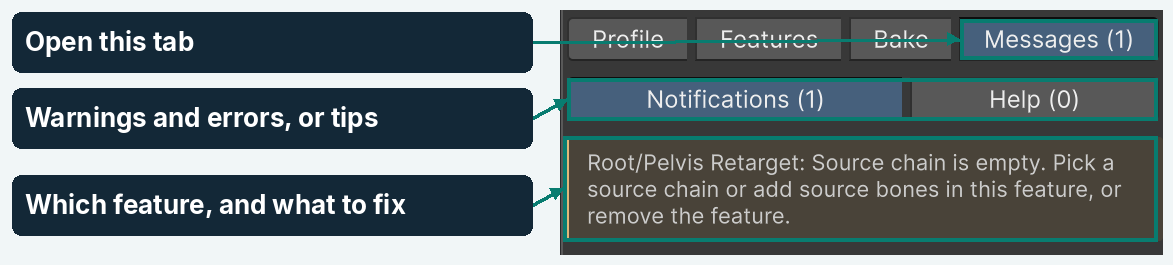
Figure 15
- Notifications: warnings and errors. Fix these first.
- Help: information about your setup that doesn’t need fixing.
Each message starts with the name of its feature, so you know which card to open. The same message also appears on that card in the Features tab.
Open a profile from the Inspector
Select a profile in the Project window to see its settings in the Inspector (Figure 16). Click Open in Retarget Window to edit it there. You can also double-click the profile, or choose Tools > Advanced Retarget > Retarget Window.
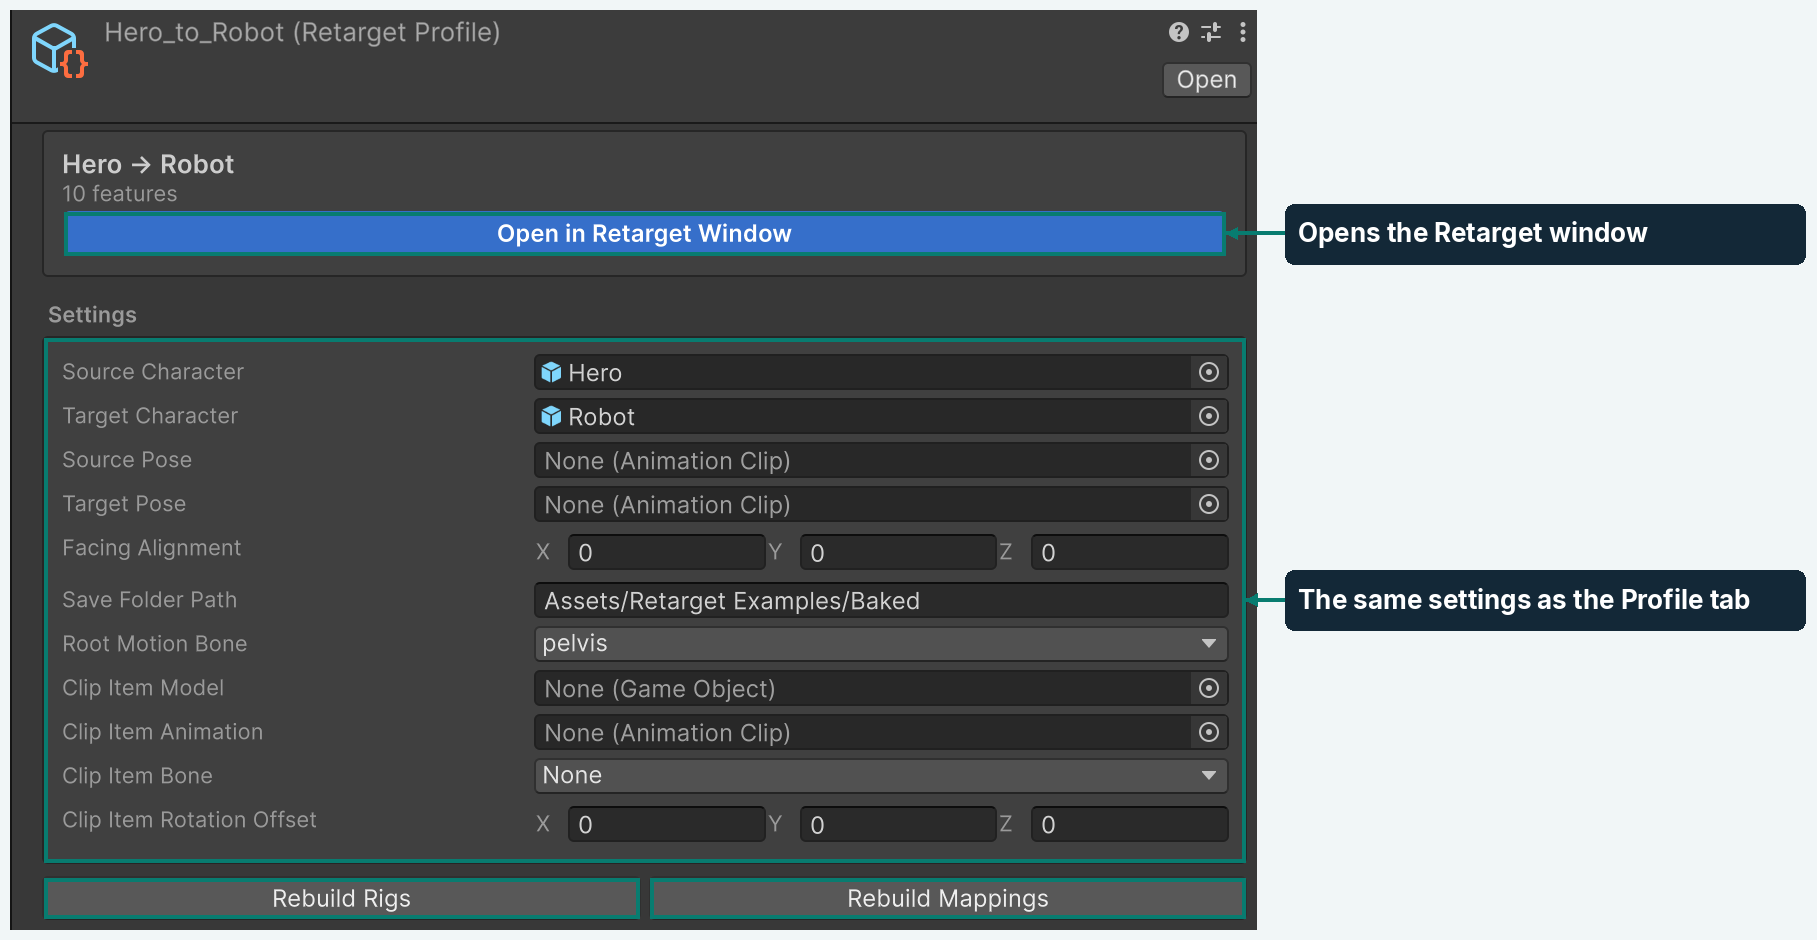
Figure 16
The Inspector has the same settings as the Profile tab, and the Rebuild Rigs and Rebuild Mappings buttons.
Choose your starting point
Find your pair of characters below. Each page lists only the steps that differ from Create your first profile and Bake your first clip.
- Both characters are humanoid: Humanoid to humanoid.
- Neither character is humanoid: Generic to generic.
- Only the target is humanoid: Generic to humanoid.
- Only the source is humanoid: Humanoid to generic.
- The target is a pair of first-person arms: Full body to first-person arms.
- Both characters are first-person arms: First-person arms to other arms.
- Both characters are four-legged animals: Animals.
These pages help with any pair:
- One character is much bigger or smaller: Characters of different sizes.
- The arms or legs always come out at a wrong angle: Characters that stand in different rest poses.
- A weapon or prop should move with the hands: Props and weapons.
- One bone is a little off: Fix a pose by hand.
- You need a left-handed version of a clip: Mirror an animation.
- You have many clips to bake: Bake many clips at once.
- You want to edit the result in a 3D program: Export an FBX file.
- The target bends or walks sideways: Skeletons that face different ways.
- The profile found no features: Use a skeleton no preset knows.
For travel and loops, see How root motion works and Keep looping clips looping.
Humanoid to humanoid
Unity can already play a humanoid clip on any humanoid character. Use Advanced Retarget when that isn’t enough:
- The hands or feet don’t land where they should, because the bodies differ.
- You want a corrected copy of the clip, with offsets or IK baked in.
- You need a Generic clip or an FBX file for the target.
- You want root motion taken from a particular bone.
- Create the profile from the two models. The profile matches the bones through each avatar, so bone names don’t matter.
- Click the Bake tab and check that Rig Type is Humanoid.
- Click Bake Selected.
Note: A humanoid source only plays humanoid clips. A clip imported as Generic leaves the source standing in a neutral pose in the preview. Select the file that holds the clip, open its Rig tab and set Animation Type to Humanoid.
Generic to generic
Use this when neither character has a humanoid avatar. Examples are two robots with different skeletons, a Blender character and an Unreal character, or two creatures.
- Create the profile from the two models. The package matches the bones by their names.
- Click the Features tab. Each chain both skeletons share gets a card: legs, arms, spine, neck and fingers.
- Check that every card has a green dot. Fix the cards that need setup, or remove them.
- Click the Bake tab and set Rig Type to Generic.
- Click Bake Selected.
The baked clip moves the target’s bones directly. It plays on the target, and on any model with the same bone names and hierarchy.
Tip: If a mesh object is named like a bone, such as Mesh_hand_r, it can end up in a chain. See Edge cases.
Generic to humanoid
Use this to turn generic clips into humanoid clips. A humanoid clip plays on every humanoid character in your project, so you retarget once and share the result.
The target needs a valid humanoid avatar. Select the target model, open its Rig tab, set Animation Type to Humanoid and click Apply (Figure 17).
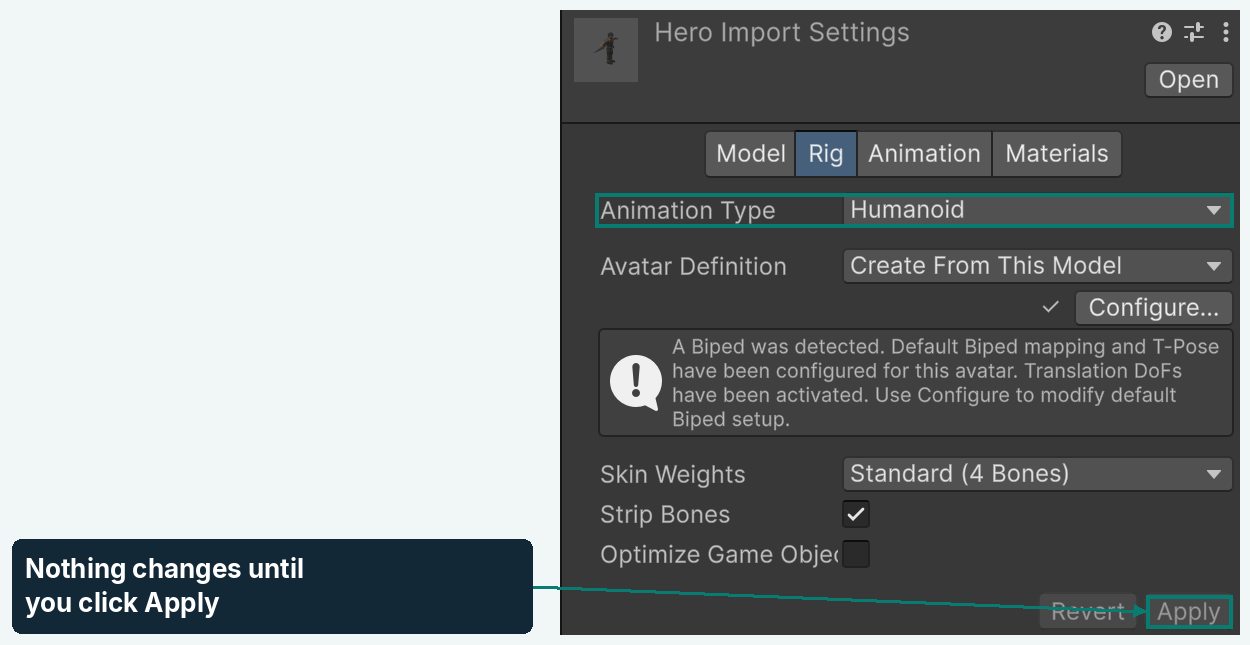
Figure 17
- Create the profile from the generic source and the humanoid target.
- Click the Bake tab and set Rig Type to Humanoid.
- Click Bake Selected.
Warning: A humanoid clip only stores the bones the avatar knows. A weapon bone, a tail or a cape won’t move. Bake with Rig Type set to Generic when those bones matter.
Humanoid to generic
Use this when the source is humanoid but the target can’t be. Examples are a robot with extra joints, a character with a tail, or a model you want to keep Generic.
- Check that the source clips are humanoid clips. See the note in Humanoid to humanoid.
- Create the profile from the humanoid source and the generic target.
- Click the Bake tab and set Rig Type to Generic.
- Click Bake Selected.
The baked clip moves the target’s bones directly, including bones a humanoid avatar doesn’t have. A bone that no card moves keeps the pose you see in the preview. To move it, add a card for it. For example, add a Basic Retarget card for a tail, or a Copy Bone card for a weapon bone.
Full body to first-person arms
Use this to put third-person animation, such as aiming or reloading, onto a first-person arms model. Both models need a weapon bone: a bone that moves with the gun.
- Create the profile from the full-body source and the arms model. If a message says the skeleton couldn’t be mapped, click OK.
- In the Features tab, click Add Feature and choose Fps. A card named FPS Animation Retarget appears at the bottom of the list. Keep it below any other arm cards, so it has the last word on the arms.
- Open the card. The package has already searched both models by bone name and filled in the arms and the weapon (Figure 18). In the figure, both models have a bone for the gun, named
ik_hand_gun. If a model has none, the weapon stays empty until you add a bone with Add bone…. - Check every chain under Source Chains and Target Chains. If one is empty or holds the wrong bones, pick a chain from its drop-down, or empty it with × and use Add bone… to add the upper arm, the forearm and the hand, in that order.
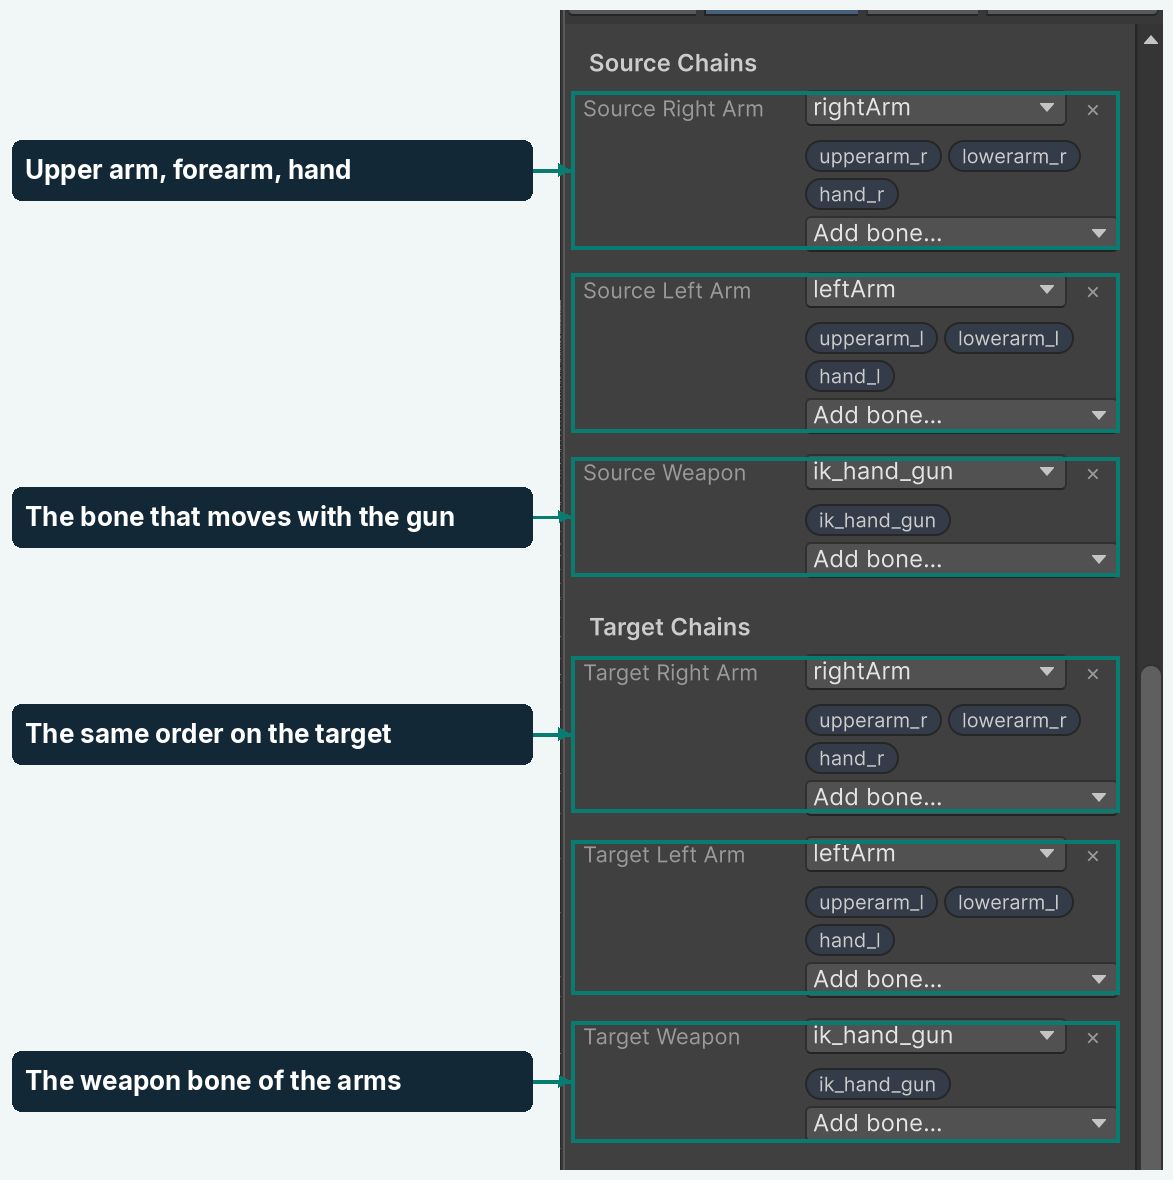
Figure 18
The dot turns green when all six chains are filled. After you rename bones or change a model, click Remap in the Profile tab to search again. A chain the search can’t fill keeps the bones it has.
Check and adjust the arms
- Click the Bake tab and click a clip. The target arms follow the source’s weapon (Figure 19).
- Click Play and watch both hands through the whole clip.
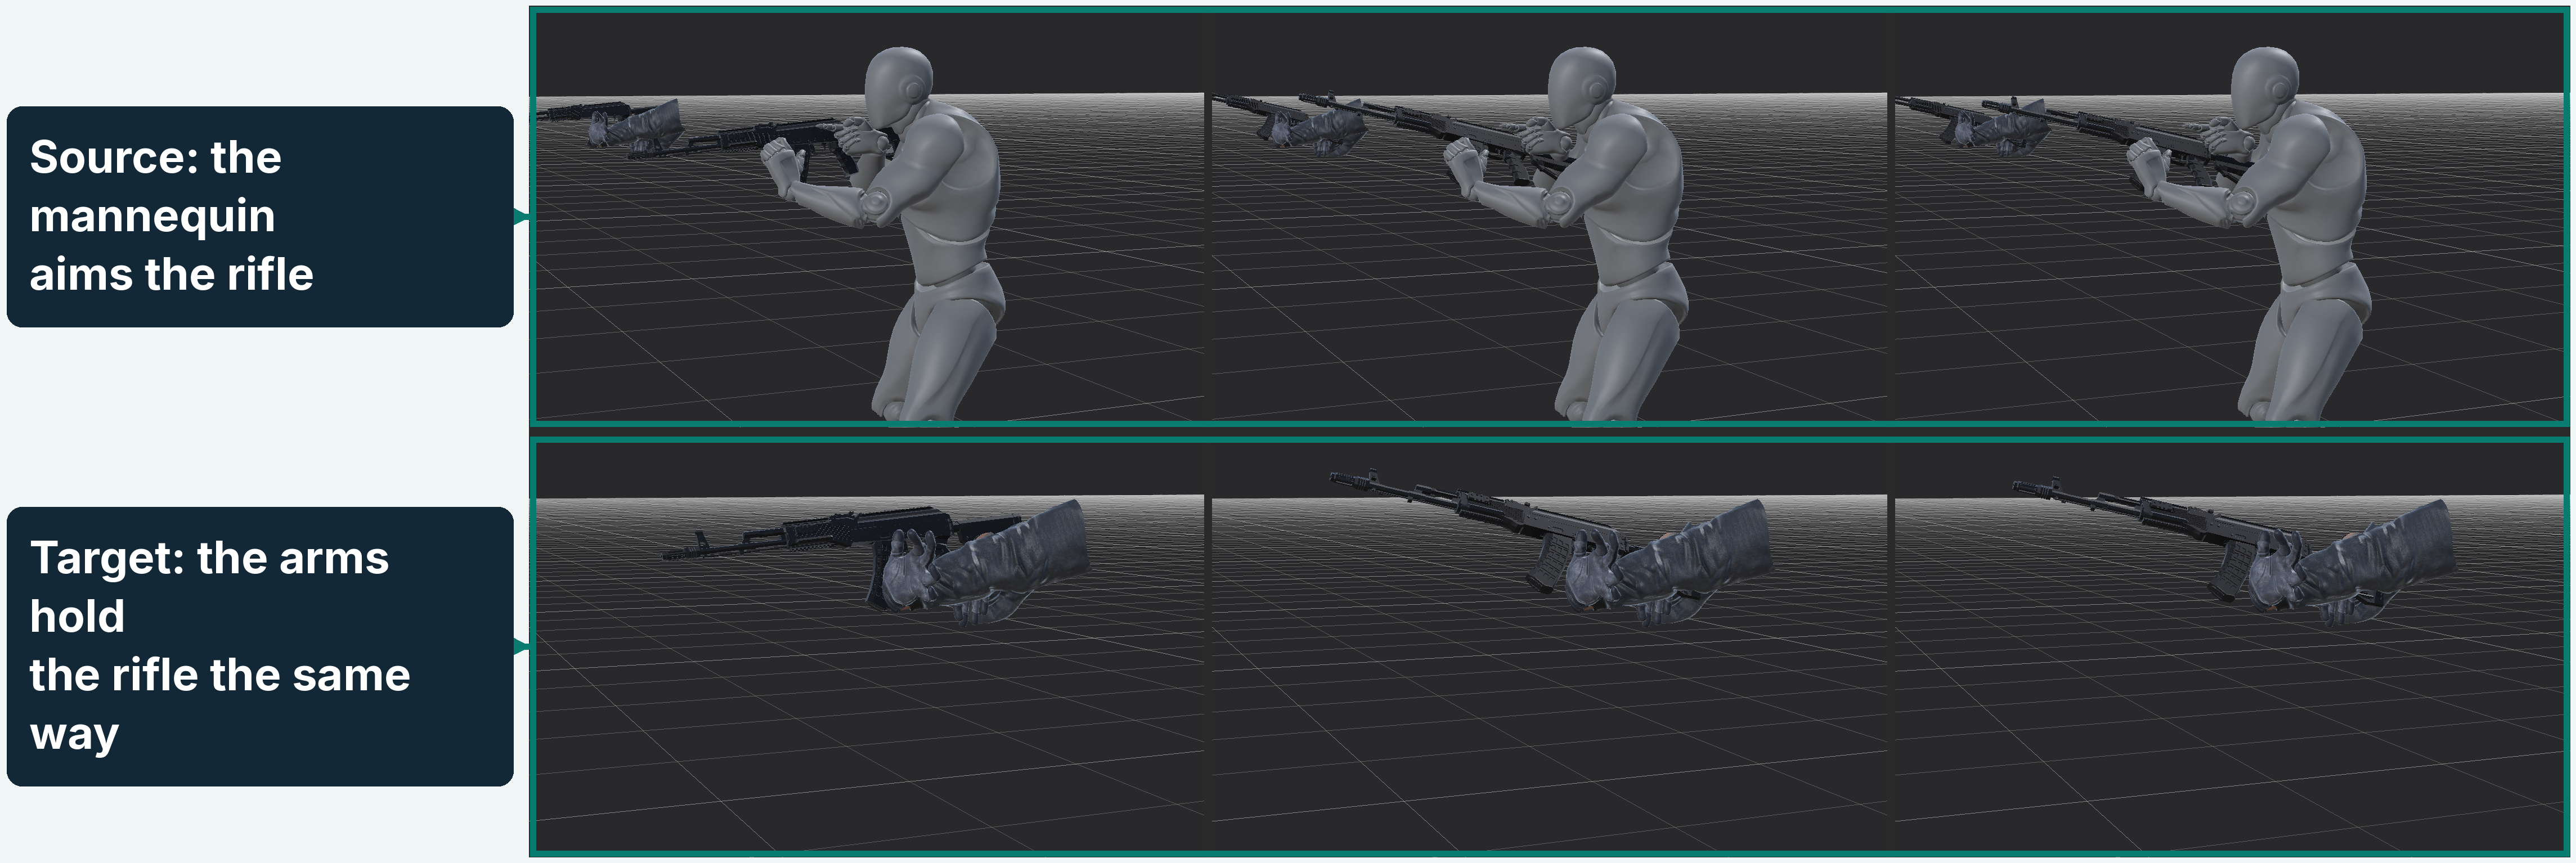
Figure 19
Here’s what the feature does. The target weapon copies the movement of the source weapon. The hands hold the target weapon the way the source’s hands hold the source weapon. The arms bend to reach the hands.
To adjust the result, change these settings on the FPS Animation Retarget card:
- Weapon Offset: moves the weapon, and both hands with it. Use it to put the gun where your camera expects it.
- Right Hand Offset and Left Hand Offset: move one hand on the weapon.
- Right Pole Offset and Left Pole Offset: move the point an elbow aims at. Use them to tuck an elbow in or push it out.
Arms models are rarely humanoid, so bake with Rig Type set to Generic.
Fix a weapon that sits badly in the hands
The feature copies where the source’s weapon bone goes, so the target only looks right when the weapon sits right in the source’s hands. A rifle that floats in front of the face or points the wrong way is a problem with the weapon’s placement on its bone, not with the retargeting. Fix it on the source first:
- Put the weapon model under the source’s weapon bone, with its local position and rotation at
0. This is the starting point. - Play the clip in the preview and stop on a frame where both hands hold the weapon, such as the aim.
- Check the weapon’s direction first. It should point away from the character, along the arms. If it points up, down or backward, turn it by a quarter turn around one axis at a time,
90or-90, until the barrel points the right way. - Then move the weapon along the bone’s axes in small steps of about
0.05. Move it until the front hand wraps the handguard and the rear hand sits on the grip. - Look at it from the side and from above, and check a second frame, such as the reload. A weapon that fits one frame but not another has the wrong pivot, not the wrong offset.
- Keep the values you end with. In the figure, the rifle needed a position of
(0.1, 0, -0.05)and no turn.
Once the source looks right, the target follows. If the target’s weapon still sits a little off, use Weapon Offset on the card, and Right Hand Offset or Left Hand Offset to move a single hand. Don’t compensate on the target for a weapon that is wrong on the source.
First-person arms to other arms
Use this to move animation between two arms models, such as from an arms pack onto your own arms. Set up the profile the same way as in Full body to first-person arms.
Arms models differ in several ways. Here’s how each one is handled:
- A shoulder bone on only one model: this works. The arms are matched from the hand back, so an extra shoulder bone is skipped.
- Different weapon bone names: this works. You pick the weapon bone on each model, whatever it’s called.
- Weapon bones that point different ways: this works. The target weapon copies how far the source weapon turns from its own starting direction.
- Different arm lengths: the hands still hold the weapon, and the arms bend to reach. If an arm stretches straight, move the weapon closer with Weapon Offset.
- A different camera height or root position: the weapon keeps the same distance from the model’s root as on the source. Move it with Weapon Offset.
- Fingers: the FPS card doesn’t move fingers. Keep the finger cards the profile made, or add Basic Retarget cards for the finger chains.
FPS Animation Retarget needs a weapon bone on both models. If one model has none, you have two options. Pick the hand that holds the gun as its weapon bone, then check the preview. Or remove the FPS card and use Basic Retarget cards for the arms. They copy how the arms turn, but the hands may not meet the weapon.
Animals
The package recognizes four-legged skeletons by names such as front leg, hind leg, tail, ear and jaw. Retarget between two animals the same way as in Generic to generic.
- Each leg gets an IK Retarget card with Use Chain Ik turned on. This lets legs with many bones place their paws or hooves where the source’s land.
- The front legs use the
rightArmandleftArmchains. - Tails, ears and jaws get their own cards when both animals have them.
When a paw slides or floats, see Characters of different sizes. When a knee bends the wrong way, see An elbow or knee bends the wrong way.
Characters of different sizes
Big and small characters need no extra steps. The package measures both skeletons and scales travel to fit. A target twice as tall steps twice as far.
When feet slide or float:
- Check the leg cards. They’re IK Retarget cards, which place each foot where the source’s foot is, scaled to the target’s size. Keep Ik Weight at
1. - If a straight leg pops or locks, lower Max Reach Multiplier a little, such as from
0.98to0.95. - If the whole body floats or sinks, open the Root/Pelvis Retarget card of the pelvis and change Offset. The axes follow the pelvis’s parent bone, so try one axis at a time and watch the preview.
- If a hand misses a spot it should touch, change Effector Offset on that arm’s card.
Scale Weight on each card decides how much the size difference counts. At 1, travel is scaled to the target’s size. At 0, the target moves the same distances as the source.
Characters that stand in different rest poses
A rest pose is the pose a character stands in without animation. The T-pose has the arms straight out. The A-pose has them angled down. The package compares every frame with each character’s rest pose. When the rest poses differ, limbs come out at the wrong angle. A typical sign is that the target’s arms are always too high or too low.
Fix it by giving both characters the same starting pose. For humanoid characters:
- Open the Profile tab.
- Click T-Pose next to Source Pose. The package saves a clip named after the model, such as
Hero_TPose, next to the model and assigns it (Figure 20). - Click T-Pose next to Target Pose.
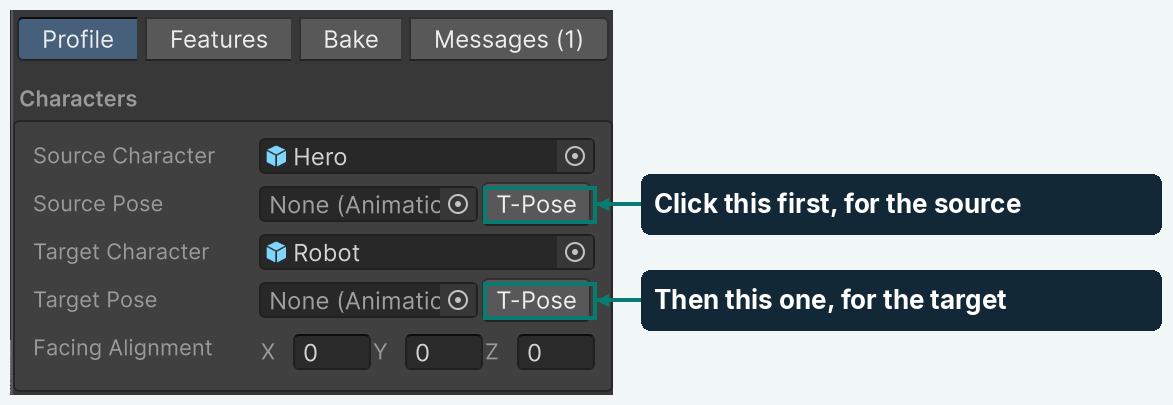
Figure 20
The preview updates, and the arms line up with the source. You can also make a pose clip without a profile: select one model in the Project window and choose Tools > Advanced Retarget > Generate T-Pose Clip.
Make your own pose clip (Advanced)
For a generic character, T-Pose records the pose the model is built in. It can’t straighten the arms of a generic model. Make the pose yourself instead:
- Drag the generic model into a scene and select it.
- Choose Window > Animation > Animation. Click Create and save a new clip.
- Click the record button. Turn the arm and leg bones until the pose matches the other character’s rest pose.
- Stop recording. Assign the clip to Source Pose or Target Pose.
Props and weapons
There are two separate jobs: showing a prop while you preview, and moving a prop bone in the baked clip.
Show a prop in the preview
Open Clip Item in the Profile tab (Figure 21):
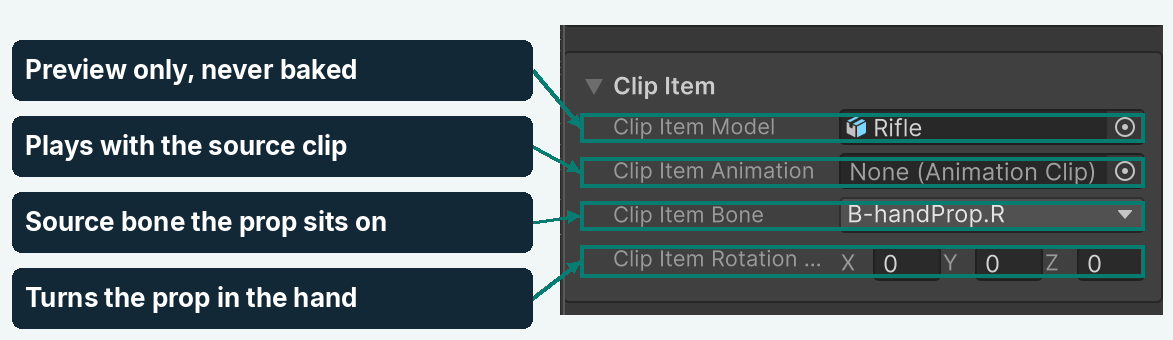
Figure 21
- Clip Item Model: the prop, such as a rifle model.
- Clip Item Animation: an optional clip for the prop, such as a magazine dropping out. It plays together with the source clip.
- Clip Item Bone: the source bone the prop sits on, usually a hand or a weapon bone. In the figure it’s the dummy’s prop bone,
B-handProp.R. - Clip Item Rotation Offset: turns the prop so it sits right in the hand.
The prop is only there to help you judge the animation. It’s never part of a baked clip.
Move a weapon bone in the baked clip
When both skeletons have a weapon bone, add a Copy Bone card:
- In the Features tab, click Add Feature and choose Copy Bone Feature.
- In Copy From, pick the source’s weapon bone.
- In Copy To, pick the target’s weapon bone (Figure 22).
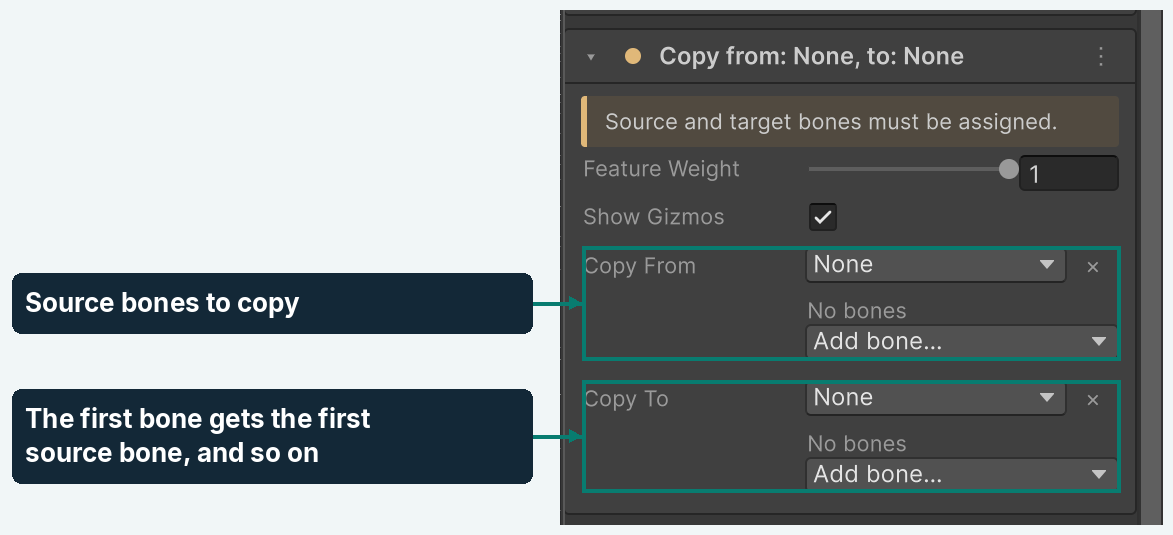
Figure 22
The target bone now copies the source bone’s position and turning, measured from each character’s root. It isn’t scaled to the target’s body size. On a much bigger or smaller target, the hands may not reach it. For first-person arms, use FPS Animation Retarget instead.
Bake with Rig Type set to Generic to keep weapon bones. Humanoid clips don’t store them.
Fix a pose by hand
Sometimes one bone is a little off: a hand turned too far, a tilted head or hips that sit too low. A Transform Modifier card corrects it.
- In the Features tab, click Add Feature and choose Transform. A card named Transform Modifier appears at the bottom of the list.
- In Target Chain, pick the bone to fix. You can add several bones; each one gets the same change.
- Set Rotation Mode to Add.
- Change Rotation a little at a time and watch the preview (Figure 23).
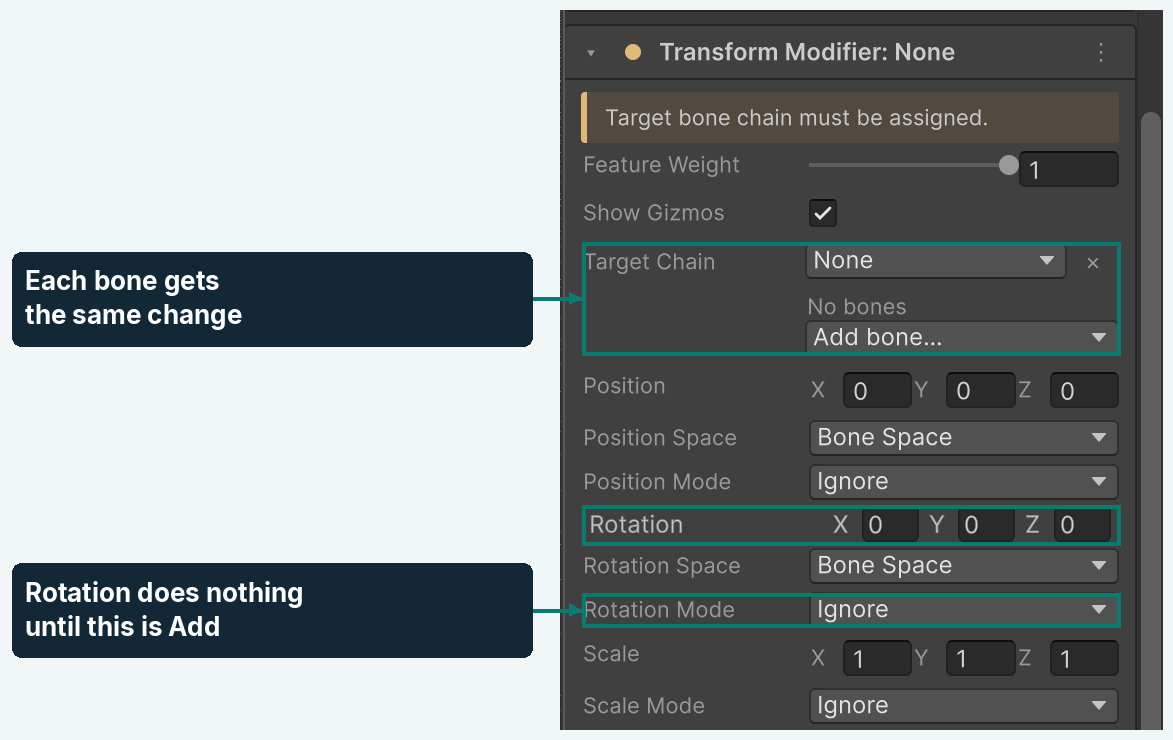
Figure 23
Use Position with Position Mode set to Add to move a bone, and Scale with Scale Mode to resize one. Keep the card below the card that moves the same bone. Otherwise, the other card overwrites the fix. Every setting is explained in Copy Bone, Transform Modifier and Mirror.
Mirror an animation
A Mirror Retarget card gives each bone in its chain the mirrored pose of its partner on the other side. A bone with “Left” in its name takes the flipped pose of the bone with “Right” in its name. Use it to make a left-handed version of a right-handed clip, or to copy a good arm onto the other side.
To mirror one limb:
- In the Features tab, click Add Feature and choose Mirror.
- In Target Bone Chain, pick the chain to change, such as
leftArm. The left arm now copies the right arm, mirrored. - Leave Axis at
1, 0, 0. That mirrors left and right on a character that faces forward along Z (Figure 24).
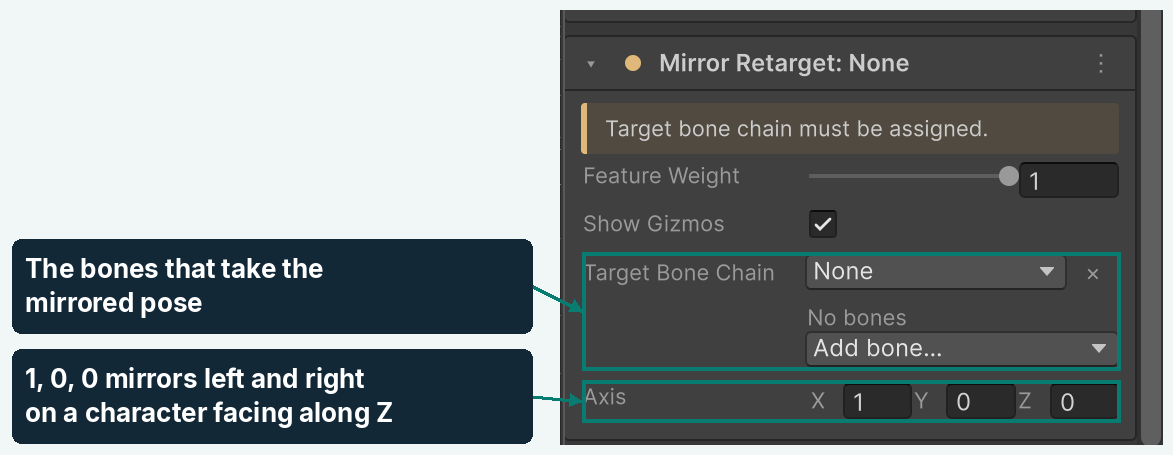
Figure 24
To mirror the whole body:
- Add one Mirror card at the bottom of the list.
- Use Add bone… to put every bone in its chain: both arms, both legs, the hips, the spine, the neck and the head.
- Play a clip. Left and right swap in one go, because the card reads every pose before it changes any.
Bones in the middle of the body, such as the spine, mirror onto themselves. That flips their twist and lean. A bone with a side in its name but no partner also mirrors onto itself. The Help list names those bones.
The package finds partners by side words and markers, such as Left and Right, left and right, _L and _R, _l and _r, l_ and r_, and .L and .R.
Bake many clips at once
- In the Project window, select the clips. You can also select models; all of their clips are included.
- Choose Tools > Advanced Retarget > Retarget Selected Clips (Figure 25). The Retarget Animations window opens with your clips (Figure 26).
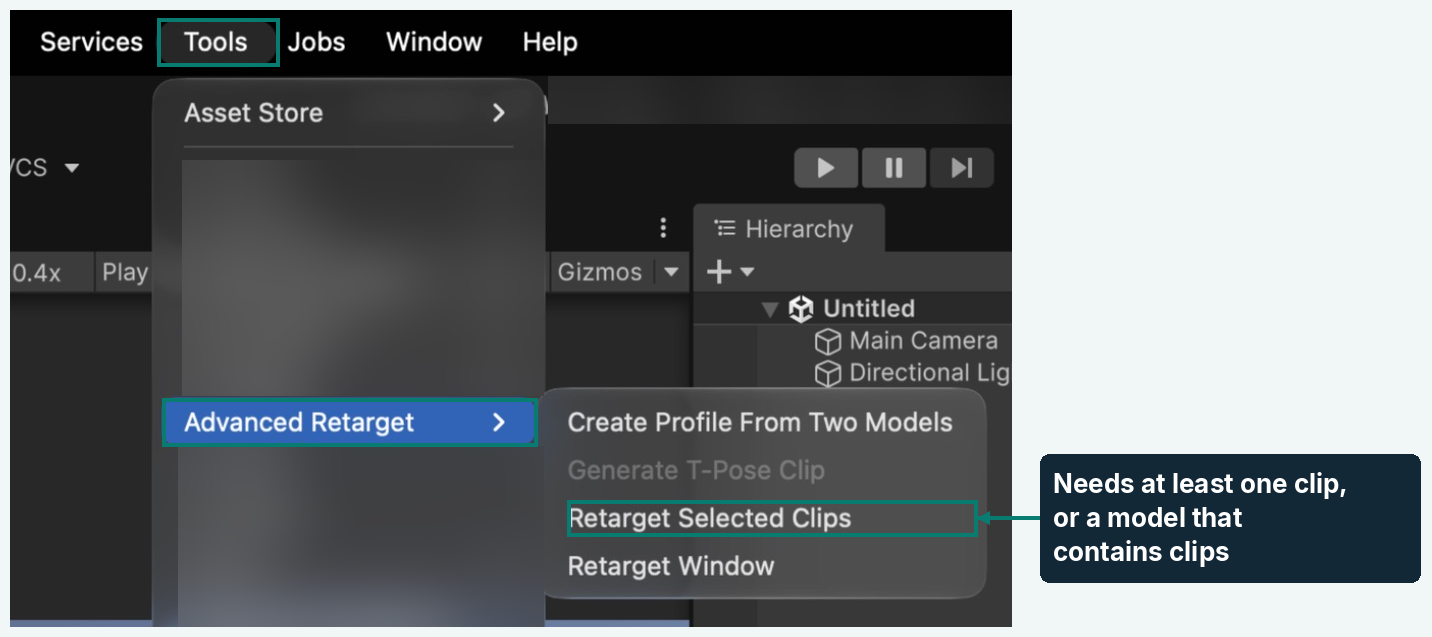
Figure 25
- Pick the Profile at the top.
- Check the settings. They work the same as on the Bake tab.
- Click Bake All.
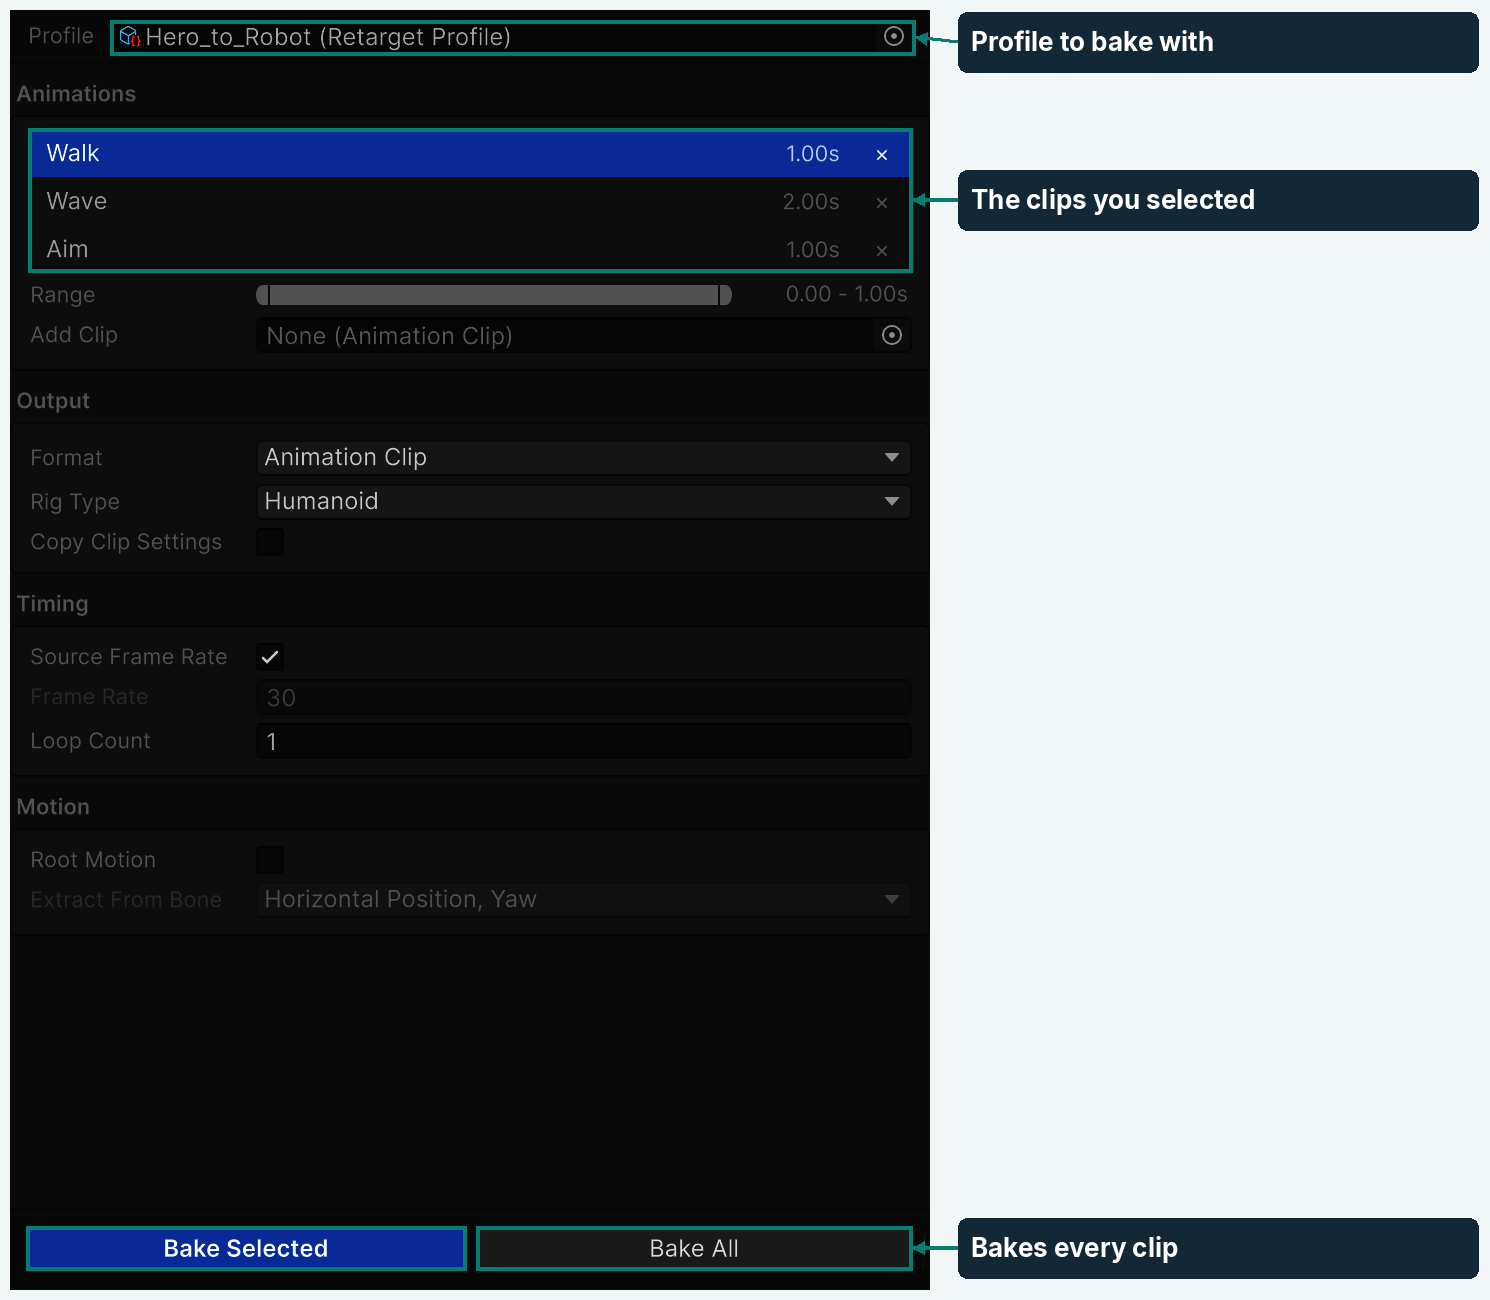
Figure 26
Bake All bakes every clip at its full length. Bake Selected bakes only the highlighted clip, using its Range. The Bake tab of the Retarget window has the same two buttons for its own list.
Tip: Turn on Copy Clip Settings before you bake a batch, so looping clips stay looping.
Export an FBX file
- Click the Bake tab and set Format to Fbx (Figure 27).
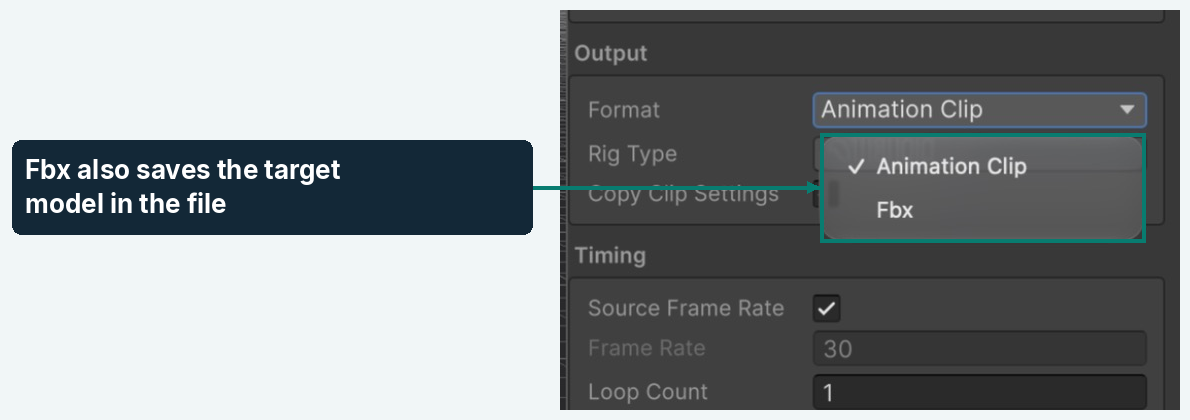
Figure 27
- Click Bake Selected or Bake All.
The FBX file holds the target model and the baked animation. The package sets the file’s import settings to match the target: Humanoid with the target’s avatar when Rig Type is Humanoid, and Generic otherwise. You can open the file in Blender, Maya or another 3D program to polish the animation.
- An FBX bake never replaces an earlier file. It adds a number to the name instead, such as
Robot_Walk 1.fbx(Figure 28). Delete the old files you don’t need.
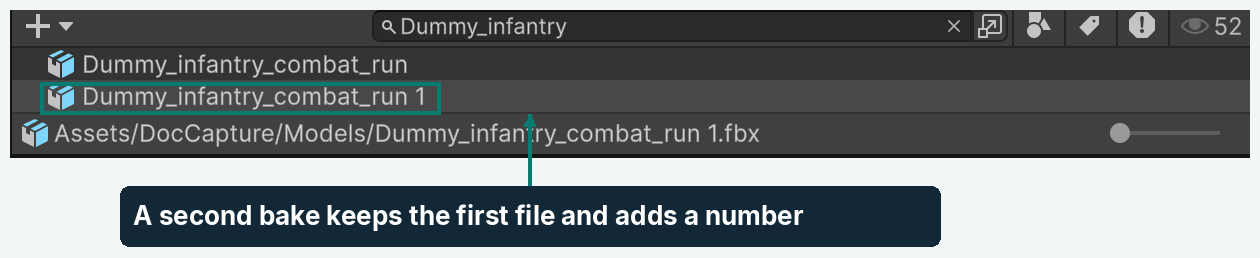
Figure 28
- In an FBX file, root motion is stored as movement of the model’s top object. When you want Unity’s root motion, the Animation Clip format is the simplest choice.
- Copy Clip Settings sets Loop Time in the FBX import settings. Animation events aren’t kept in FBX files.
- A Humanoid FBX needs the target’s avatar to be saved in the project, such as the avatar Unity makes when it imports the model.
Skeletons that face different ways
Most skeletons face the same way, and you can skip this page. Some are built facing another direction inside their model. For example, one skeleton’s front points along its Z axis and the other’s along its X axis. The target then bends sideways when the source bends forward, and root motion walks sideways.
Fix it with Facing Alignment in the Profile tab:
- Play a clip with clear forward movement, such as a walk.
- Enter a quarter turn around the up axis in Facing Alignment: set Y to
90. - Watch the preview. If the target now walks backward or to the other side, try
-90, then180. - Keep the value where the target moves and bends the same way as the source (Figure 29).
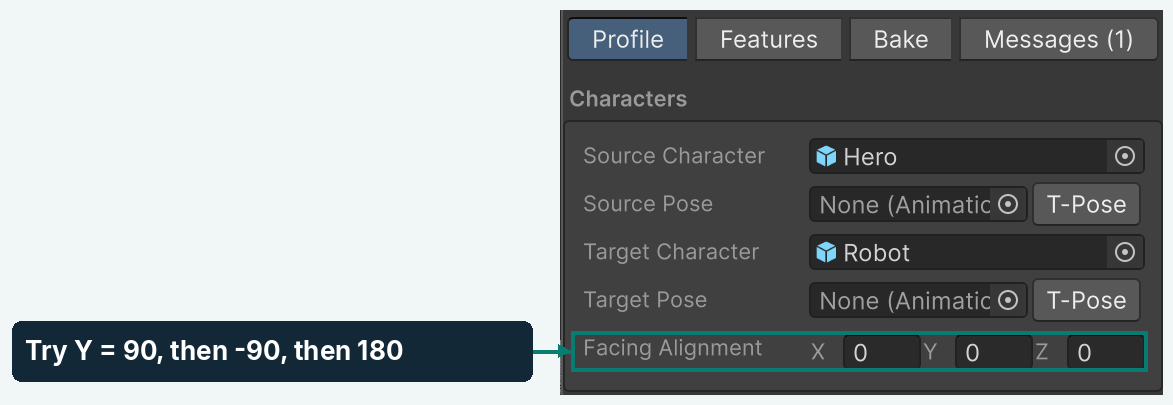
Figure 29
Facing Alignment turns the source’s movement, turning and root motion to the target’s facing. The preview, bakes and the Dynamic Retargeter all use it. It doesn’t turn the target’s rest pose. Each bone still starts from the target’s own rest pose.
Note: Where the characters stand or face in a scene doesn’t matter. The package measures everything from each character’s own root. Facing Alignment is only for skeletons that face different ways inside their models.
Use a skeleton no preset knows
When the package doesn’t recognize the bone names, it shows a message when you create the profile (Figure 30). The profile is still made, but it has no features (Figure 31). Add the features yourself:
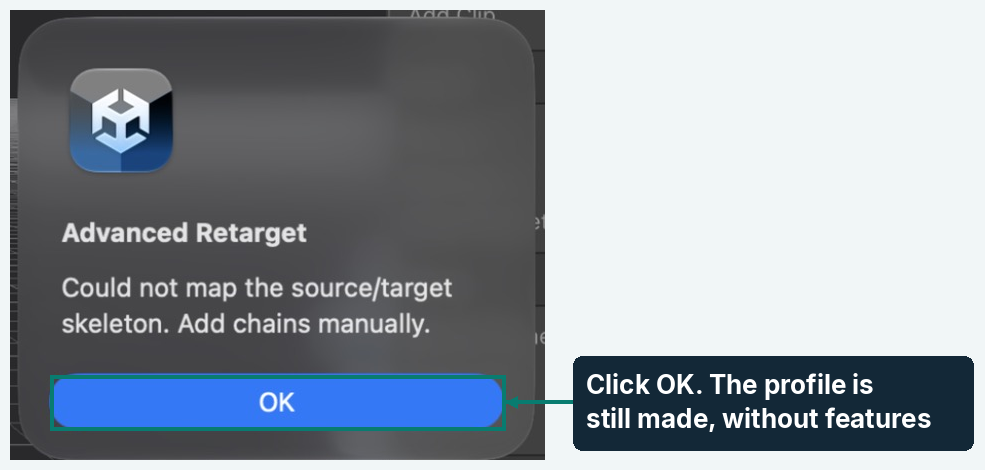
Figure 30
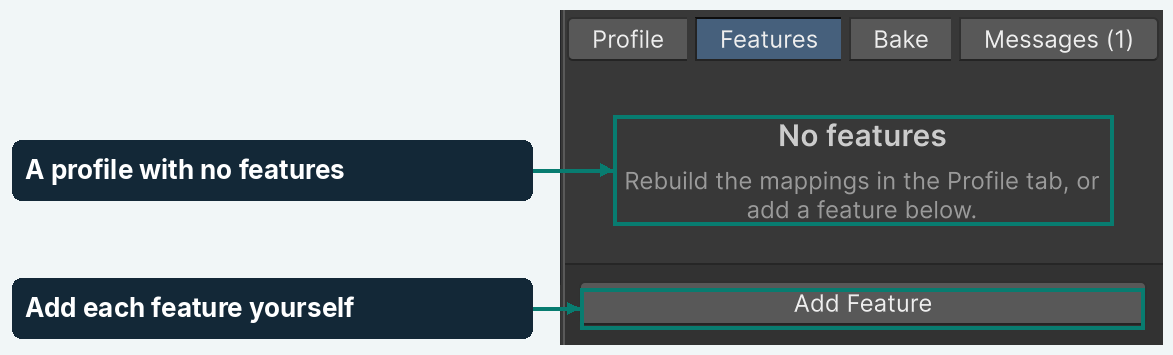
Figure 31
- Open the Features tab and click Add Feature.
- Choose Root Pelvis for the hips. Use Add bone… to put the hips bone in the source chain and in the target chain.
- Choose Ik for each arm and each leg. Add the bones from the body outward: upper arm, forearm, hand, or thigh, shin, foot.
- Choose Basic for the spine, the neck and head, each finger and the tail.
- Play a clip in the preview and check each part of the body.
The two chains of a card don’t need the same number of bones. A three-bone spine can drive a five-bone spine. The movement is spread evenly, so the first and last bones line up.
Tip: Add the hips first, then the spine, then the limbs. Cards run from top to bottom, so limbs then follow a body that’s already in place.
How root motion works
Root motion is the travel of the whole character: walking forward, jumping up or turning around. Unity stores it as movement of the character’s root. When Apply Root Motion is on in the character’s Animator, that travel moves the character’s GameObject.
Many source clips keep their travel in the hips instead. The hips walk away while the root stays behind. While it bakes, the package can move that travel from a bone onto the root.
Your source clip is one of three kinds:
- It stays in place. Nothing travels, such as an idle or an attack on the spot. Leave Root Motion off in the Bake tab.
- It already has root motion. Turn Root Motion on. The bake carries the travel over and scales it to the target’s size.
- Its hips or a root bone travel. Turn Root Motion on and set Root Motion Bone in the Profile tab. The bake moves the travel from that bone onto the root.
With Root Motion off, the travel stays in the bones, the same way the source has it.
Note: The bake carries the travel over at the target’s size. A target twice as tall travels twice as far, so its feet don’t slide.
Bake a walk with root motion
- In the Profile tab, set Root Motion Bone to the target bone that moves forward when the target walks (Figure 32). For most characters, that’s the hips or the pelvis. On skeletons with a separate root bone that carries the travel, such as Unreal Engine skeletons, pick that root bone.

Figure 32
- In the Bake tab, click the walk clip in the Animations list.
- Turn on Root Motion (Figure 33).
- Leave Extract From Bone at Horizontal Position, Yaw for walks, runs and turns.
- Turn on Copy Clip Settings, so the loop setting carries over.
- Click Bake Selected.
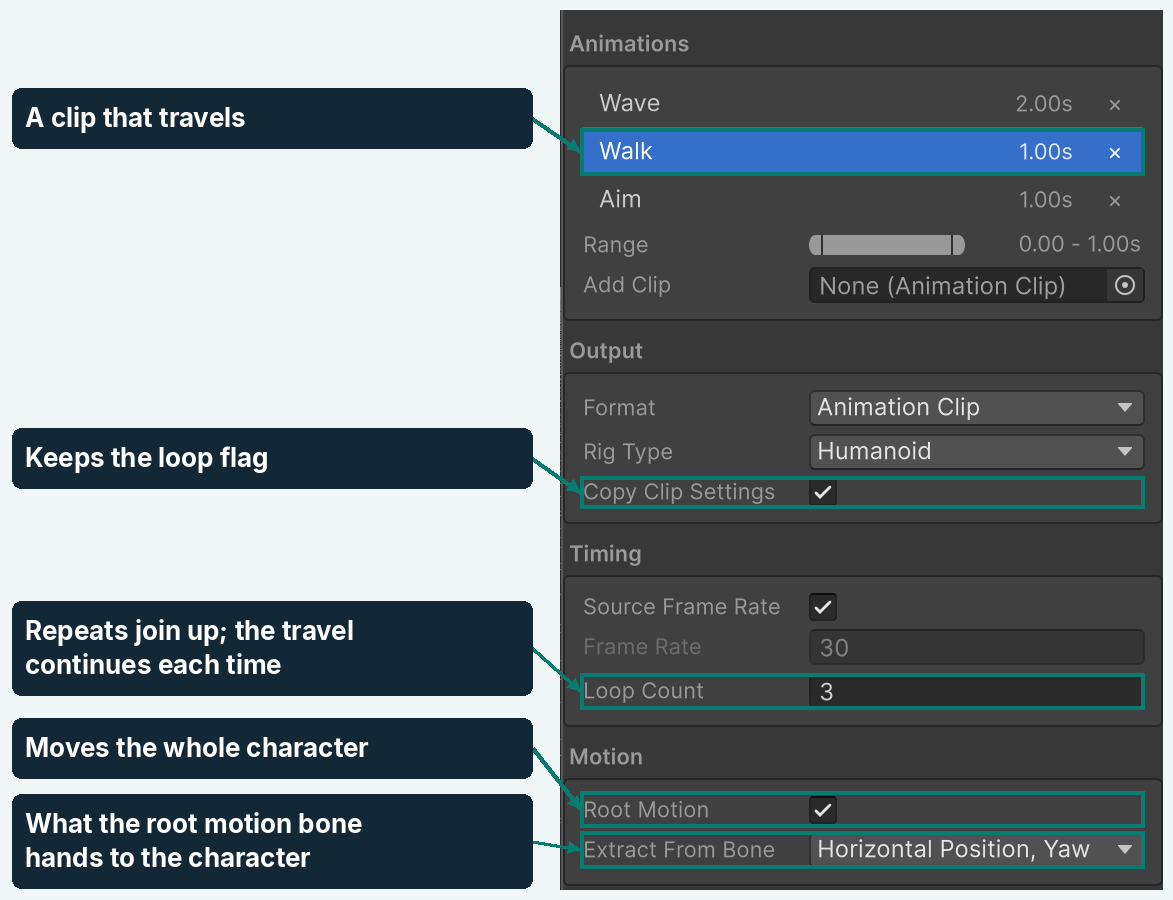
Figure 33
To check the result, give the clip to the target in a scene, as in Find and play the baked clip. Select the target and turn on Apply Root Motion on its Animator. Enter Play Mode. The target walks forward instead of walking on the spot.
Choose what moves the character
Extract From Bone decides which parts of the bone’s movement go onto the root. The other parts stay in the bone, as part of the pose (Figure 34).
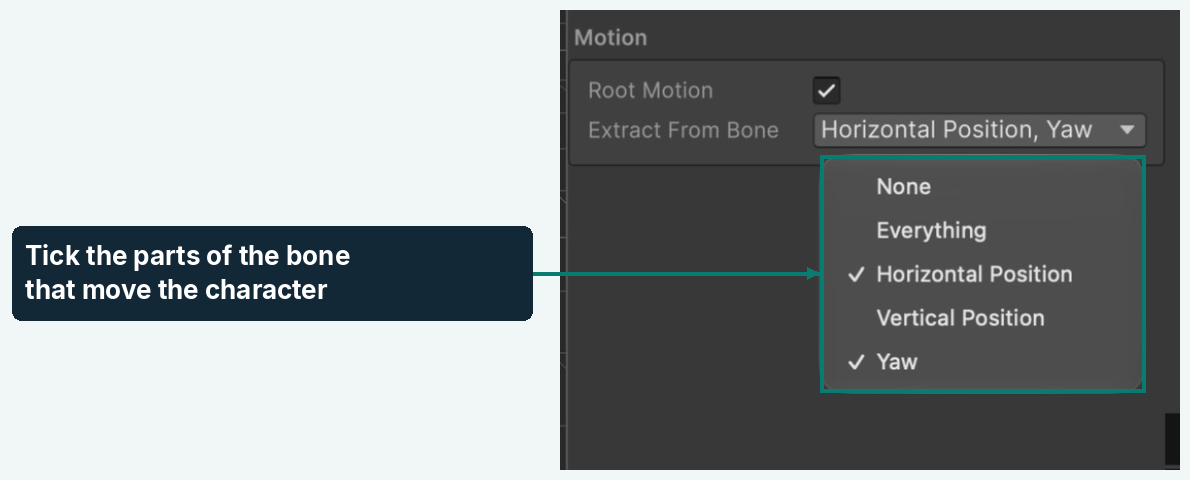
Figure 34
- Horizontal Position: travel along the ground. Use it for walks, runs and side steps.
- Vertical Position: travel up and down. Use it when the whole character should rise, such as for climbs, jumps onto a ledge or flying. Leave it off for walks. Otherwise, the root bobs up and down with every step.
- Yaw: turning left or right. Use it for turns on the spot and curved walks.
Leaning forward, backward or sideways always stays in the pose. Unity’s root motion only turns around the up axis.
Common choices:
- Walk, run or side step: Horizontal Position and Yaw.
- Turn on the spot: Yaw.
- Ladder climb: Vertical Position.
- Jump that lands on a higher floor: Horizontal Position, Vertical Position and Yaw.
- Jump that lands where it started: Horizontal Position and Yaw. The jump stays in the pose.
Warning: With Yaw selected, the target’s root and the parents of Root Motion Bone must have even scale, with the same X, Y and Z values. Otherwise the bake stops with a message. Make the scale even in your 3D program, or deselect Yaw.
Use root motion in your game
- Turn on Apply Root Motion on the character’s Animator (Figure 35). Without it, the character animates on the spot.
- Root motion moves the GameObject that has the Animator. If a script also moves the character, both movements add up. Use one of them, or take over root motion in a script with Unity’s
OnAnimatorMovemessage. - For Humanoid clips, Unity’s clip settings also decide which travel the Animator applies. Select the baked clip and check Root Transform Rotation, Root Transform Position (Y) and Root Transform Position (XZ) in the Inspector (Figure 36). Bake Into Pose keeps that part in the pose instead of moving the character.
- Root motion and Loop Count work together. Each repeat continues from where the last one stopped. See Repeat or trim a clip.
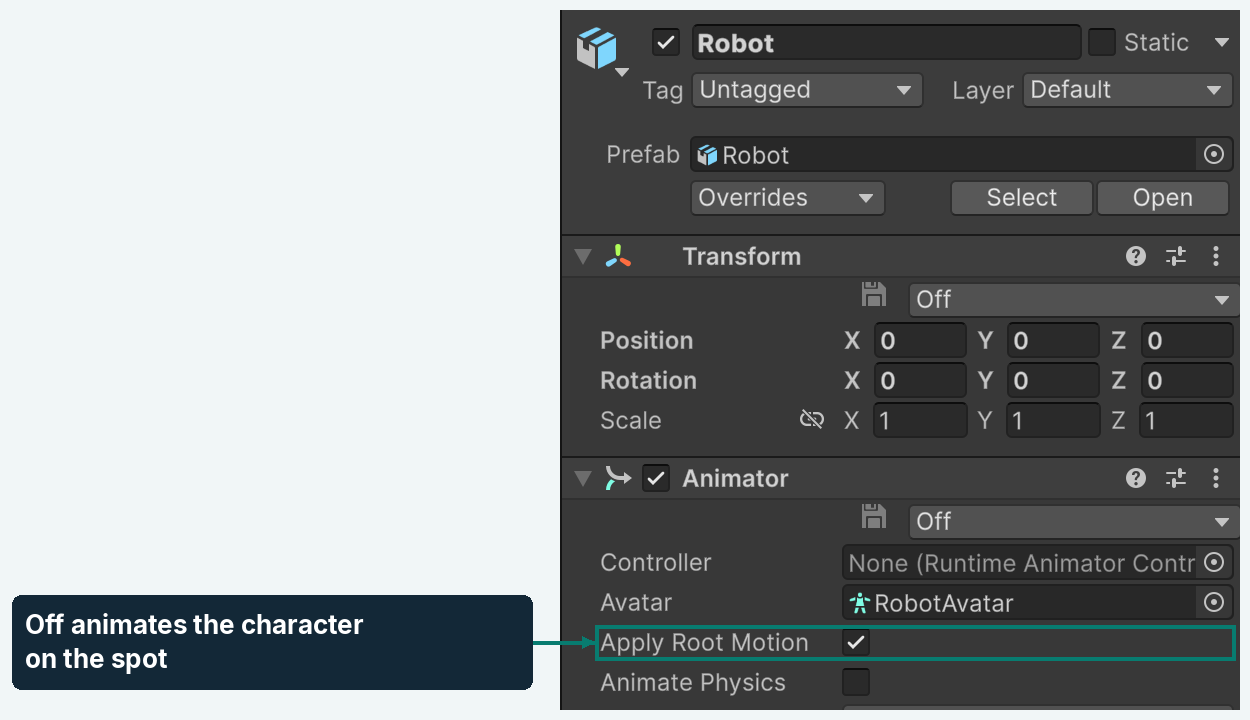
Figure 35
Keep looping clips looping
A looping clip, such as a walk cycle or an idle, ends in the same pose it starts with. To keep it looping after the bake:
- Turn on Copy Clip Settings in the Bake tab.
- Bake the whole clip. Use Bake All, or drag both ends of Range to the start and end of the clip before you click Bake Selected.
Copy Clip Settings copies Loop Time, Loop Pose and the source clip’s other loop and root transform settings. It also copies the animation events.
Without it, the baked clip doesn’t loop. To fix that later, select the baked clip and turn on Loop Time in the Inspector (Figure 36).
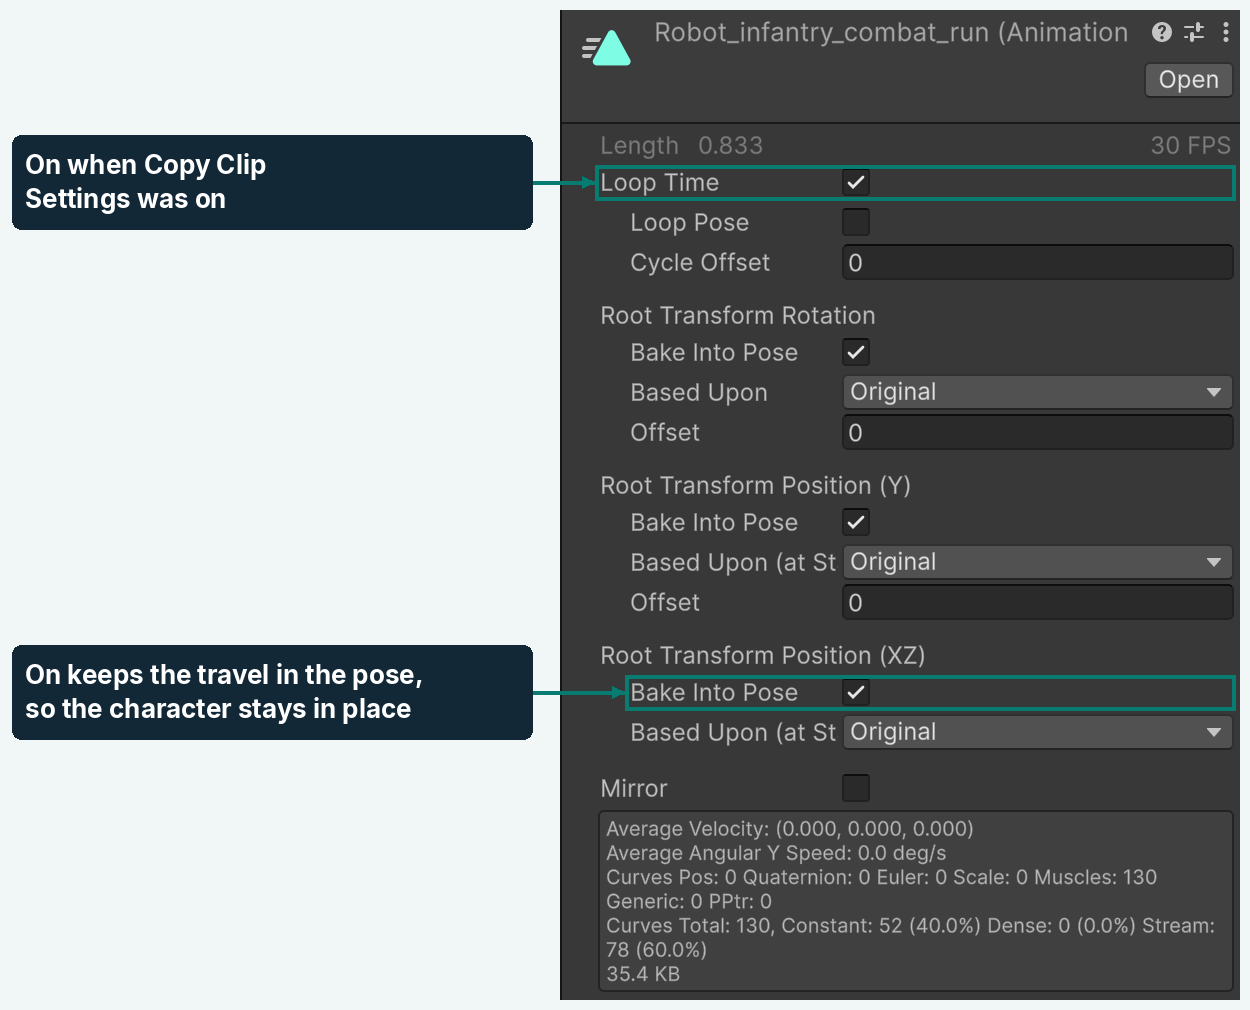
Figure 36
Watch for these cases:
- A trimmed range never loops. A part of a loop doesn’t end where it starts, so the package turns Loop Time off.
- A pop at the end of the source loop stays. If the source’s last frame doesn’t match its first, the baked clip has the same jump. Turn on Loop Pose on the baked clip to blend the ends together.
- The character jumps back at the end of each loop. The source travels in its hips, and the bake left that travel in the pose. Bake with root motion. See Bake a walk with root motion.
Repeat or trim a clip
Repeat a clip with Loop Count
Loop Count in the Bake tab plays the clip several times in a row and bakes them into one clip. With 3, a 1-second walk becomes a 3-second walk.
Use it for a longer clip in a cutscene or on a Timeline, or for a walk that covers a set distance. With Root Motion on, each repeat continues from where the last one stopped. The character keeps walking forward instead of jumping back to the start.
Only the parts selected in Extract From Bone continue from one repeat to the next. The other parts start over with each repeat. With Copy Clip Settings on, animation events repeat with every loop.
Bake part of a clip
Drag the ends of Range in the Bake tab (Figure 38) to pick part of the selected clip. The numbers on the right show the start and end times. Use it to cut one swing out of a long combo, or one cycle out of a long take.
- Bake Selected bakes only the range. Bake All always bakes whole clips.
- The baked clip starts at zero, whatever part you picked.
- With Copy Clip Settings on, events inside the range are kept and moved to match.
- Loop Count repeats only the range.
Settings every feature has
These pages explain the settings of each feature. To learn what features are and which one to use, see What features do and Choose a feature.
Every feature starts with these two settings:
- Feature Weight: how strongly the feature moves the target, from
0to1. Set it to0to switch the feature off without removing it. - Show Gizmos: draws the feature’s bones in the preview while Bones is on above the preview. It also draws them in the Scene view when you select a character with a Dynamic Retargeter.
Basic Retarget and Root/Pelvis Retarget
Basic Retarget copies how each bone of the source chain turns onto the target chain. The profile uses it for the spine, neck, head, toes and fingers. Root/Pelvis Retarget is the same card with travel copied as well. The profile uses it for the root and the hips.
- Source Chain: the source bones to read.
- Target Chain: the target bones to move. It may have more or fewer bones than the source chain. The movement is spread evenly, so the first and last bones line up.
- Scale Weight: how much the size difference counts. At
1, travel is scaled to the target’s size. At0, the target moves the same distances as the source. - Translation Weight: how much of the source’s travel is copied, on top of the turning. It’s
0on Basic Retarget, so only turning is copied. It’s1on Root/Pelvis Retarget, so the body also moves up, down and around. - Offset: moves the bones after retargeting, along the axes of their parent bone. Use it to lift or lower the hips.
IK Retarget
IK Retarget places the end of a limb, such as a hand or a foot, where the source’s is, scaled to the target’s size. Then it bends the limb to reach that spot. The profile uses it for arms and legs. It has every setting of Basic Retarget, plus these (Figure 37):
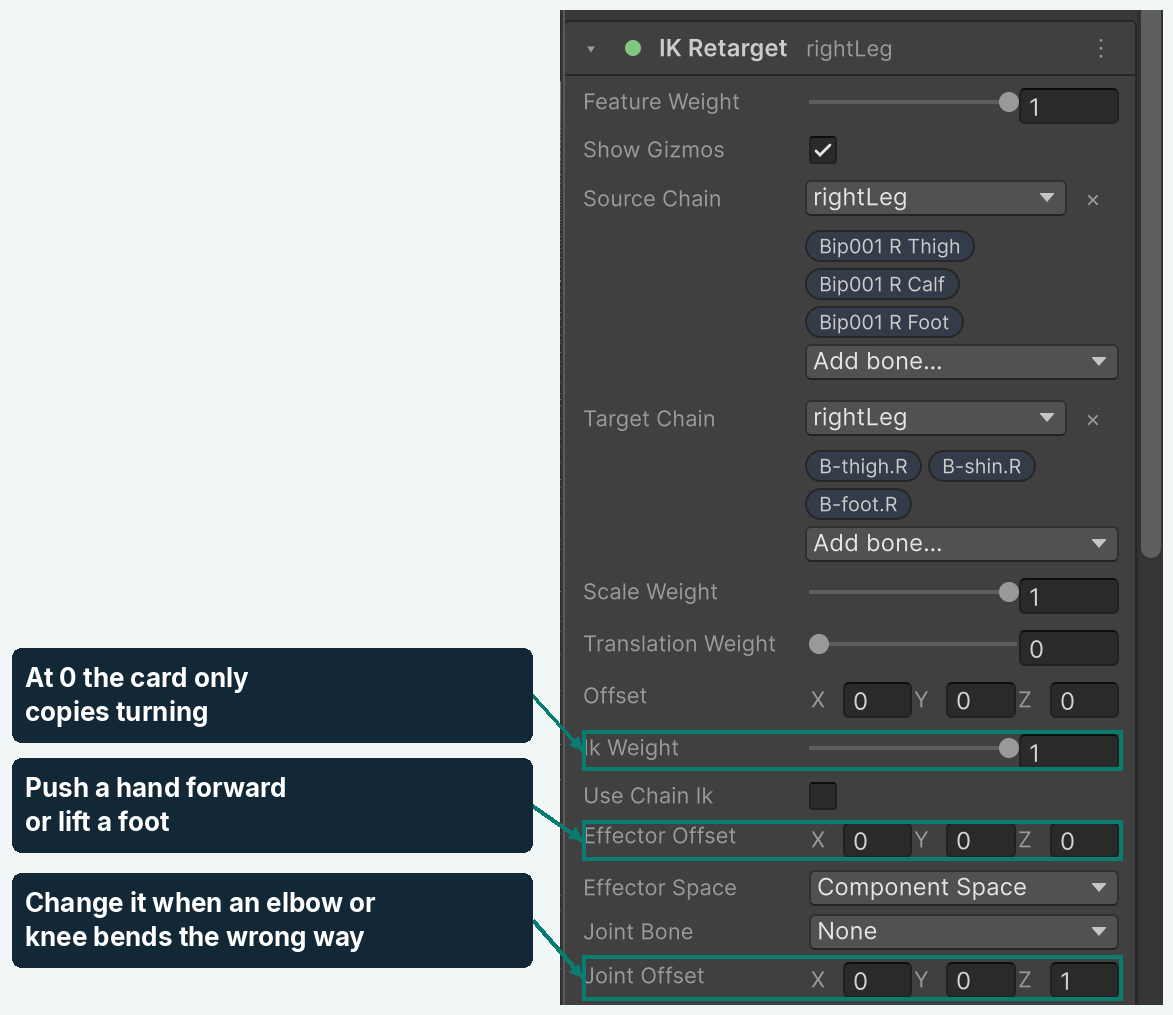
Figure 37
- Ik Weight: how strongly the hand or foot is pulled to the source’s position. At
0, the card only copies turning, like Basic Retarget. - Use Chain Ik: bends limbs with more than three bones, such as animal legs. The profile turns it on where it’s needed.
- Effector Offset: moves the spot the hand or foot reaches for. Use it to push a hand forward or lift a foot.
- Effector Space: the axes Effector Offset uses. Component Space is the default and uses the character’s own axes, so Y is the character’s up. World Space uses the scene’s axes. Bone Space uses the hand or foot bone’s axes, and Parent Bone Space uses its parent’s axes.
- Joint Bone: the elbow or knee bone. When it’s empty, the second-to-last bone of the chain is used.
- Joint Offset: the direction the elbow or knee points. The profile sets elbows to
0, 0, -1and knees to0, 0, 1. At0, 0, 0, the limb keeps the bend of the retargeted pose. Change it when an elbow or knee bends the wrong way. - Pole Weight: how firmly the bend direction is held. Lower it if an elbow or knee flips during the clip.
- Max Reach Multiplier: how far the limb may stretch, as a part of its full length, from
0.1to1. The default is0.98. Lower it if a straight arm or leg pops or locks.
FPS Animation Retarget
FPS Animation Retarget makes a pair of arms hold a weapon the way the source holds it. The setup steps are in Full body to first-person arms.
When you add the card, the package fills its six chains by searching the bone names of both models. Remap in the Profile tab searches again and replaces every chain it can fill.
Under Source Chains and Target Chains:
- Source Right Arm and Source Left Arm: the source’s upper arm, forearm and hand, in that order. An extra shoulder bone in front is fine.
- Source Weapon: the source bone that moves with the weapon.
- Target Right Arm, Target Left Arm and Target Weapon: the same bones on the target.
Under IK Offsets and Pole IK Offsets:
- Right Hand Offset and Left Hand Offset: move a hand on the weapon, along the hand’s own axes.
- Weapon Offset: moves the weapon, and both hands with it, along the target character’s axes.
- Right Pole Offset and Left Pole Offset: move the point an elbow aims at, along the target character’s axes.
Copy Bone, Transform Modifier and Mirror
Copy Bone
Copy Bone copies the position, turning and size of source bones onto target bones, measured from each character’s root. Nothing is scaled to the target’s body size. Its card title shows both bones, such as Copy from: Weapon, to: ik_hand_gun.
- Copy From: the source bones to copy.
- Copy To: the target bones that receive the copy. The first bone copies the first source bone, the second copies the second, and so on.
Transform Modifier
Transform Modifier changes the position, rotation or scale of target bones after the cards above it have run.
- Target Chain: the bones to change. Each bone gets the same change.
- Position, Rotation and Scale: the values to apply.
- Position Mode, Rotation Mode and Scale Mode: Ignore leaves the value alone, and is the default. Add works on top of the current value: positions are added, rotations turn further and scales are multiplied. Replace sets the value outright.
- Position Space and Rotation Space: the axes the value uses. Bone Space uses the bone’s own axes, and is the default. Parent Bone Space uses the parent bone’s axes. Component Space uses the character’s own axes. World Space uses the scene’s axes.
Mirror Retarget
Mirror Retarget gives each bone in its chain the mirrored pose of its partner on the other side. See Mirror an animation.
- Target Bone Chain: the bones that take the mirrored pose.
- Axis: the mirror direction, along the character’s own axes.
1, 0, 0mirrors left and right on a character that faces forward along Z. The largest of the three values, ignoring minus signs, decides the axis. The mirror is always along X, Y or Z.
Bake settings
These settings are on the Bake tab and in the Retarget Animations window. They’re saved on your computer, not in the profile, so each person on a team keeps their own.
Animations
The clip list holds everything you want to bake (Figure 38).
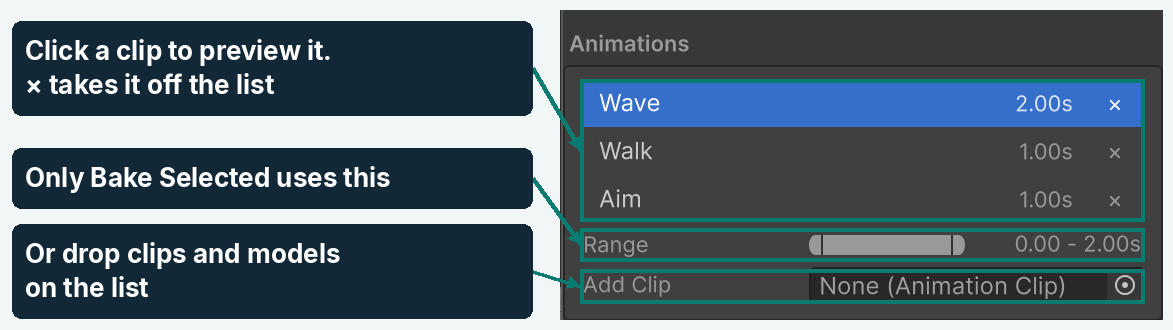
Figure 38
- Clip list: the clips to bake. Click a clip to preview it and to choose it for Bake Selected. Click × to take it off the list; the clip stays in your project.
- Range: the part of the selected clip that Bake Selected uses.
- Add Clip: adds a clip to the list. You can also drop clips or models onto the list.
Output
The Output settings decide what file comes out (Figure 39).
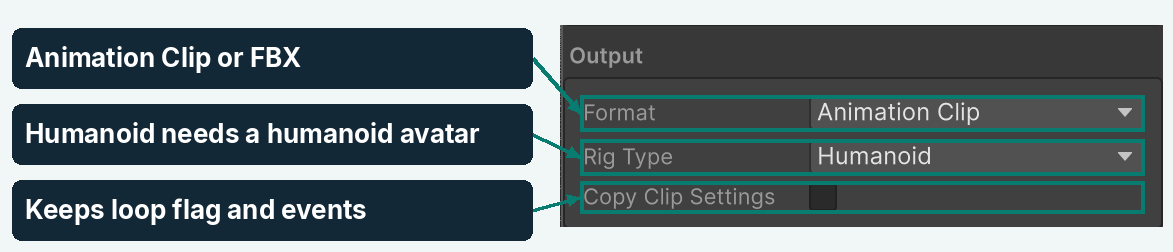
Figure 39
- Format: Animation Clip saves an
.animfile. Fbx saves an FBX file with the target model and the animation. - Rig Type: Humanoid writes a humanoid clip, which needs a target with a valid humanoid avatar. Generic writes the movement of every target bone, including bones a humanoid avatar doesn’t have.
- Copy Clip Settings: copies the loop settings and animation events of the source clip. Off by default.
Bake settings: timing and motion
The Timing and Motion settings sit under Output (Figure 40).
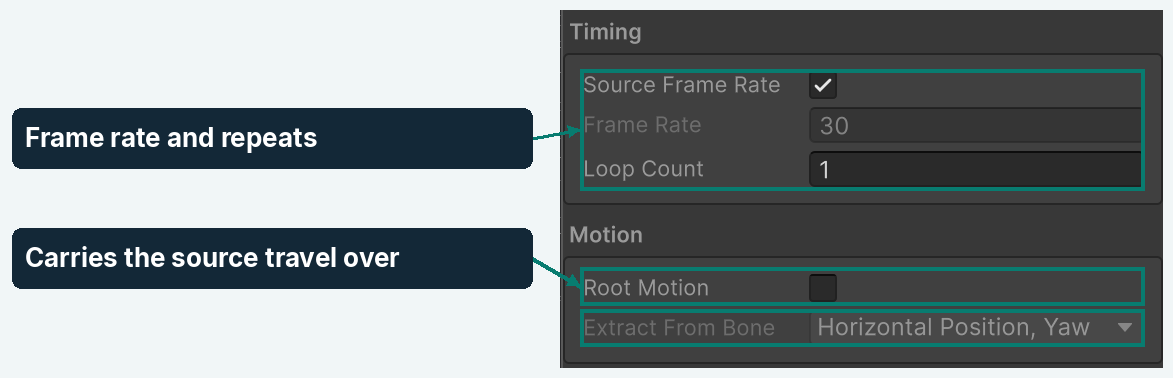
Figure 40
Timing
- Source Frame Rate: bakes each clip at the frame rate of its source clip. On by default.
- Frame Rate: the frame rate to bake at when Source Frame Rate is off, from
1to240. The default is30. Higher values make larger clips. - Loop Count: how many times the clip is repeated in one bake. The default is
1.
Motion
- Root Motion: carries the source’s travel over to the baked clip. Off by default.
- Extract From Bone: the parts of Root Motion Bone’s movement that move the whole character. The default is Horizontal Position, Yaw. You can change it while Root Motion is on.
Retarget while the game runs
Baking is the usual route. The Dynamic Retargeter component is for cases where you can’t bake ahead of time. Examples are animation that’s made while the game runs, or a character that switches who it copies. It retargets every frame.
- Put the source and the target in your scene. Give the source an Animator that plays its animation.
- Select the target. Click Add Component and choose Advanced Retarget > Dynamic Retargeter.
- Assign the source to Animation Source and the profile to Profile (Figure 41).
- Enter Play Mode. The target copies the source.

Figure 41
- Apply Root Motion: moves the target along with the source, scaled to the target’s size and turned by Facing Alignment. On by default. Turn it off when something else moves the target, such as your character controller.
Keep these points in mind:
- The source must keep animating. If you hide the source’s meshes, set its Animator’s Culling Mode to Always Animate. Otherwise, Unity can stop animating a character it doesn’t draw.
- The component runs after the frame’s other animation, so it overrides the target’s own Animator on the bones its cards move.
- If Animation Source or Profile is empty, the Console shows an error and the target doesn’t move.
- Select the target in the Scene view to see the bones of each card whose Show Gizmos is on.
- Each Dynamic Retargeter does retargeting work every frame. Baked clips are ordinary clips and need no extra work while the game runs. Prefer baked clips when you can.
Bake from a script
This page is for programmers. Use RetargetClipBaker to bake clips from your own editor tools, such as a menu command that bakes a whole folder. Put the script in an Editor folder.
using UnityEditor;
using UnityEngine;
using Zal.AdvancedRetarget;
using Zal.AdvancedRetarget.Editor;

static class BakeWalk
{
    [MenuItem("Tools/My Game/Bake Walk")]
    static void Bake()
    {
        var profile = AssetDatabase.LoadAssetAtPath<RetargetProfile>("Assets/Characters/Hero_to_Robot.asset");
        var walk = AssetDatabase.LoadAssetAtPath<AnimationClip>("Assets/Animations/Walk.anim");
        var settings = new BakeSettings
        {
            BakerId = "humanoid",
            UseRootMotion = true,
            CopyClipSettings = true,
            LoopCount = 3,
        };

        if (!RetargetClipBaker.TryCreate(profile, settings, out var baker, out var error))
        {
            Debug.LogError(error);
            return;
        }

        using (baker)
        {
            if (!baker.TryBake(walk, out var result, out error))
            {
                Debug.LogError(error);
                return;
            }

            Debug.Log($"Saved {result.AssetPath}");
        }
    }
}- Create one baker per profile, bake as many clips as you need, then dispose it. Disposing releases the hidden characters the baker uses.
BakerIdis"humanoid"or"generic".OutputTypechooses betweenBakeOutputType.AnimationClipandBakeOutputType.Fbx.TryBake(clip, startTime, endTime, out result, out error)bakes part of a clip.result.Clipis the saved clip for.animoutput. It’snullfor FBX output; useresult.AssetPathinstead.- Set
baker.Progressto receive progress. Returntruefrom it to cancel the bake.
Profiles and runtime from a script
Create a profile
RetargetProfileTools.TryCreateProfile(source, target, out profile, out message) does the same as Create Profile From Two Models. Pass model or prefab assets. It returns false with a message when something is missing. When the rigs could be read but no features could be made, profile is still set, so you can add features to it.
RetargetProfileTools.TryRebuildRigs, TryRebuildMappings and TryRemap match the buttons of the Profile tab. TPoseClipGenerator.TryGenerate(model, folder, out clip, out error) saves a pose clip, like the T-Pose button.
Switch the source at runtime
DynamicRetargeter.Initialize points a running retargeter at a new source.
using UnityEngine;
using Zal.AdvancedRetarget;

public class FollowSource : MonoBehaviour
{
    [SerializeField] DynamicRetargeter _retargeter;
    [SerializeField] RetargetProfile _profile;

    public void Follow(GameObject source)
    {
        if (!_retargeter.Initialize(source, _profile))
        {
            Debug.LogWarning("The profile can't drive this character.", this);
        }
    }
}
Initialize returns true when at least one card of the profile could start. IsRunning tells you whether the retargeter is driving the character.
Add the Dynamic Retargeter to the target in the Editor, and keep its fields filled. Adding it from a script with empty fields logs an error until you call Initialize.
Write your own feature
Your own cards derive from RetargetFeature and return a RetargetFeatureState that does the work each frame. Every class that derives from RetargetFeature appears in the Add Feature menu.
Edge cases
These situations are easy to miss. Each one says what happens and what to do.
Models and skeletons
- A model without a skinned mesh. The package reads bones from a skinned mesh, or from a humanoid avatar. A model with neither can’t be used, and the message says
Model has no SkinnedMeshRenderer and no valid avatar. - A mesh object named like a bone. A mesh called
Mesh_hand_rcan end up in a hand chain, because chains are found by name. Rename the mesh objects in your 3D program and re-import the model. Then click Rebuild Rigs and Rebuild Mappings. You can also empty the chain with × and add its bones again with Add bone…. - A humanoid source with generic clips. A source that has a humanoid avatar only plays humanoid clips. A generic clip leaves it in a neutral pose. Set the clip file’s Animation Type to Humanoid, or the source model’s to Generic.
- Bones on only one of the models. A chain without a partner on the other model gets no card. Its bones keep the pose you see in the preview. Add a card for them if they should move.
- Chains with different bone counts. A three-bone spine can drive a five-bone spine. The movement is spread so the first and last bones line up.
- The source and target were picked the wrong way round. Click Swap in the Profile tab.
- Rebuild Mappings after tuning. Rebuild Mappings replaces the Basic Retarget, IK Retarget and Root/Pelvis Retarget cards, and your changes to them are lost. Use Remap to keep them.
Clips
- A trimmed range never loops. Loop Time is turned off for it, even with Copy Clip Settings on.
- Additive clips. The additive reference pose isn’t copied, because it belongs to the source skeleton. Set a new one on the baked clip if you need it.
- Blend shapes and custom curves. They aren’t baked. Only bone movement is. With Copy Clip Settings on, animation events are kept.
- Weapon and prop bones in Humanoid clips. Humanoid clips don’t store them. Bake with Rig Type set to Generic.
- Re-baking. An
.animbake replaces the old clip in place. An FBX bake always makes a new, numbered file. - Uneven scale with Yaw root motion. The bake stops when the target’s root or the parents of Root Motion Bone have uneven scale. Make the scale even, or deselect Yaw.
Features
- Two cards on the same bone. The lower card wins. Keep fixes such as Transform Modifier below the card they correct.
- Mirror without a partner. A bone with a side in its name but no partner mirrors onto itself. The Help list names those bones.
- Mirror Axis. The mirror always runs along X, Y or Z. Values in between snap to the largest one.
- Copy Bone on characters of different sizes. Copy Bone isn’t scaled, so on a much bigger or smaller target, the copied bone can end up away from the hands.
- Where the characters stand. It doesn’t matter. Results are measured from each character’s own root, so moving or turning a character in a scene changes nothing.
Nothing moves in the preview
Neither character moves
No clip is playing. Click the Bake tab and click a clip in the Animations list. Then click Play under the preview.
The source stands still in a neutral pose
The clip doesn’t fit the source. A humanoid source only plays humanoid clips. A generic source only plays clips made for its own bone names. Select the clip’s file and check its Animation Type in the Rig tab.
The source moves, but the target doesn’t
- Open the Messages tab and read Notifications. Fix every card it names.
- Open the Features tab and look for cards without a green dot.
- Check Feature Weight on the cards. At
0, a card doesn’t move anything. - If the tab has no cards at all, the package didn’t recognize the bones. See Use a skeleton no preset knows.
Create Profile From Two Models is greyed out
The menu needs exactly two models selected in the Project window. Objects in a scene don’t count. Select two model files or prefabs, such as FBX or Blender files (Figure 42).
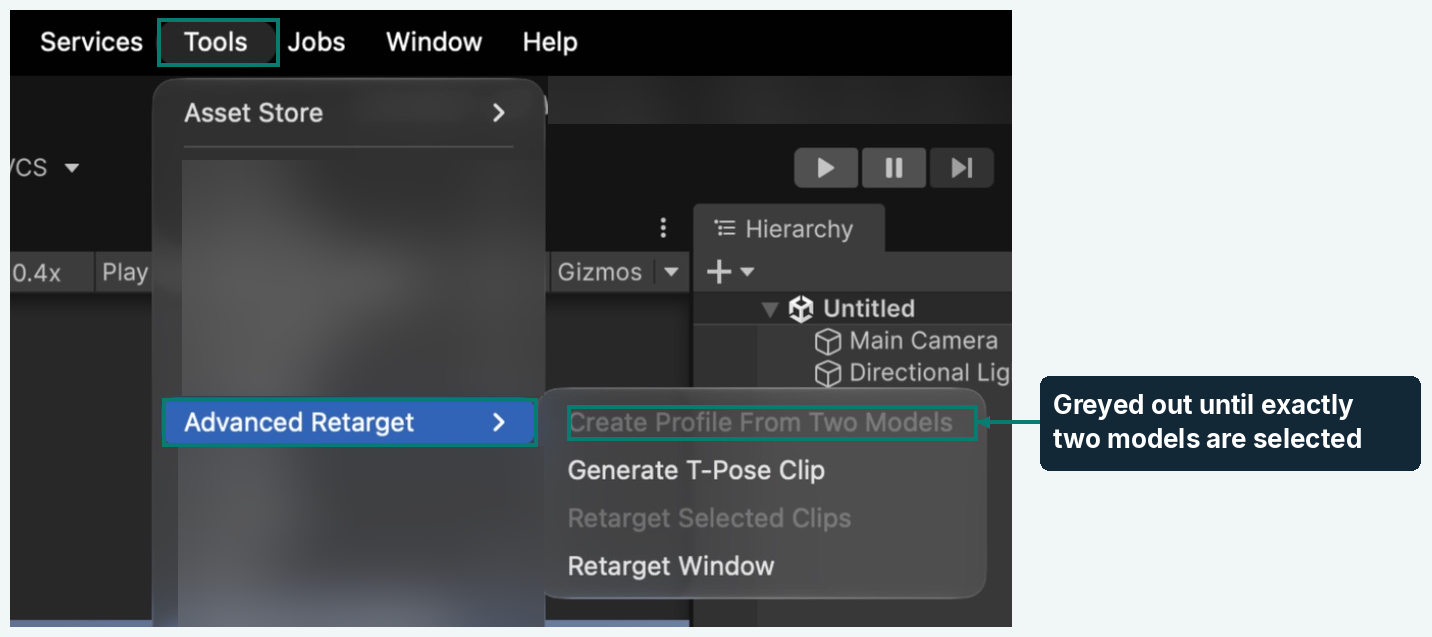
Figure 42
Retarget Selected Clips is greyed out
Select at least one animation clip, or a model that contains clips, in the Project window.
The pose looks wrong
The arms are always too high or too low
The two characters stand in different rest poses, such as a T-pose and an A-pose. Give both the same starting pose. See Characters that stand in different rest poses.
Feet slide or float
Check that the leg cards are IK Retarget cards with Ik Weight at 1. Then lift or lower the hips with Offset on the Root/Pelvis Retarget card of the pelvis. See Characters of different sizes.
An elbow or knee bends the wrong way
- Open the arm or leg card and change Joint Offset to point the other way. For example, change
0, 0, 1to0, 0, -1. - Check that Joint Bone is the elbow or knee.
- If the joint flips only now and then, lower Pole Weight.
A limb pops when it’s stretched straight
Lower Max Reach Multiplier on that card, such as from 0.98 to 0.95.
A limb twists or points the wrong way
Check the chain order on the card. Bones must go from the body outward, such as upper arm, forearm, hand. Empty the chain with × and add the bones again in order.
The target bends sideways or walks sideways
The skeletons face different ways inside their models. See Skeletons that face different ways.
A fix doesn’t show up
Another card below your fix moves the same bone and overwrites it. Use the three-dot button on the fixing card to move it down the list.
Baking and playback problems
The bake stops with a message about the humanoid avatar
The message is The Humanoid baker needs a target with a valid humanoid avatar. Set Rig Type to Generic, or set the target model’s Animation Type to Humanoid.
The bake stops with a message about Yaw and scale
The target’s root or a parent of Root Motion Bone has uneven scale. Make the X, Y and Z scale the same in your 3D program, or deselect Yaw in Extract From Bone.
The baked clip doesn’t play on my character
- A Humanoid clip only plays on a character with a humanoid avatar.
- A Generic clip only plays on models with the same bone names and hierarchy as the target. Bake again with the right target, or bake with Rig Type set to Humanoid.
The character walks on the spot in the game
- Turn on Apply Root Motion on the character’s Animator.
- Check that Root Motion was on when you baked, and that Root Motion Bone is the bone that travels.
- For Humanoid clips, check that Bake Into Pose is off under Root Transform Position (XZ) on the baked clip.
The character jumps back at the end of each loop
The travel stayed in the hips. Bake again with Root Motion on. See Bake a walk with root motion.
The character bobs up and down while walking
Vertical Position is selected in Extract From Bone. Deselect it and bake again.
The hands don’t hold the weapon
- Check that the FPS Animation Retarget card has a green dot.
- Check the arm chains: upper arm, forearm, hand, in that order.
- Check that Source Weapon and Target Weapon are bones that move with the gun.
- Move the card to the bottom of the list, so no other card moves the arms after it.
The weapon bone doesn’t move in the baked clip
Humanoid clips don’t store weapon bones. Bake with Rig Type set to Generic, and add a Copy Bone card or an FPS Animation Retarget card for the weapon.
Questions and answers
Does it change my source clips or models?
No. The package only reads them. It writes new assets: profiles, pose clips and baked clips.
Do I need it for humanoid to humanoid?
Not always. Unity already plays humanoid clips on every humanoid character. Use the package when you need IK fixes, offsets, root motion from a particular bone, a Generic clip or an FBX file. See Humanoid to humanoid.
Can one profile serve several targets?
No. A profile holds one source and one target. Make a profile for each pair. Every clip made for the source can be baked with the same profile.
Can I retarget the other way?
Yes. Click Swap to turn the profile around, or make a second profile with the models picked in the other order. A second profile keeps both directions.
Where are my baked clips?
In the profile’s Save Folder Path. The Bake tab shows the path after each bake, and the Project window highlights the clip.
Can I bake again after I change a setting?
Yes. An .anim bake replaces the old clip in place, so Animator Controllers and Timelines that use it keep working.
Can I edit a baked clip?
Yes. A baked clip is an ordinary Unity animation clip. Open it in the Animation window, or bake an FBX file and edit it in a 3D program.
Are fingers retargeted?
Yes, when both characters have finger bones. Each finger gets a card that covers both hands.
Is facial animation retargeted?
Face bones, such as a jaw, move when both characters have them and a card drives them. Blend shapes aren’t retargeted.
Do baked clips work on mobile, web and consoles?
Yes. Baked clips are ordinary Unity animation clips.
Which Unity version do I need?
Unity 6 or newer. The package installs Unity’s FBX Exporter package for FBX output.
Can I retarget while the game runs?
Yes, with the Dynamic Retargeter component. See Retarget while the game runs. Prefer baked clips when you can.
Which feature fixes my problem?
Choose a feature says what each feature is for. For a symptom, such as sliding feet or a bent elbow, start with The pose looks wrong.